|
|
This
page is not “public”. I
have to send the link for you to see it. I
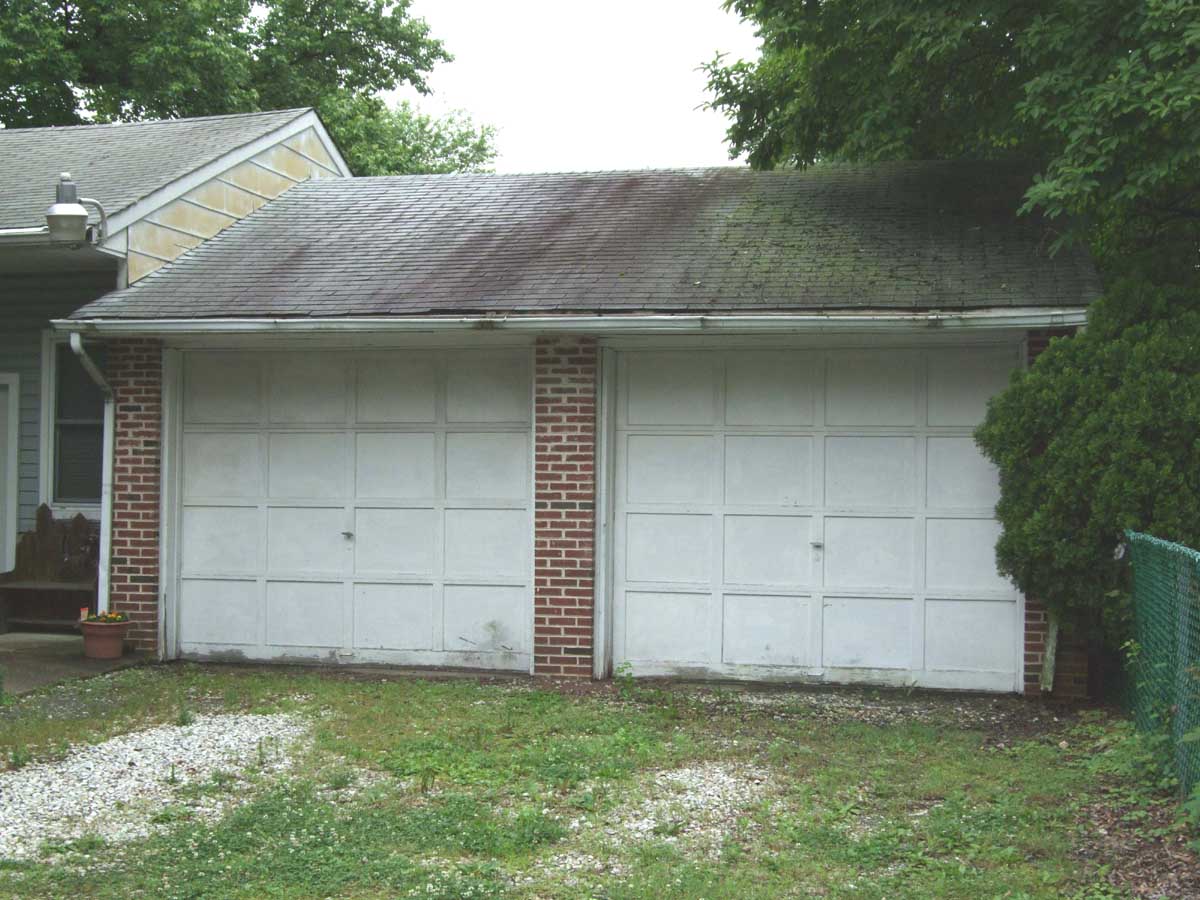
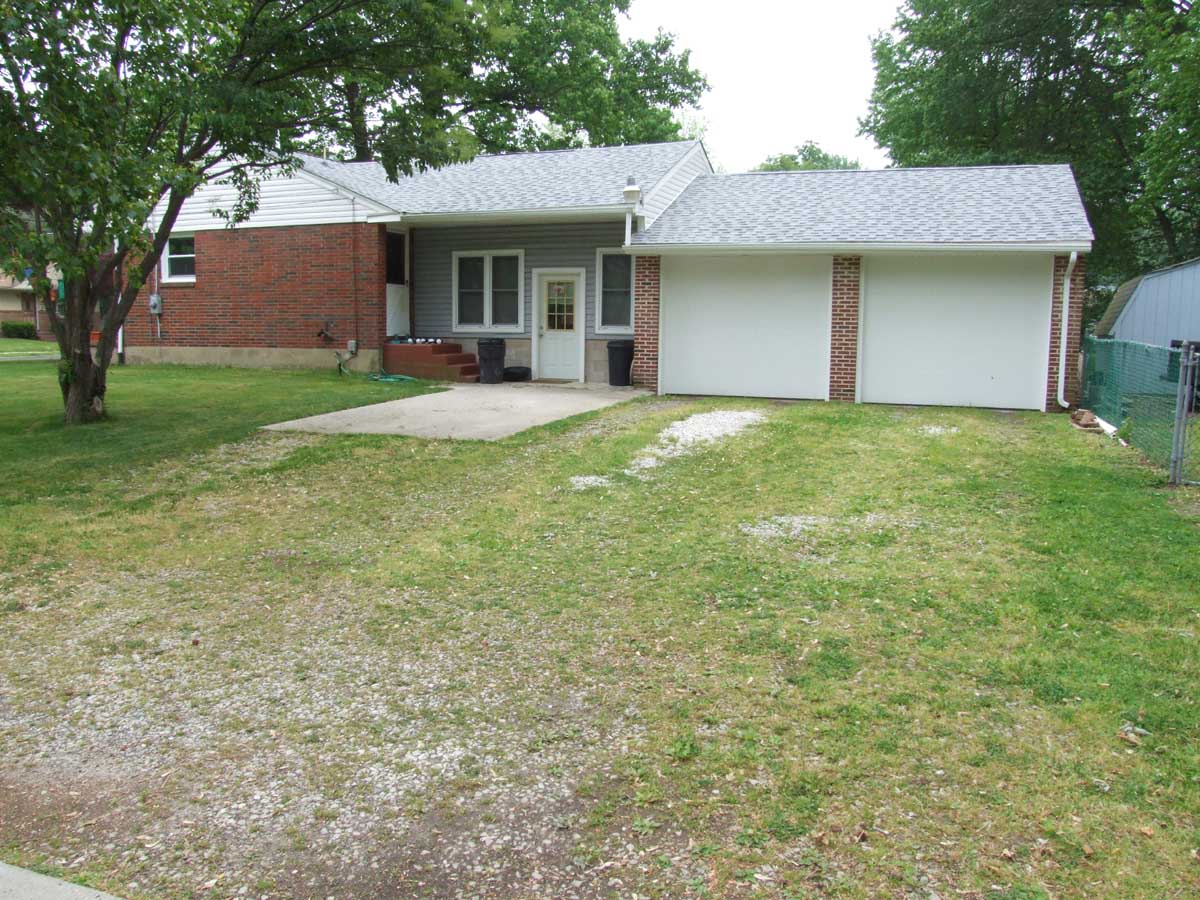
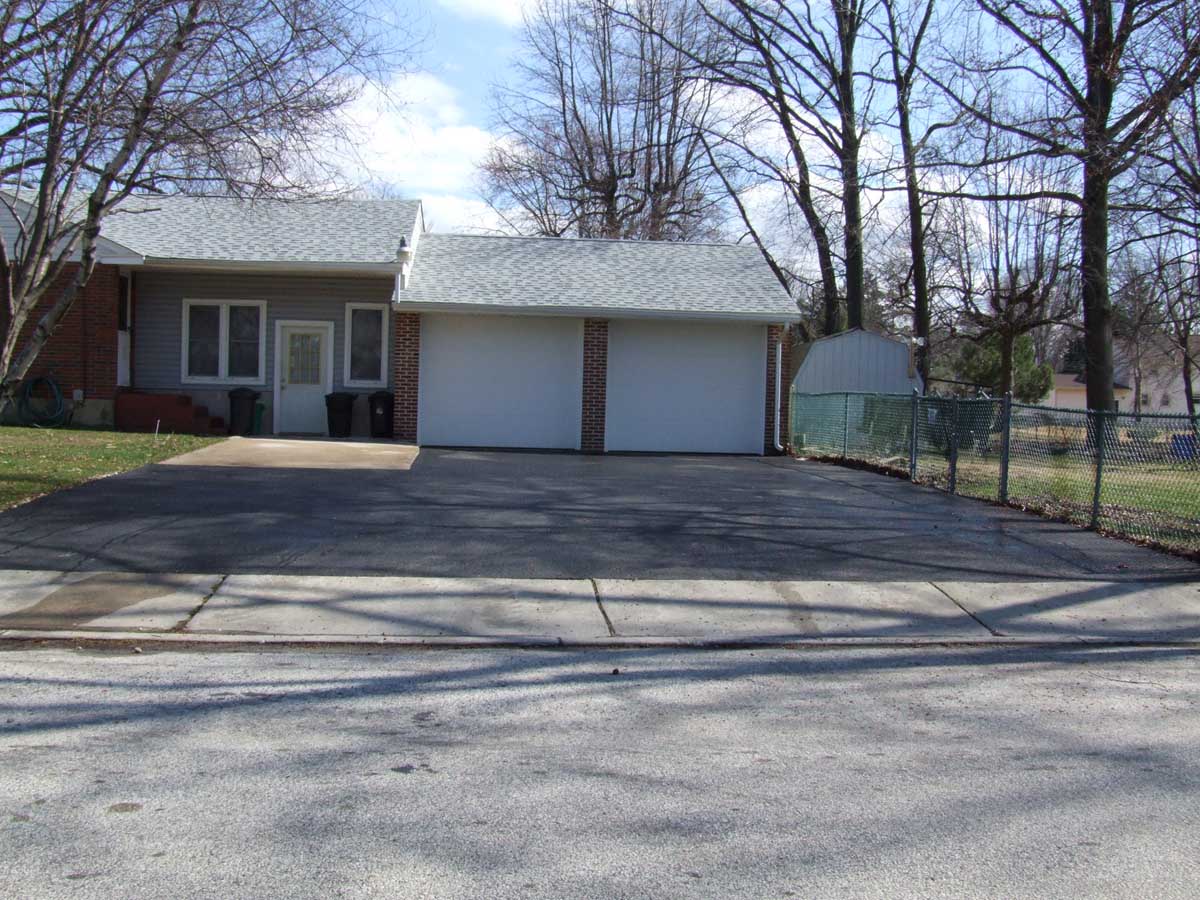
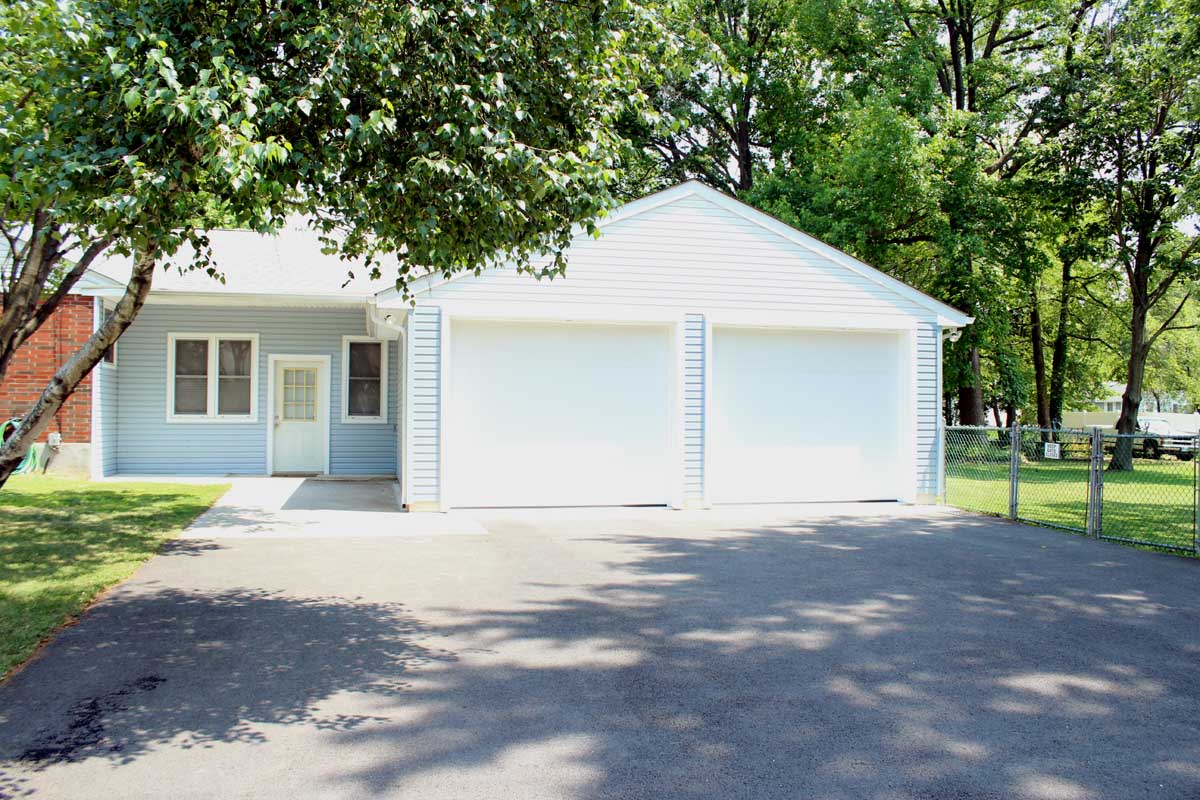
had a garage addition built. We started on 11-15-11. My original 24 x 24 2 car
garage became my full time permanent workshop. The new garage is for our
cars. My first plan was to just bump out another bay and have 3 garage bays
in a row. But
it did not happen that way! I
have a large open area of my yard adjacent to my old garage. It is actually
another lot. Since I am on a corner lot, zoning restrictions and the
amazingly stupid wandering route of the gas main for my house has rendered
building anything permanent in this
area impossible without moving the gas main. It should have entered from the
front of the house with a shorter run but the gas meter is on the corner of
the original garage. The gas company traced the main which in places gets up
to 2 feet from the surface. No one would let us pour concrete on top of the
gas main without moving it. A new structure would literally have to be in the
middle of the yard once zoning offsets are considered which is not
convenient. I
did not want to get involved with moving the gas main so I built down the
driveway instead. We just got the driveway paved 7 months earlier and ½ of
the asphalt had to be removed for the addition. I wanted a 24 x 24 addition
on the front of the original garage but that is where the line of sight
zoning restriction that kept me to 24 x 17. The extra few feet beyond 17 feet
would really have been helpful for parking the cars and opening rear hatches
inside the garage after returning from shopping. It is a little tight. I knew
that there would be a new dividing wall built to separate the old and new
garages as heated and insulated and not insulated. The wall was built 4 feet
inside of the old garage to give the new garage more space to park the cars.
It was too much money to have the original brick garage front removed and
supported with steel beams so it remains as is. The garage doors were moved
from the old front to the new front.
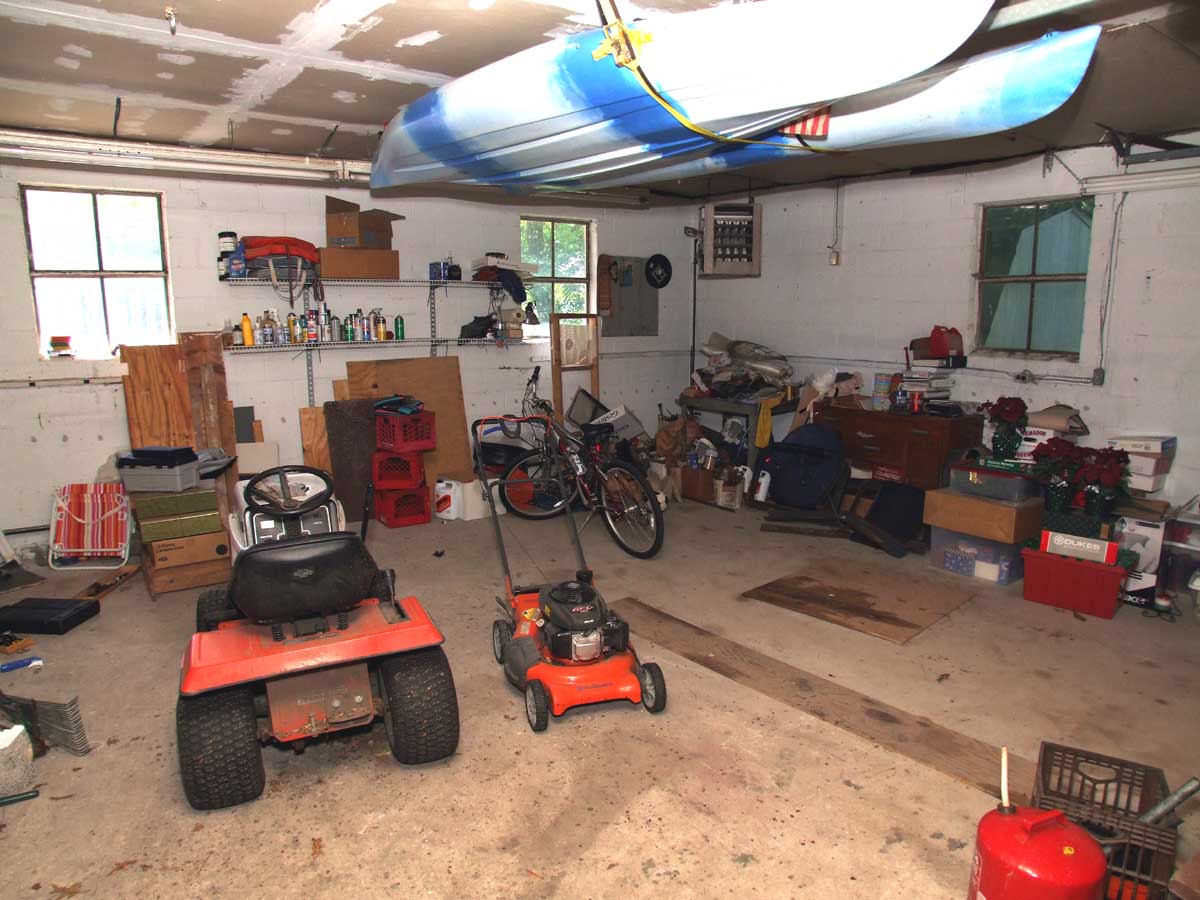
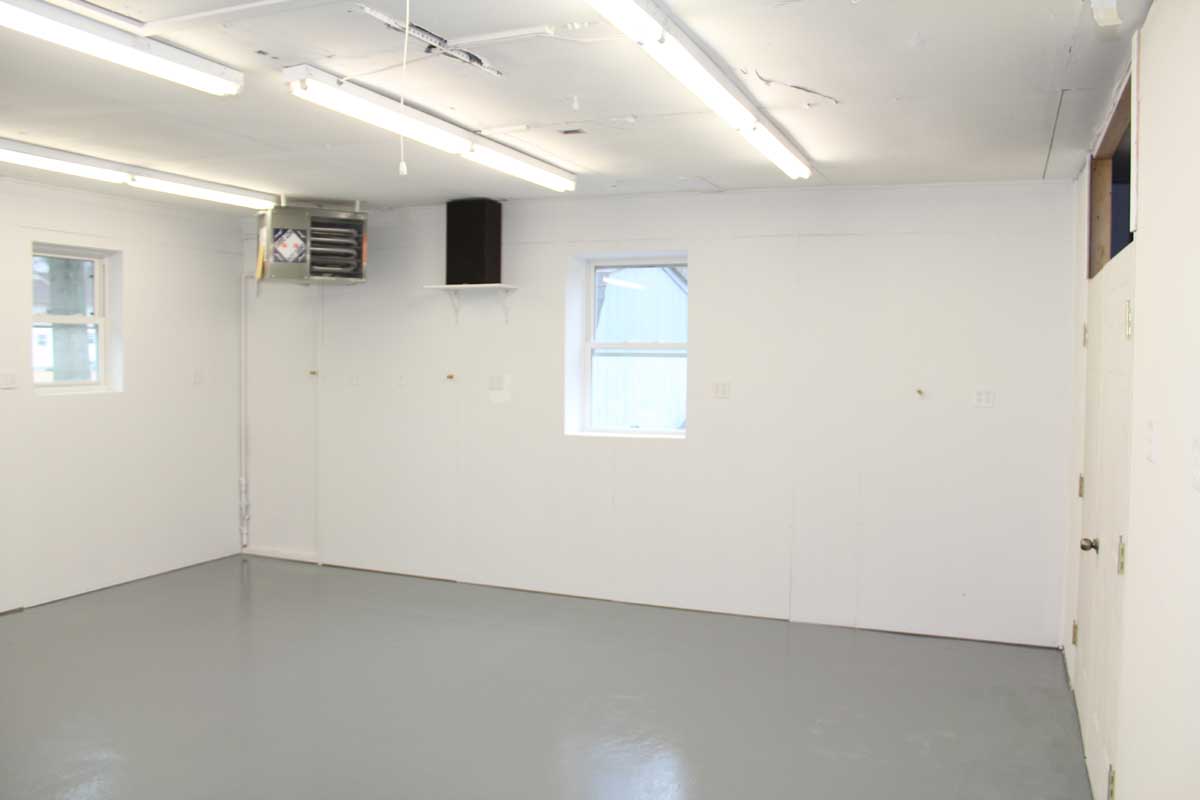
Even with the 4 feet concession I wound up with a much larger workshop
than I ever expected. With the layout taking up most of the basement I had
little room for tools and tinkering. I
have plenty of room now, over 400 square feet of full time workshop space! |
|


The top 2 photos are from 2009 BEFORE we bought the house!
Note the 30 year old drywall ceiling was never painted & it
smelled bad – yikes!
2010
2011 2012
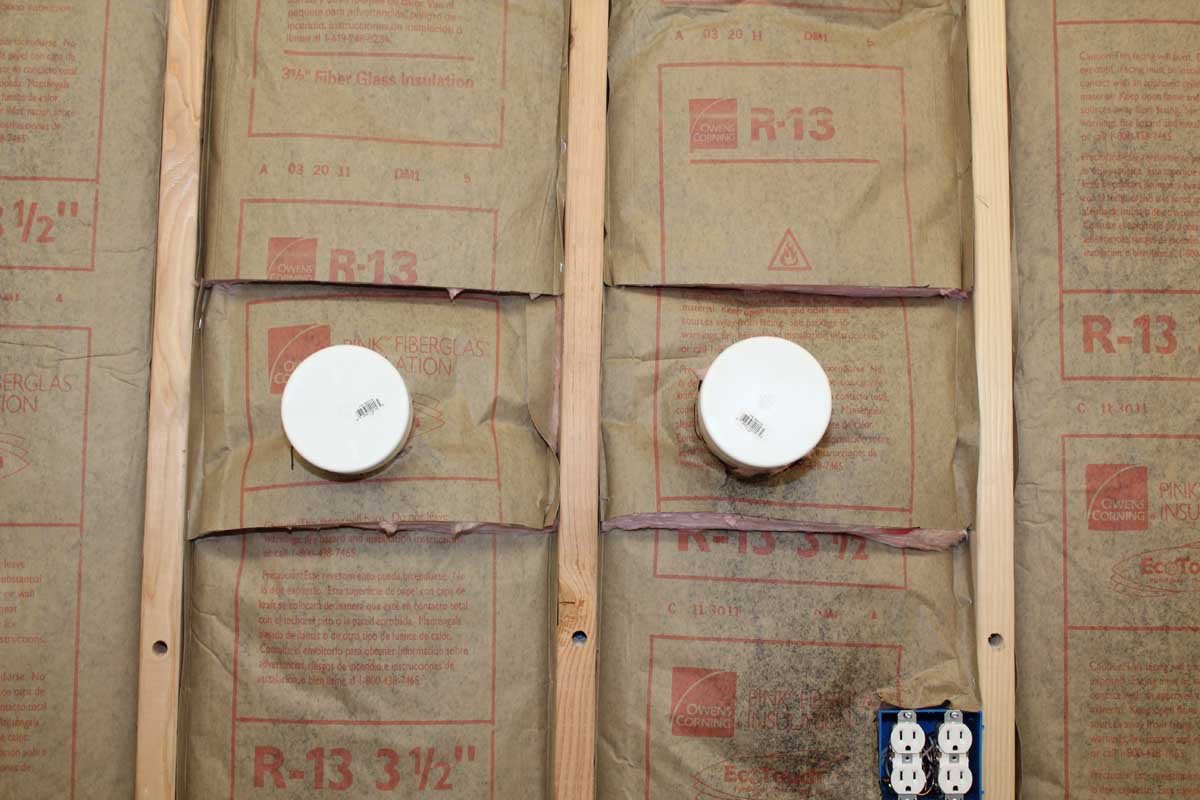
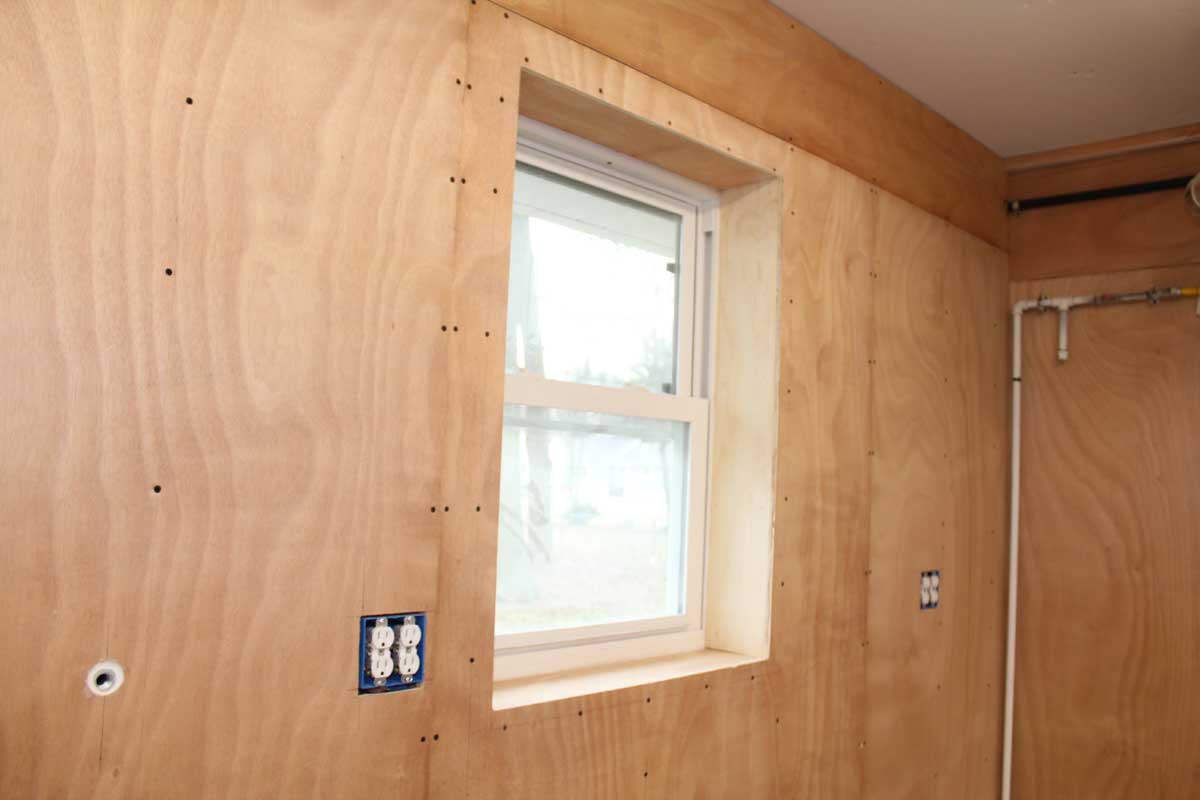
Compressed Air, HVAC, Insulation and Windows
This was the bulk of the garage/workshop remodel work. It took
an obscene amount of time to complete.
I
had the original 3 steel garage windows replaced with insulated double hung in
2009 by the contractor that did my roof, which I had known all of my life. We
grew up together. Not a good idea. Roofers do not necessarily know how to
install windows! Don’t let a real Crackhead touch yur house _ EVER. He ordered the windows as the wrong size
and tried to “make them fit” with wood framing and spray foam. In the end he
ran out of spray foam and just left them as is so the windows were never sealed at all. When
I looked at the top of one of the windows where it was supposed to be sealed I
saw the outside! I knew I would have to remove them and start again, which is
what I did. They are now as caulked and insulated as you can get.
There
was a heater in the garage when we bought the house. It was a small hanging
industrial looking unit that you might see in a factory or warehouse. As with
everything else original in our house the heater worked fine but it was old. It
had a gas pilot that occasionally blew out and had a slight scent of leaking
gas so it had to go. I had quotes of $3500.00 to $6200.00 for a full house HVAC
system. As much as I would have liked the convenience of it, for the hours in a
year it would be used I simply could not justify the expense. There really is
no HVAC system made aimed at being used in just garages and workshops. Pretty
much the only options are a separate heat and A/C unit or the full 1 ½ ton HVAC
system at a premium price. There is also a heat pump “split” system but a big
hole has to be cut in the block wall – no thanks. It was not recommended if a
possibly dusty environment anyway. Further, none of the original windows were
big enough to put install ANY window air conditioner so I had a larger one cut
in during the addition work. I found a smaller gas heater unit for a reasonable
price.
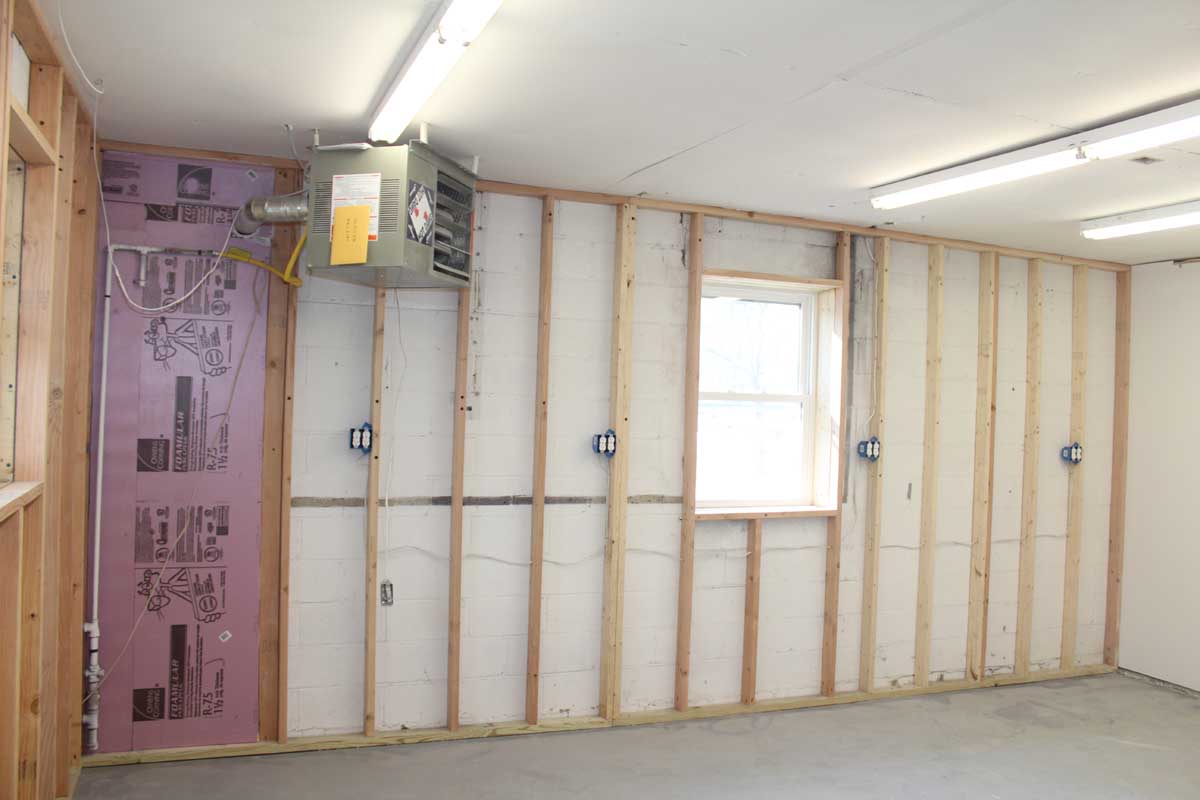
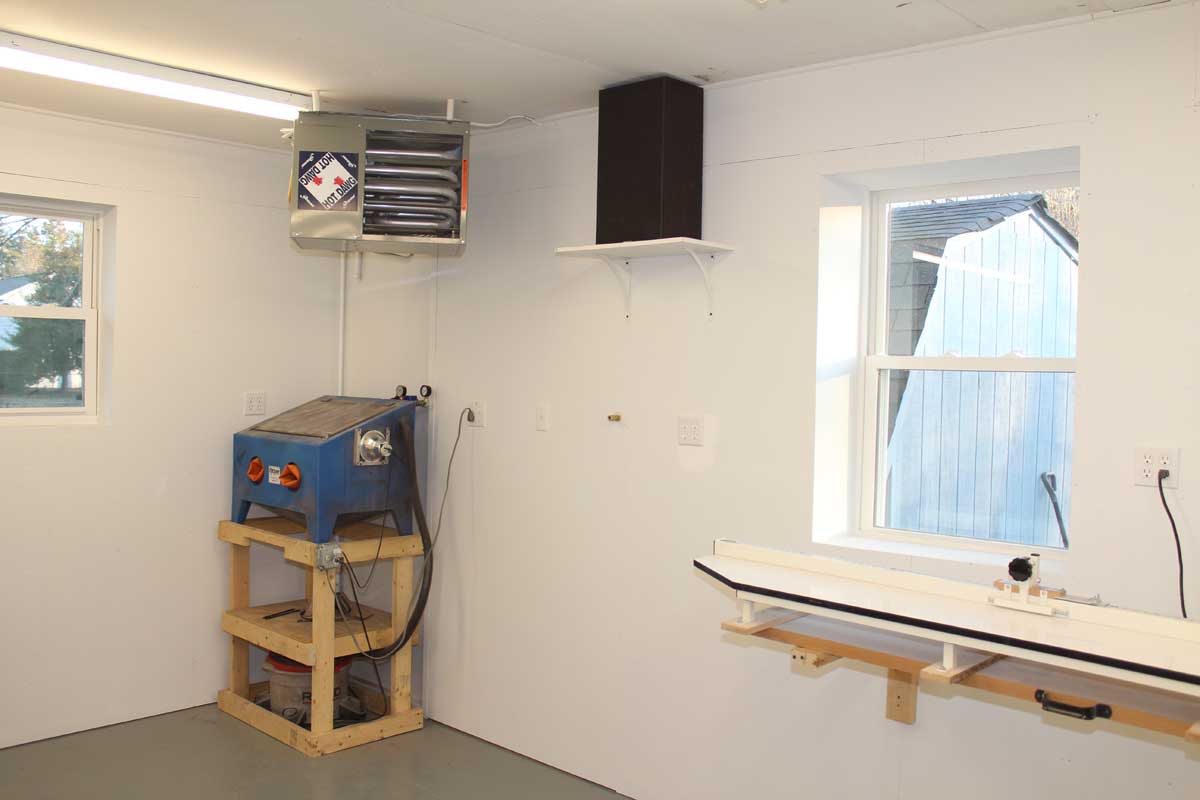
The
heater was called a HOT DAWG (by
Modine) so how could I NOT get it? It pretty much bolted up in place of the old
heater but is almost ½ of the size. The workshop footprint called for a 40,000
BTU but I got a 60,000 BTU. I wanted it to be able to hold the temperature and
get there quickly if I had it turned down at night. I also ran a 220v dedicated
line next to the window for the air conditioner. (See below)

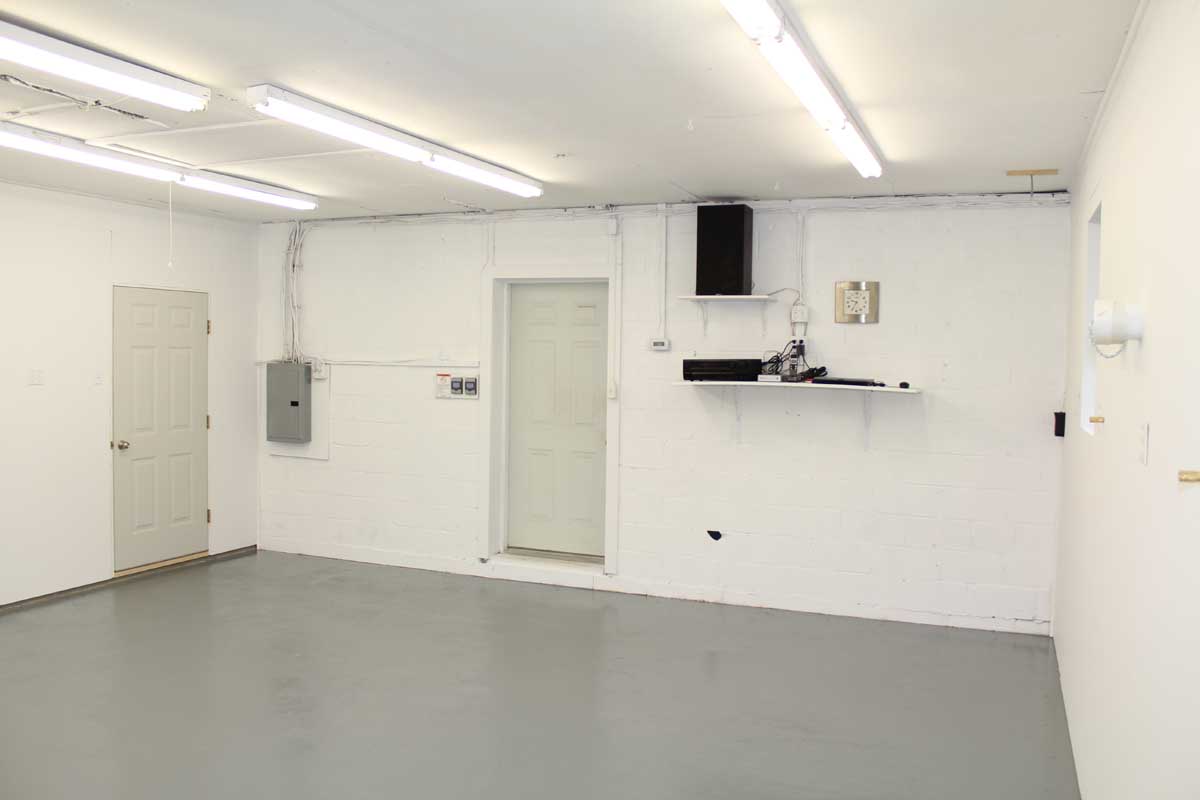
The
adjoining shop wall to the house remains exposed cinder blocks because it is
insulated in the house so there was no need for double insulation. There are lots
of wires etc on it and would have been very difficult to cover up as well.
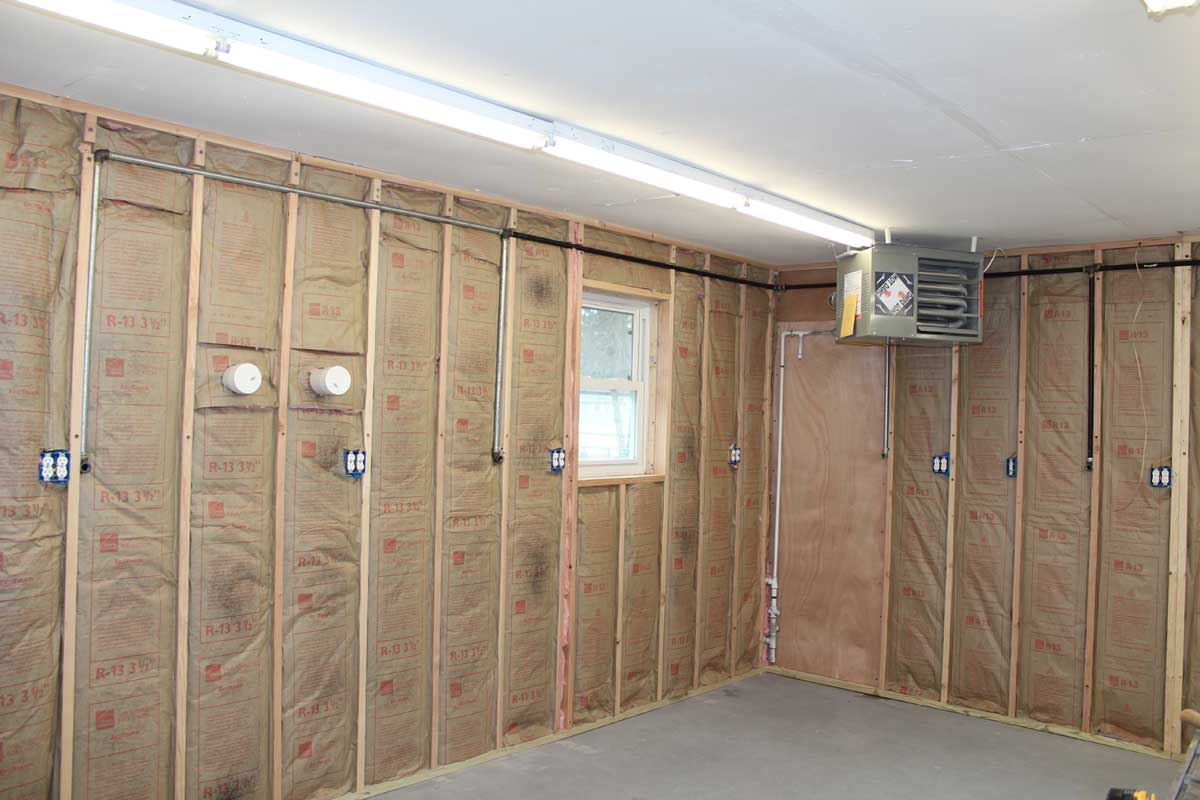
I wanted to stud out and insulate the 2 remaining exterior
cinder block walls.
In
July 2012 we had an enduring heat wave. When it was approximately 100 degrees
outside the shop remained at 80 degrees maximum without the air conditioner in
use. Previously it had hit high 80s + on hot days before the insulating was
done. I call that a success!
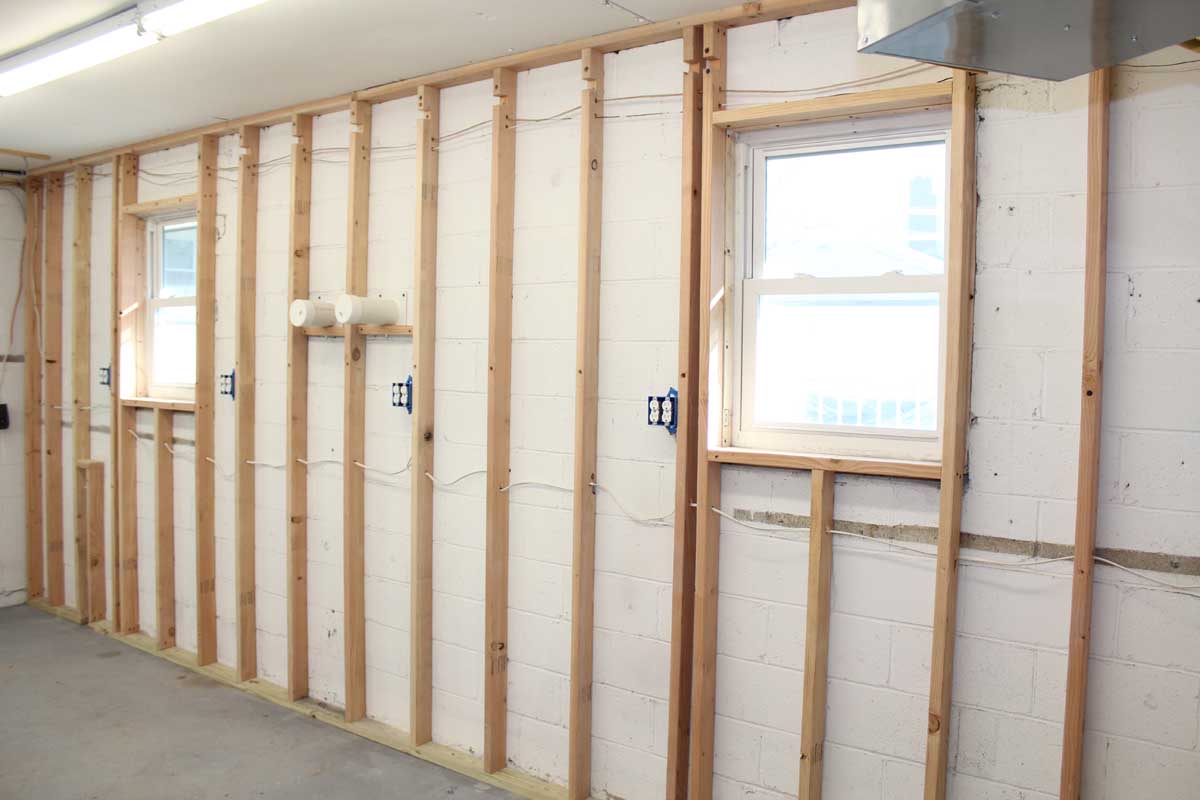
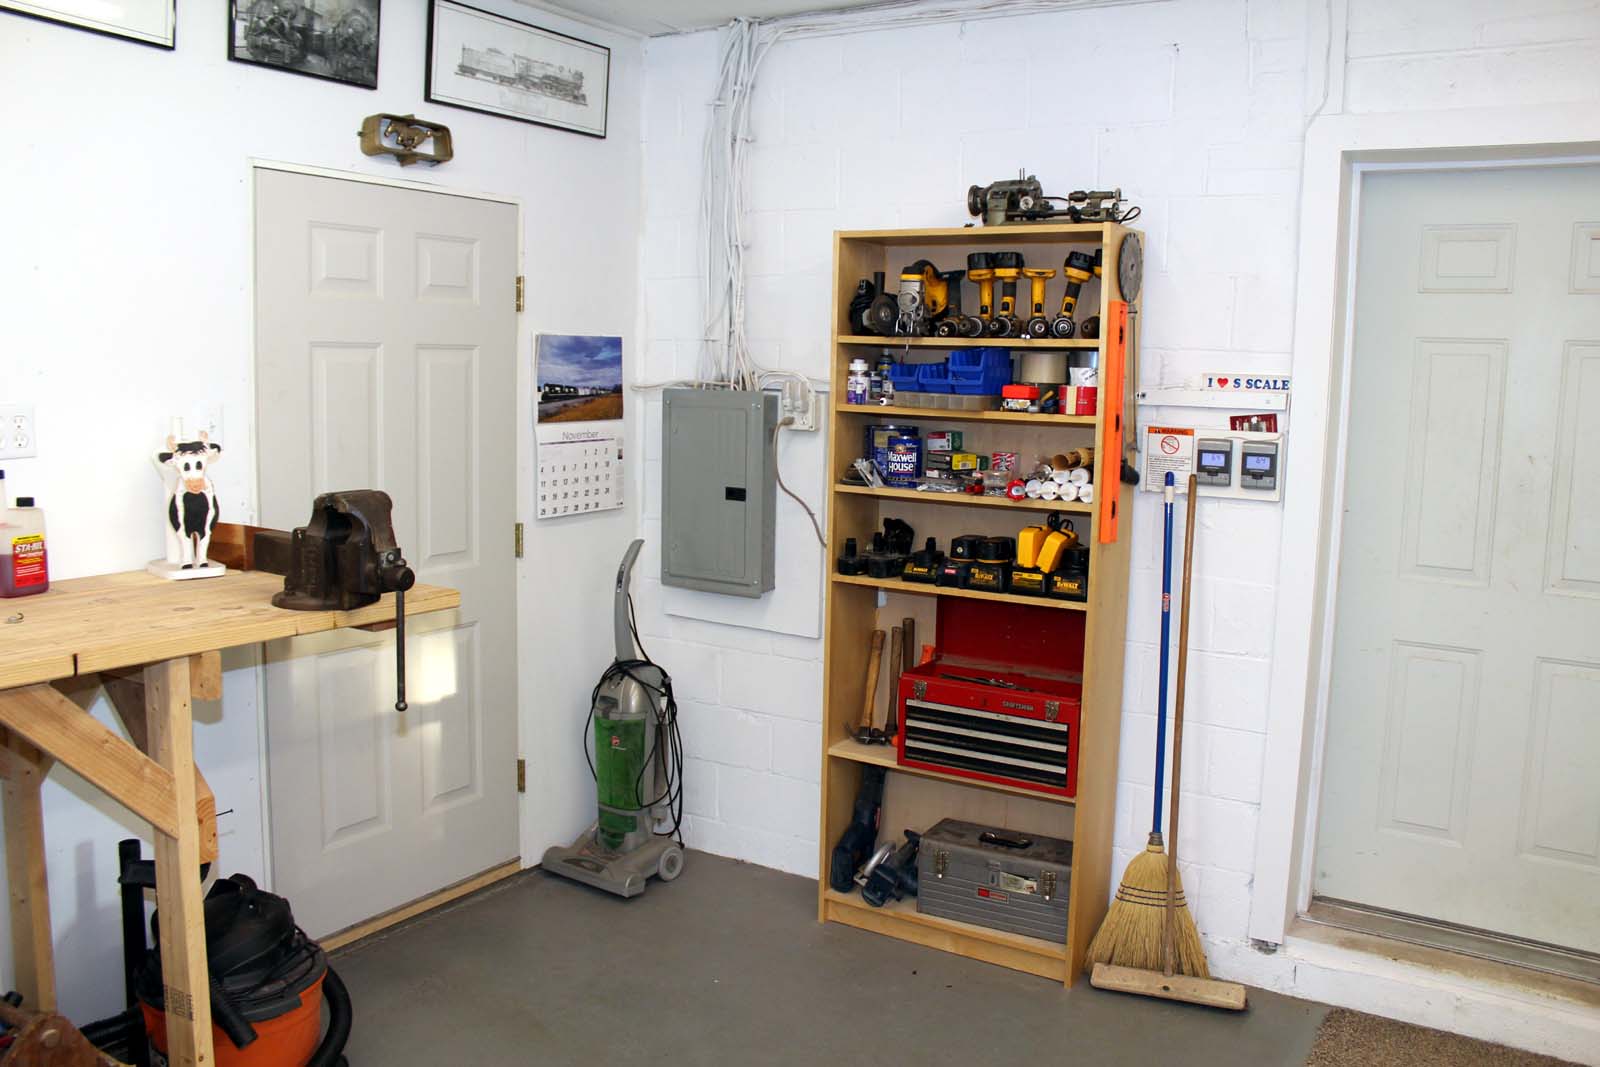
There were originally many circuit breakers in
the garage sub-panel that were not identified. I wanted to clean that up a bit
and better identify the breakers. I probably went too crazy with outlets but at
least every wall is on its own circuit breaker now. I ran a stereo speaker
wire, thermostat wire and ¾” steel pipe in the walls for compressed air
distribution. I am very happy on how the compressed air piping turned out –
just as I wanted it. There are now 5 compressed air quick disconnect outlets
total on the 2 walls. There is an air outlet just where I need air without any
hoses cluttering up the floor. When the milling machine was moved in I just
snapped in a coil hose with a blow off gun – done! The compressor is now on the
other side of the divider wall so it is quieter. I just flip a light switch and
it starts up. Before getting the new compressor (See below) I actually used 2
110v compressors when I am using the blasting booth because that uses a lot of
air volume. I have not popped a breaker yet.
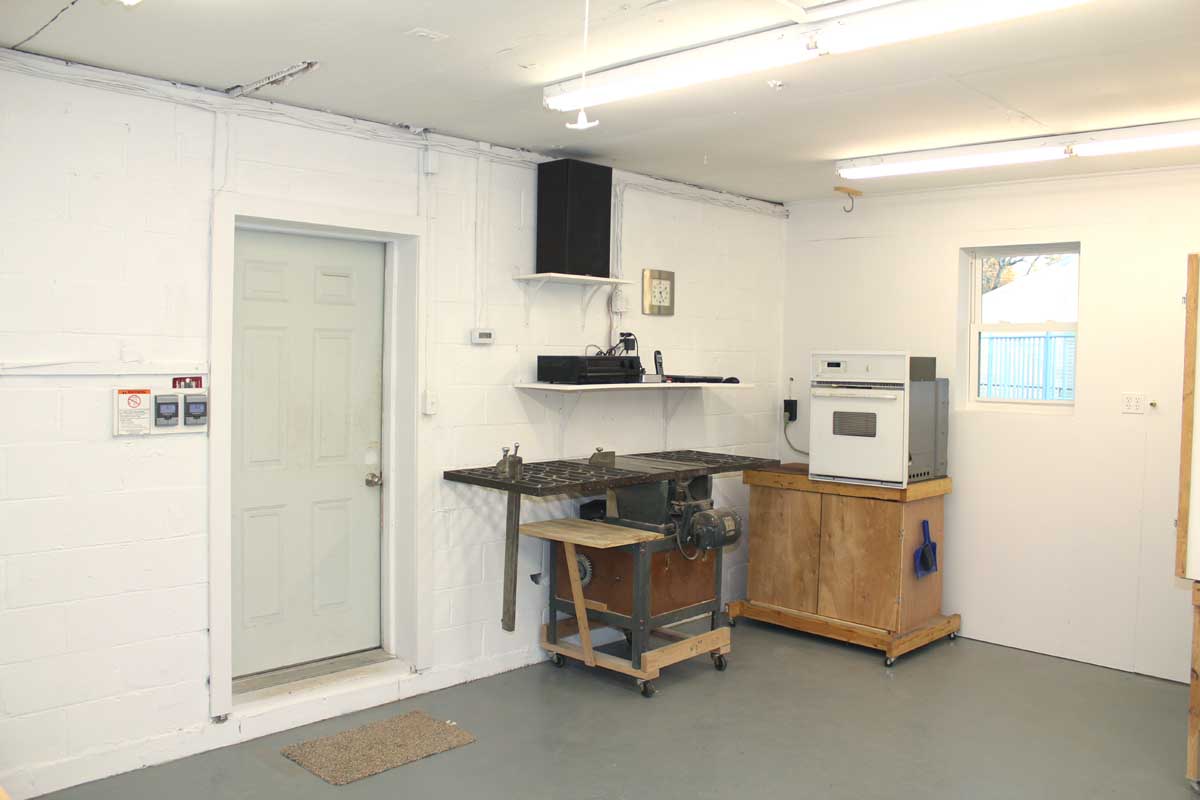
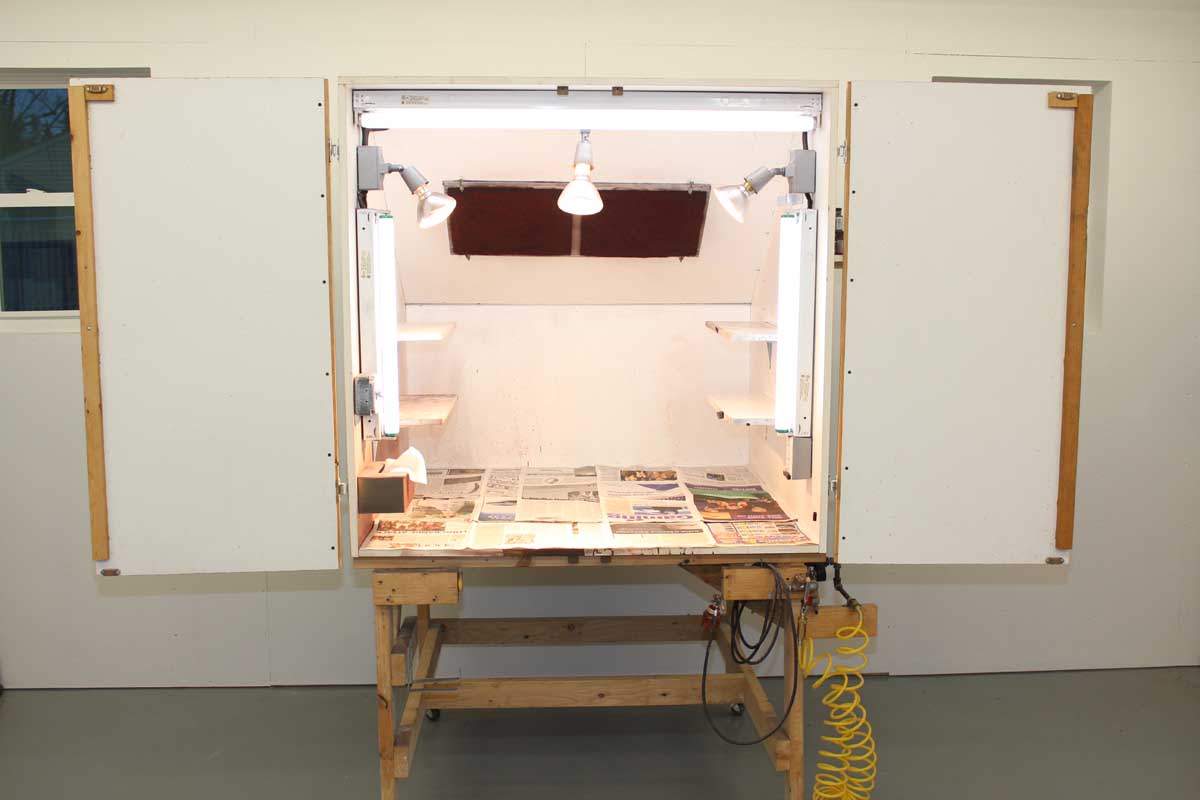
I
was previously using my paint booth with a wood vent insert I made and put in a
window for the 2 exhaust ducts. They are now permanent vents through the walls
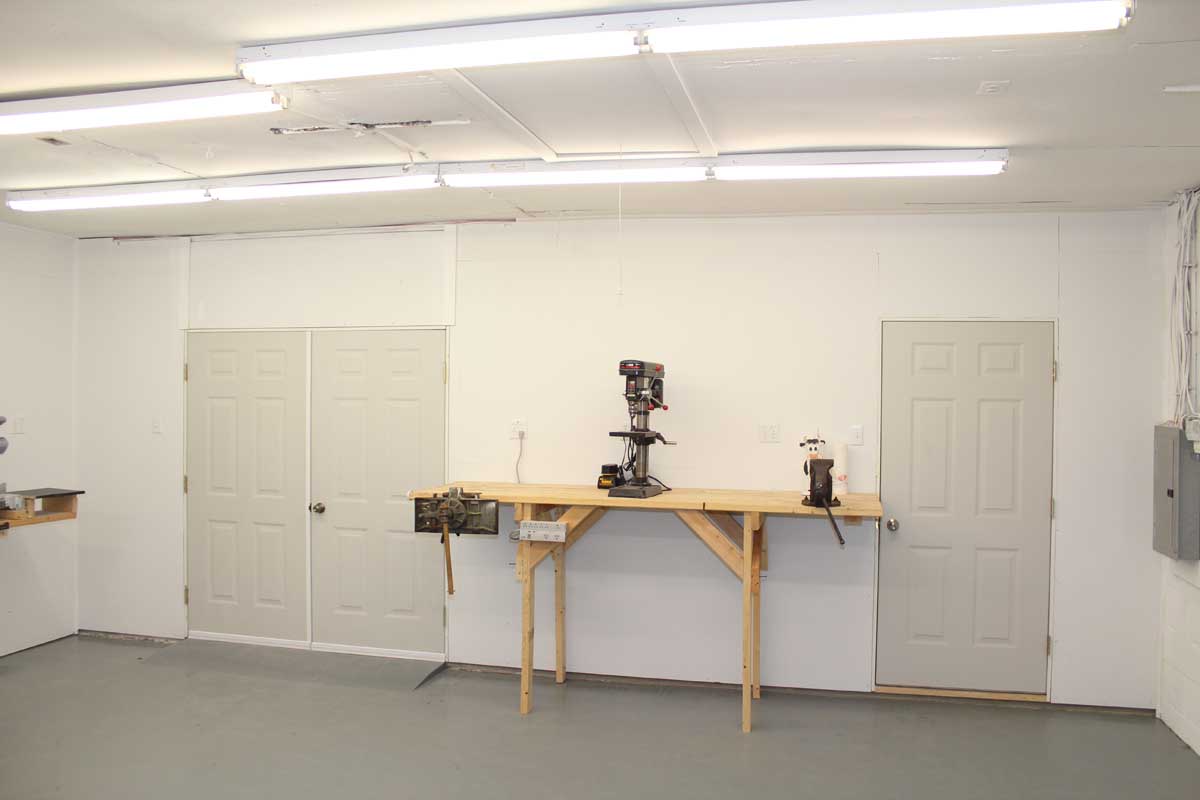
as seen below. The header and top panel over the double doors is removable for
large items like the milling machine. The opening goes floor to ceiling at over
9 feet high. Take out a few screws and the panel can be coaxed out. I made it
snug to keep it air tight. There are 2 handles mounted on the other side to
assist in its removal.
All
new walls were sheathed with ½” A/C birch plywood. The A/C gave a suitable
finished look to it when painted. With the plywood things can be screwed to it
and hung from it anywhere. I left the drywall screws exposed in case I want to
access any part of the walls in the future to or add change something. I HATE
sanding spackle truly more than anything in remodeling which is the main reason
for using plywood. I was really phobic about handling fiberglass insulation
in any way. The manufacturing process must have changed in the past 20ish years
to create a significantly less irritating end product to the installer. I got
through the insulating stage largely itch free which was great. All studs were
screwed to the block walls with concrete screws in multiple places.

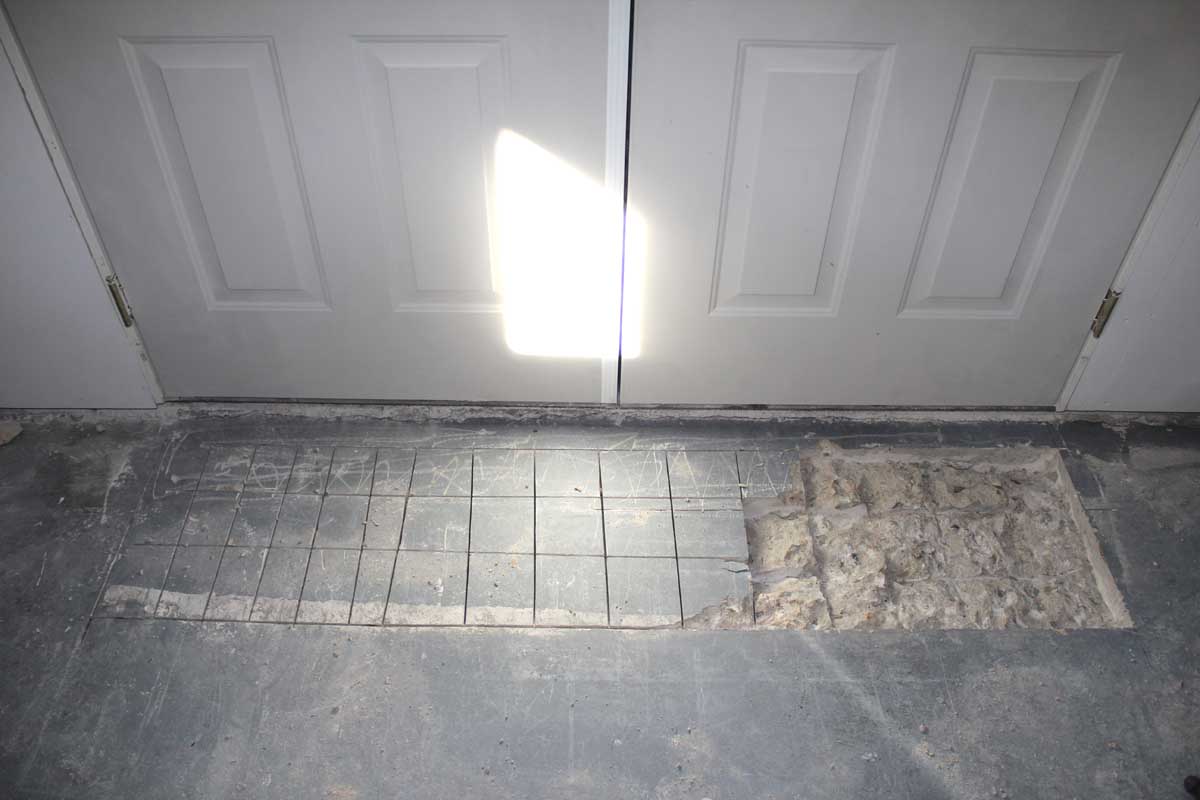
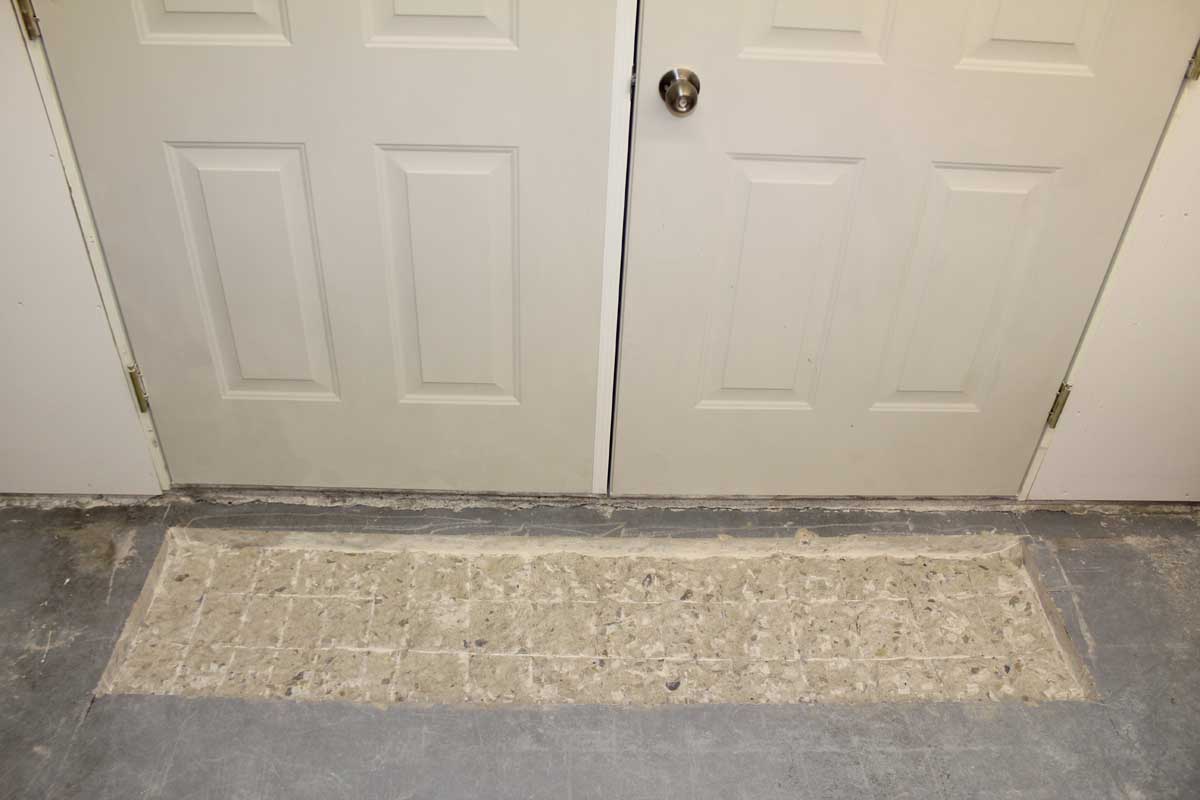
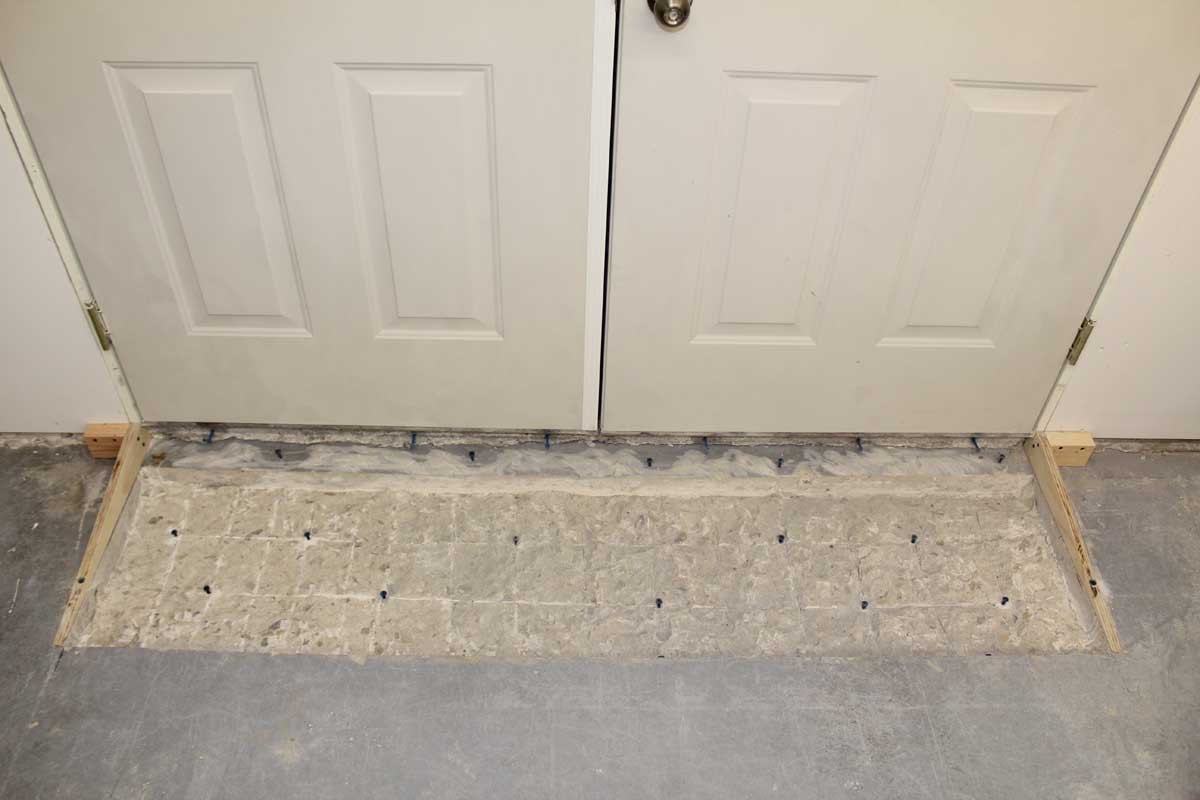
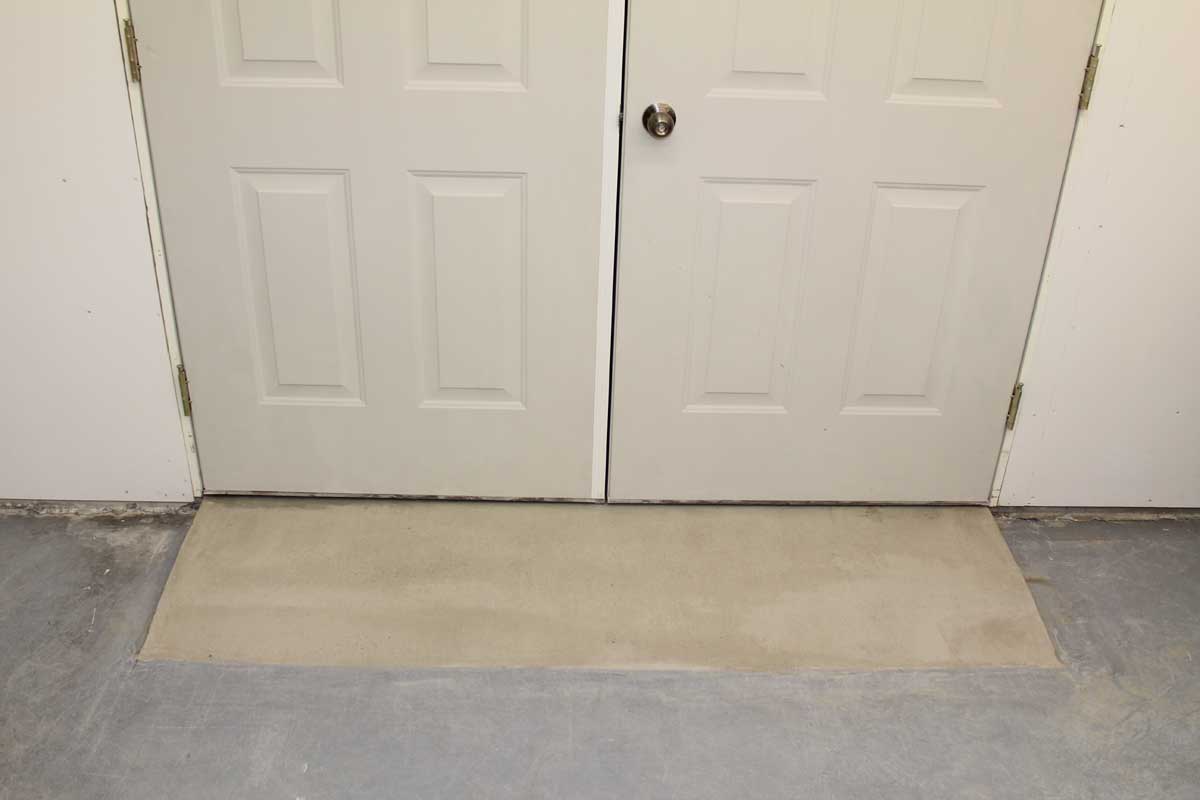
Concrete Ramp
In
order to meet code the new garage floor had to be poured 2 inches higher than
the old garage floor to get slope away from the house – yet another challenge
to this project. Occasionally I would previously take my table saw outside to
avoid the dust so a concrete ramp had to be made. I also knew my milling
machine would be moved here. After the
dividing wall was built the ramp was formed in place by the double doors just
plopped on the old floor but it did not last. With the maximum thickness being
2 inches down to a feather edge the concrete cracked in 1 week while still
curing. This was cause for a side project of serious and amazingly dusty
proportions! I rented a concrete saw to cut down 2” and cubed the original
floor in the footprint of the new ramp. I literally chipped it out with a cold
chisel and hand sledge hammer for almost 2 days. The saw threw concrete dust everywhere. The first photo below was taken after
2 hours of shop vac work. My left hand took a beating a few times with
the hand sledge hammer. There are still some scars remaining from the job. Oh
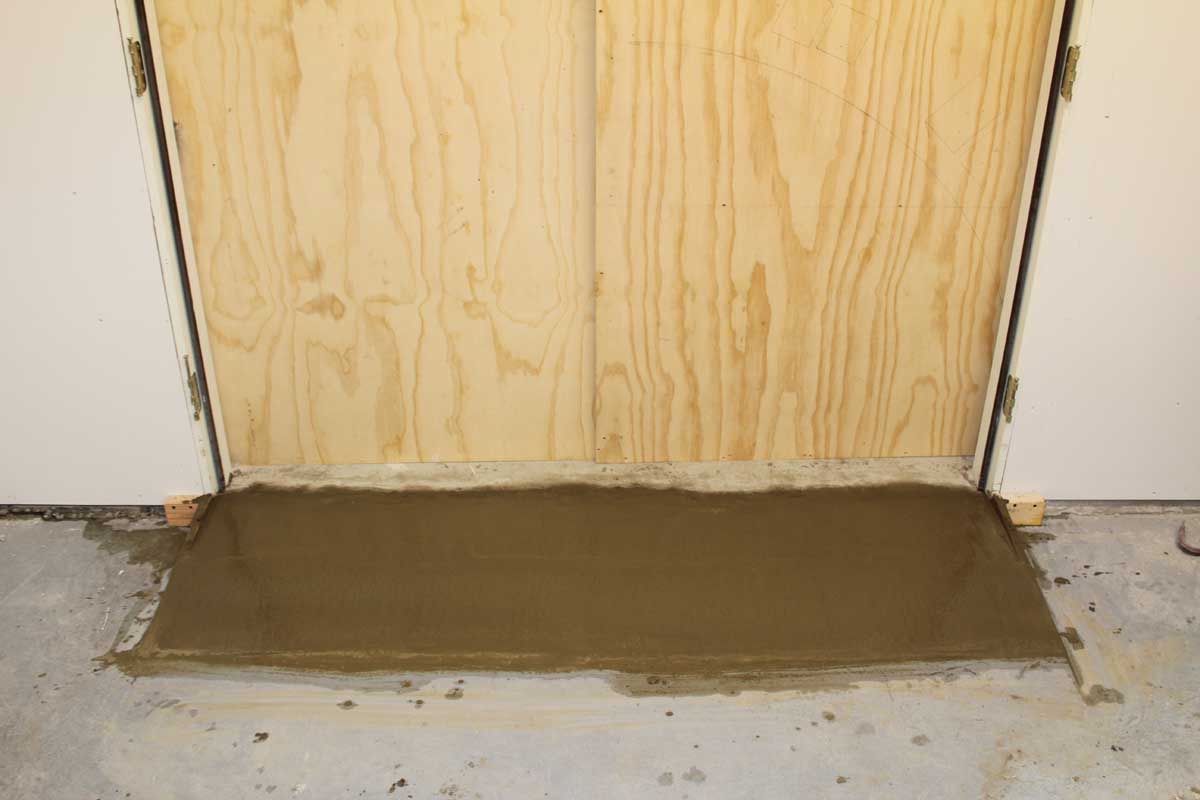
what fun! But in the end the ramp was a minimum of 1 ½” thick surrounded by and
anchored to the original floor. I used concrete screws for the concrete to bond
to. It should NOT crack now!
I used Solidworks to try and figure out the ramp cubic volume
but was WAY off. (:->)
I had to get 2 more bags of concrete in the middle of the pour
to finish the job.
Painting the floor and Moving In
When
this space was still the garage I used epoxy floor paint since it was the first
time it was ever painted. The epoxy paint was also over $400.00. This time I
decided to use oil based concrete paint to save money. It might not have been a
good decision. The paint can said a 2 hour tack free
time & recoat in 24 hours. HA! They lied! I put the heater on to 75 degrees for
at least 12 hours. It still took over 60 hours before I tried to walk on it. 5
days later I was still scarring it when something was moved. So my pretty new
floor is not as pristine as I hoped for but I HAD to move back in and get
started on other projects. At least the epoxy paint was cured completely as per
the directions. I don’t think any time of year would have cured the oil based
paint in 2 hours.
I
am also making this space Dog proof so our Pack of Dachshunds can run around while I
am in the shop.
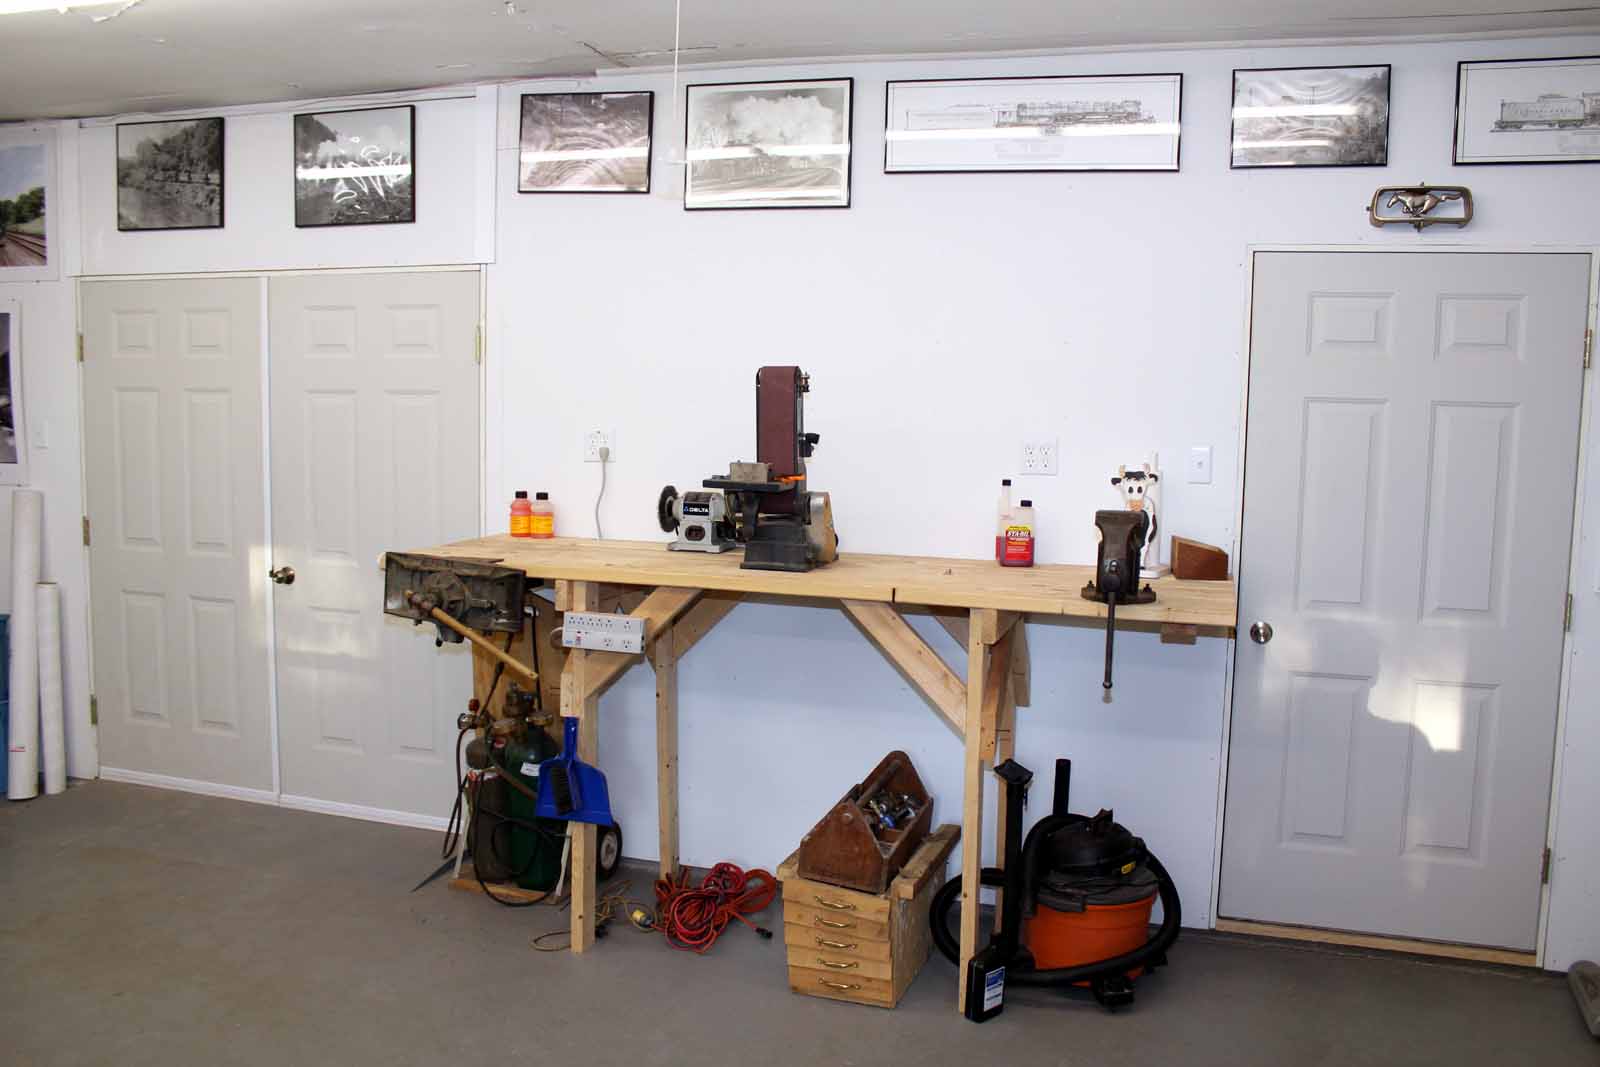
Two
of my late Pop’s most prized possessions are shown here – his 1950s built
Craftsman table saw and wood patternmakers vise on the left end of the work
bench. Most people have never seen a vise like this. The table saw is still
going strong after 60+ years.
Added
2-18-12


Added 3-27-12
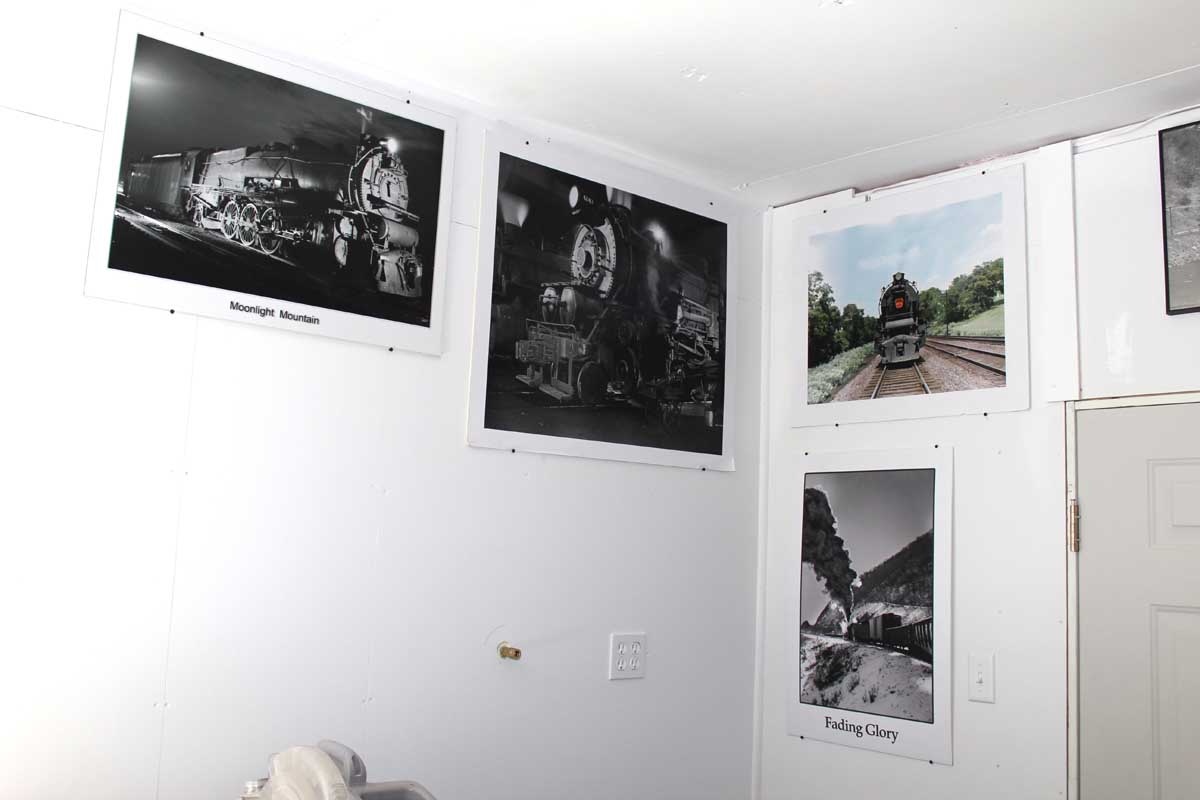
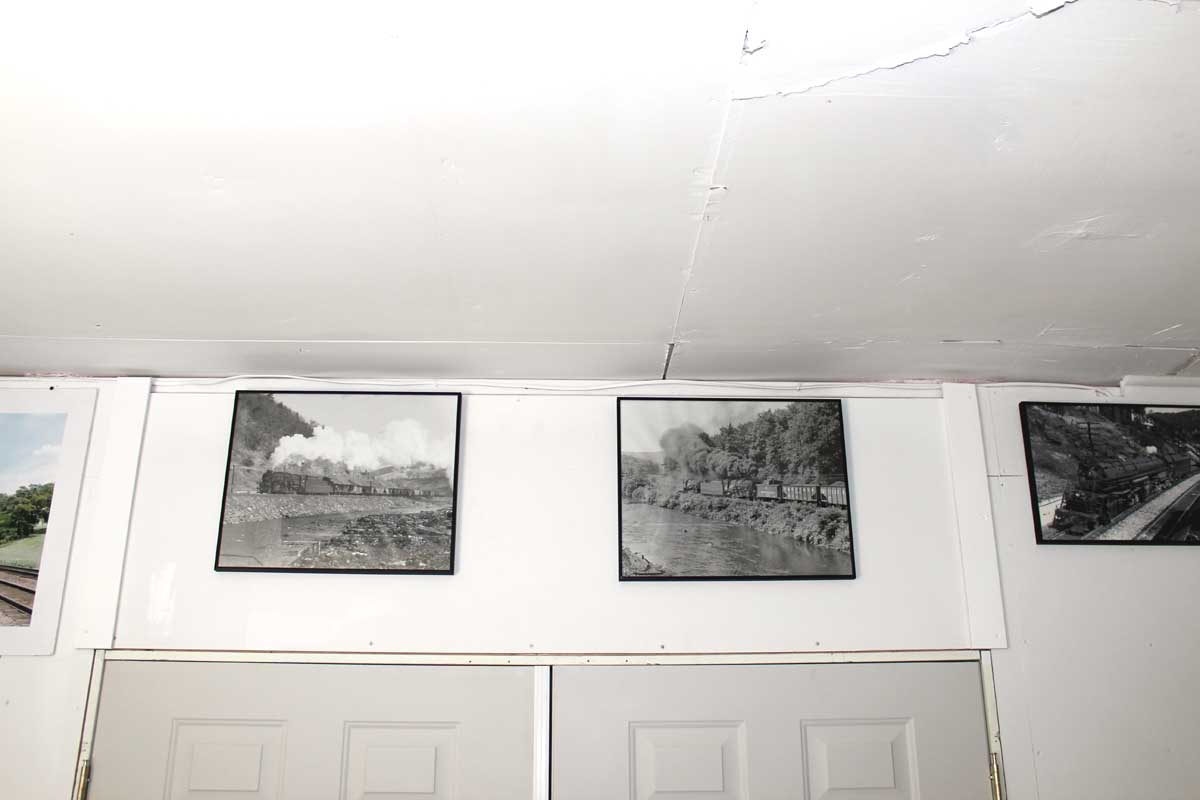
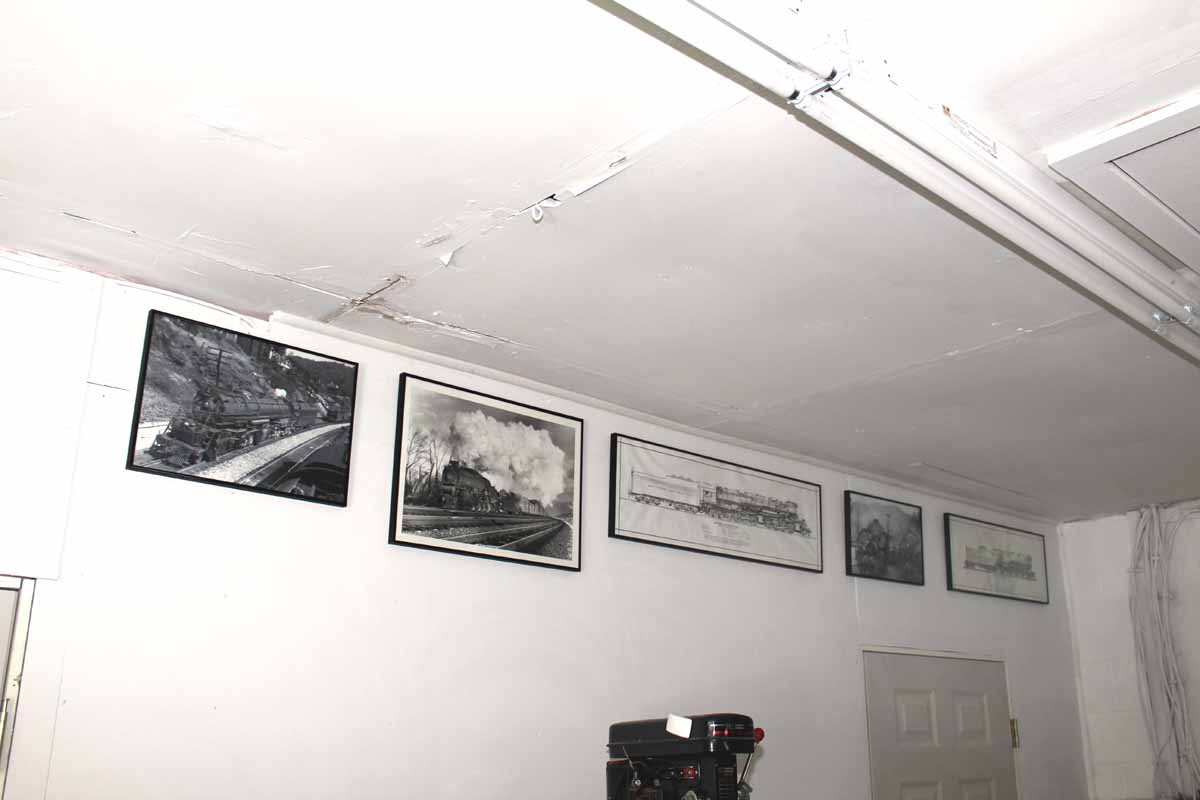
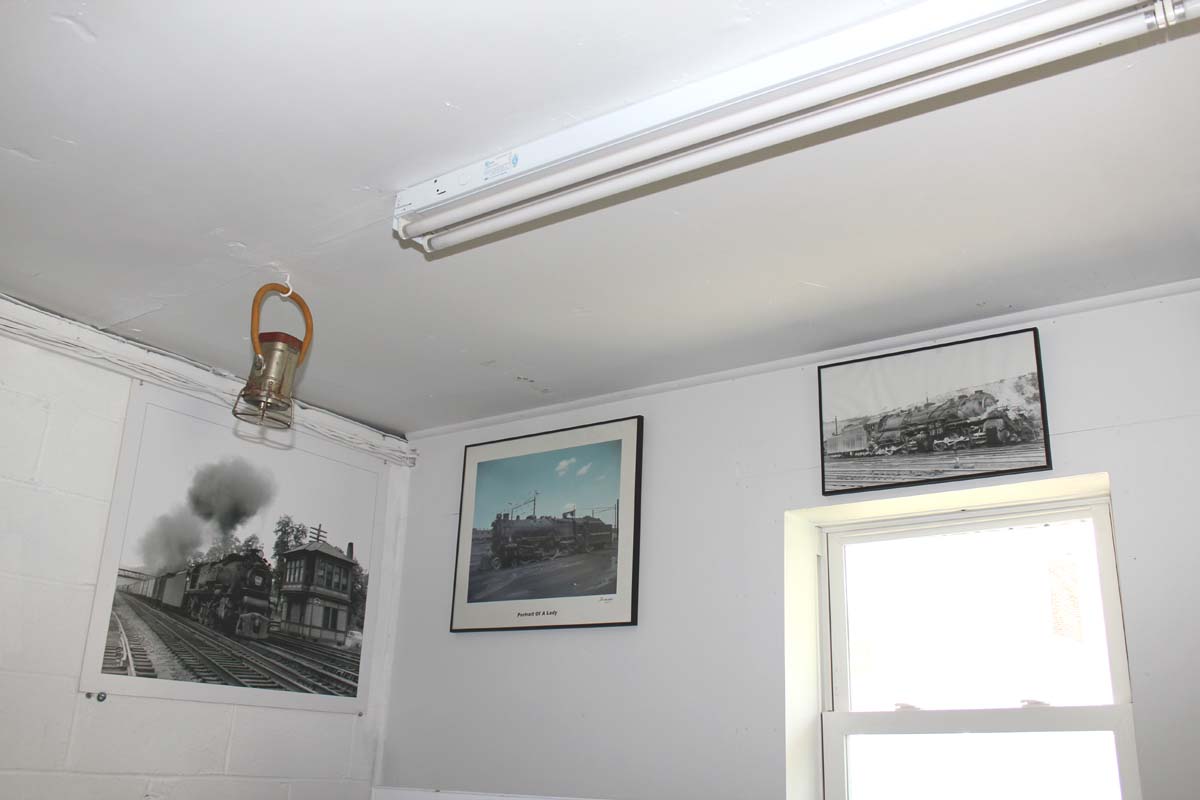
Don Wood is in the shop!
Decorated with classic images of the Mighty PRR, B&O and
N&W
I
have a reasonable collection of Don Wood images on the shop walls. Most are computer
generated but 1 print (so far) is a darkroom print I purchased directly from
Don. It is the M1 above the drill press. He said it might be the last print he
made on his enlarger with his negatives. All prints past that point were
computer generated. What a true class
act Don was and the
last of the real old school master rail photographers. I went to the estate
auction after he passed and bought most of what is seen below. Some are VERY
large prints! The rest of the images are mostly from negatives I bought on eBay
that of course are not by Don Wood. They are darkroom and computer generated as
well. My computer photo printer can make 13 x 19 enlargements.
I still have a few Don Wood darkroom prints to hang up that are
currently in need of frames.
Don
sent a few of them to me for free just for corresponding with him.
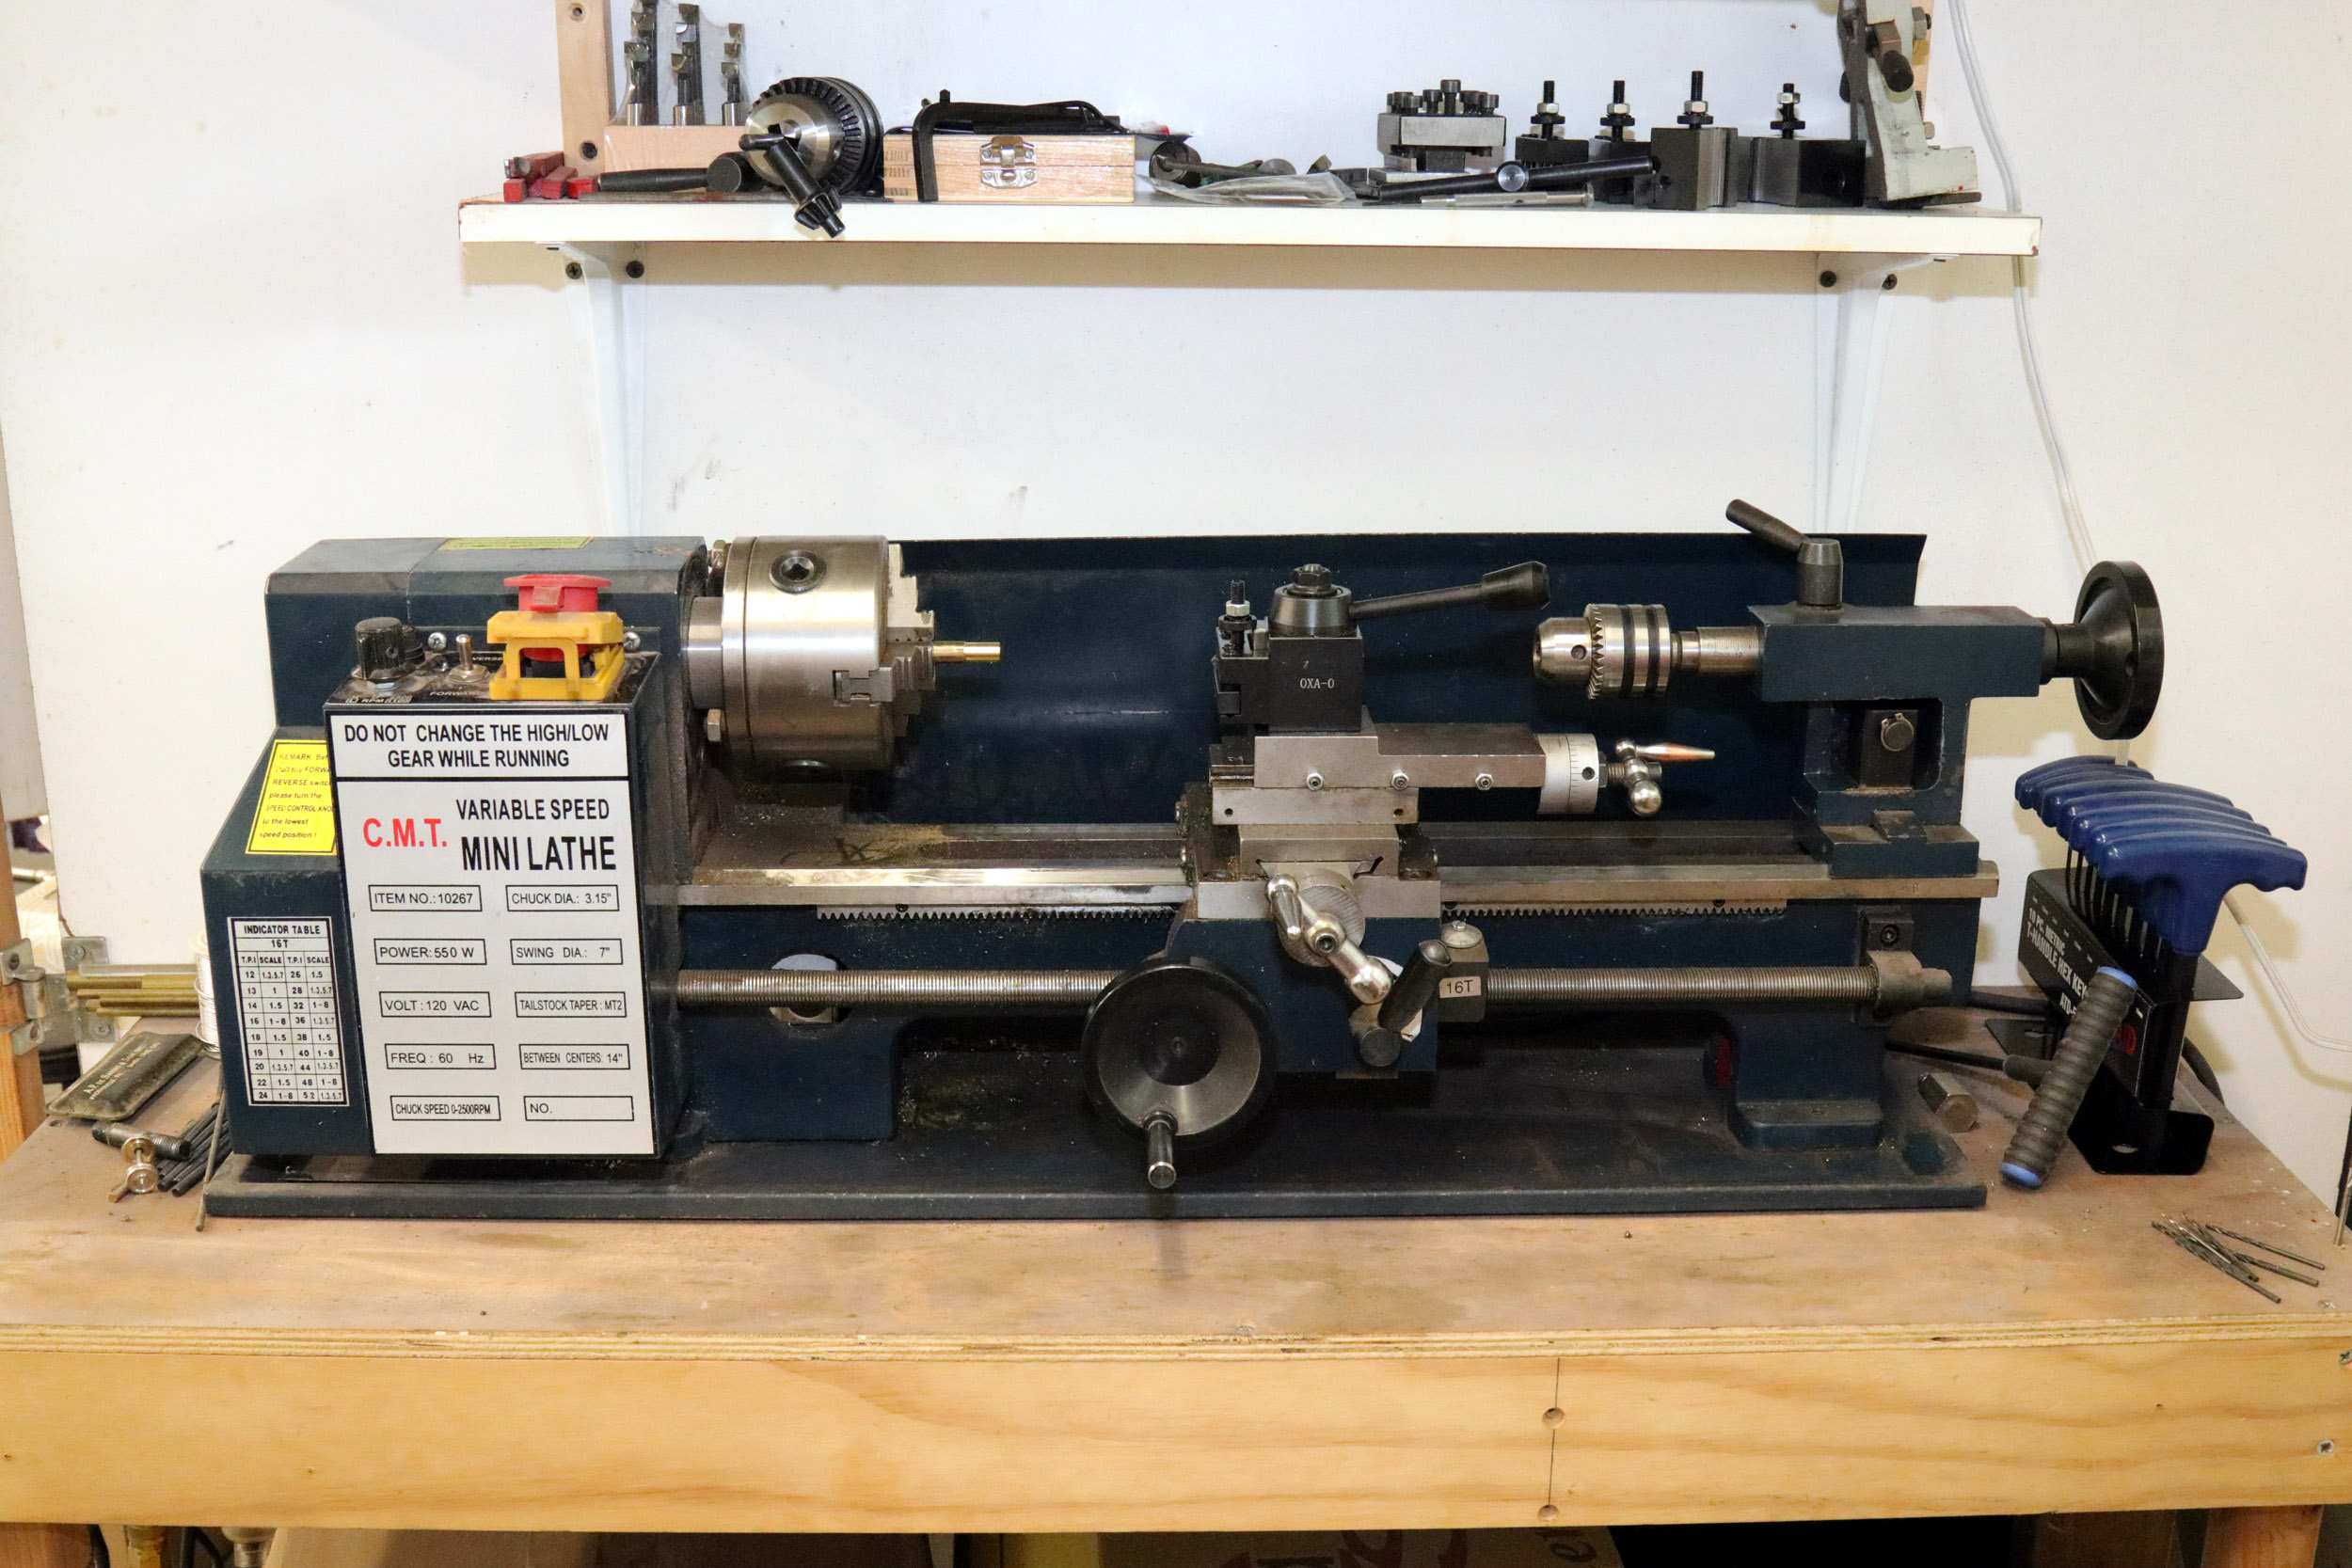
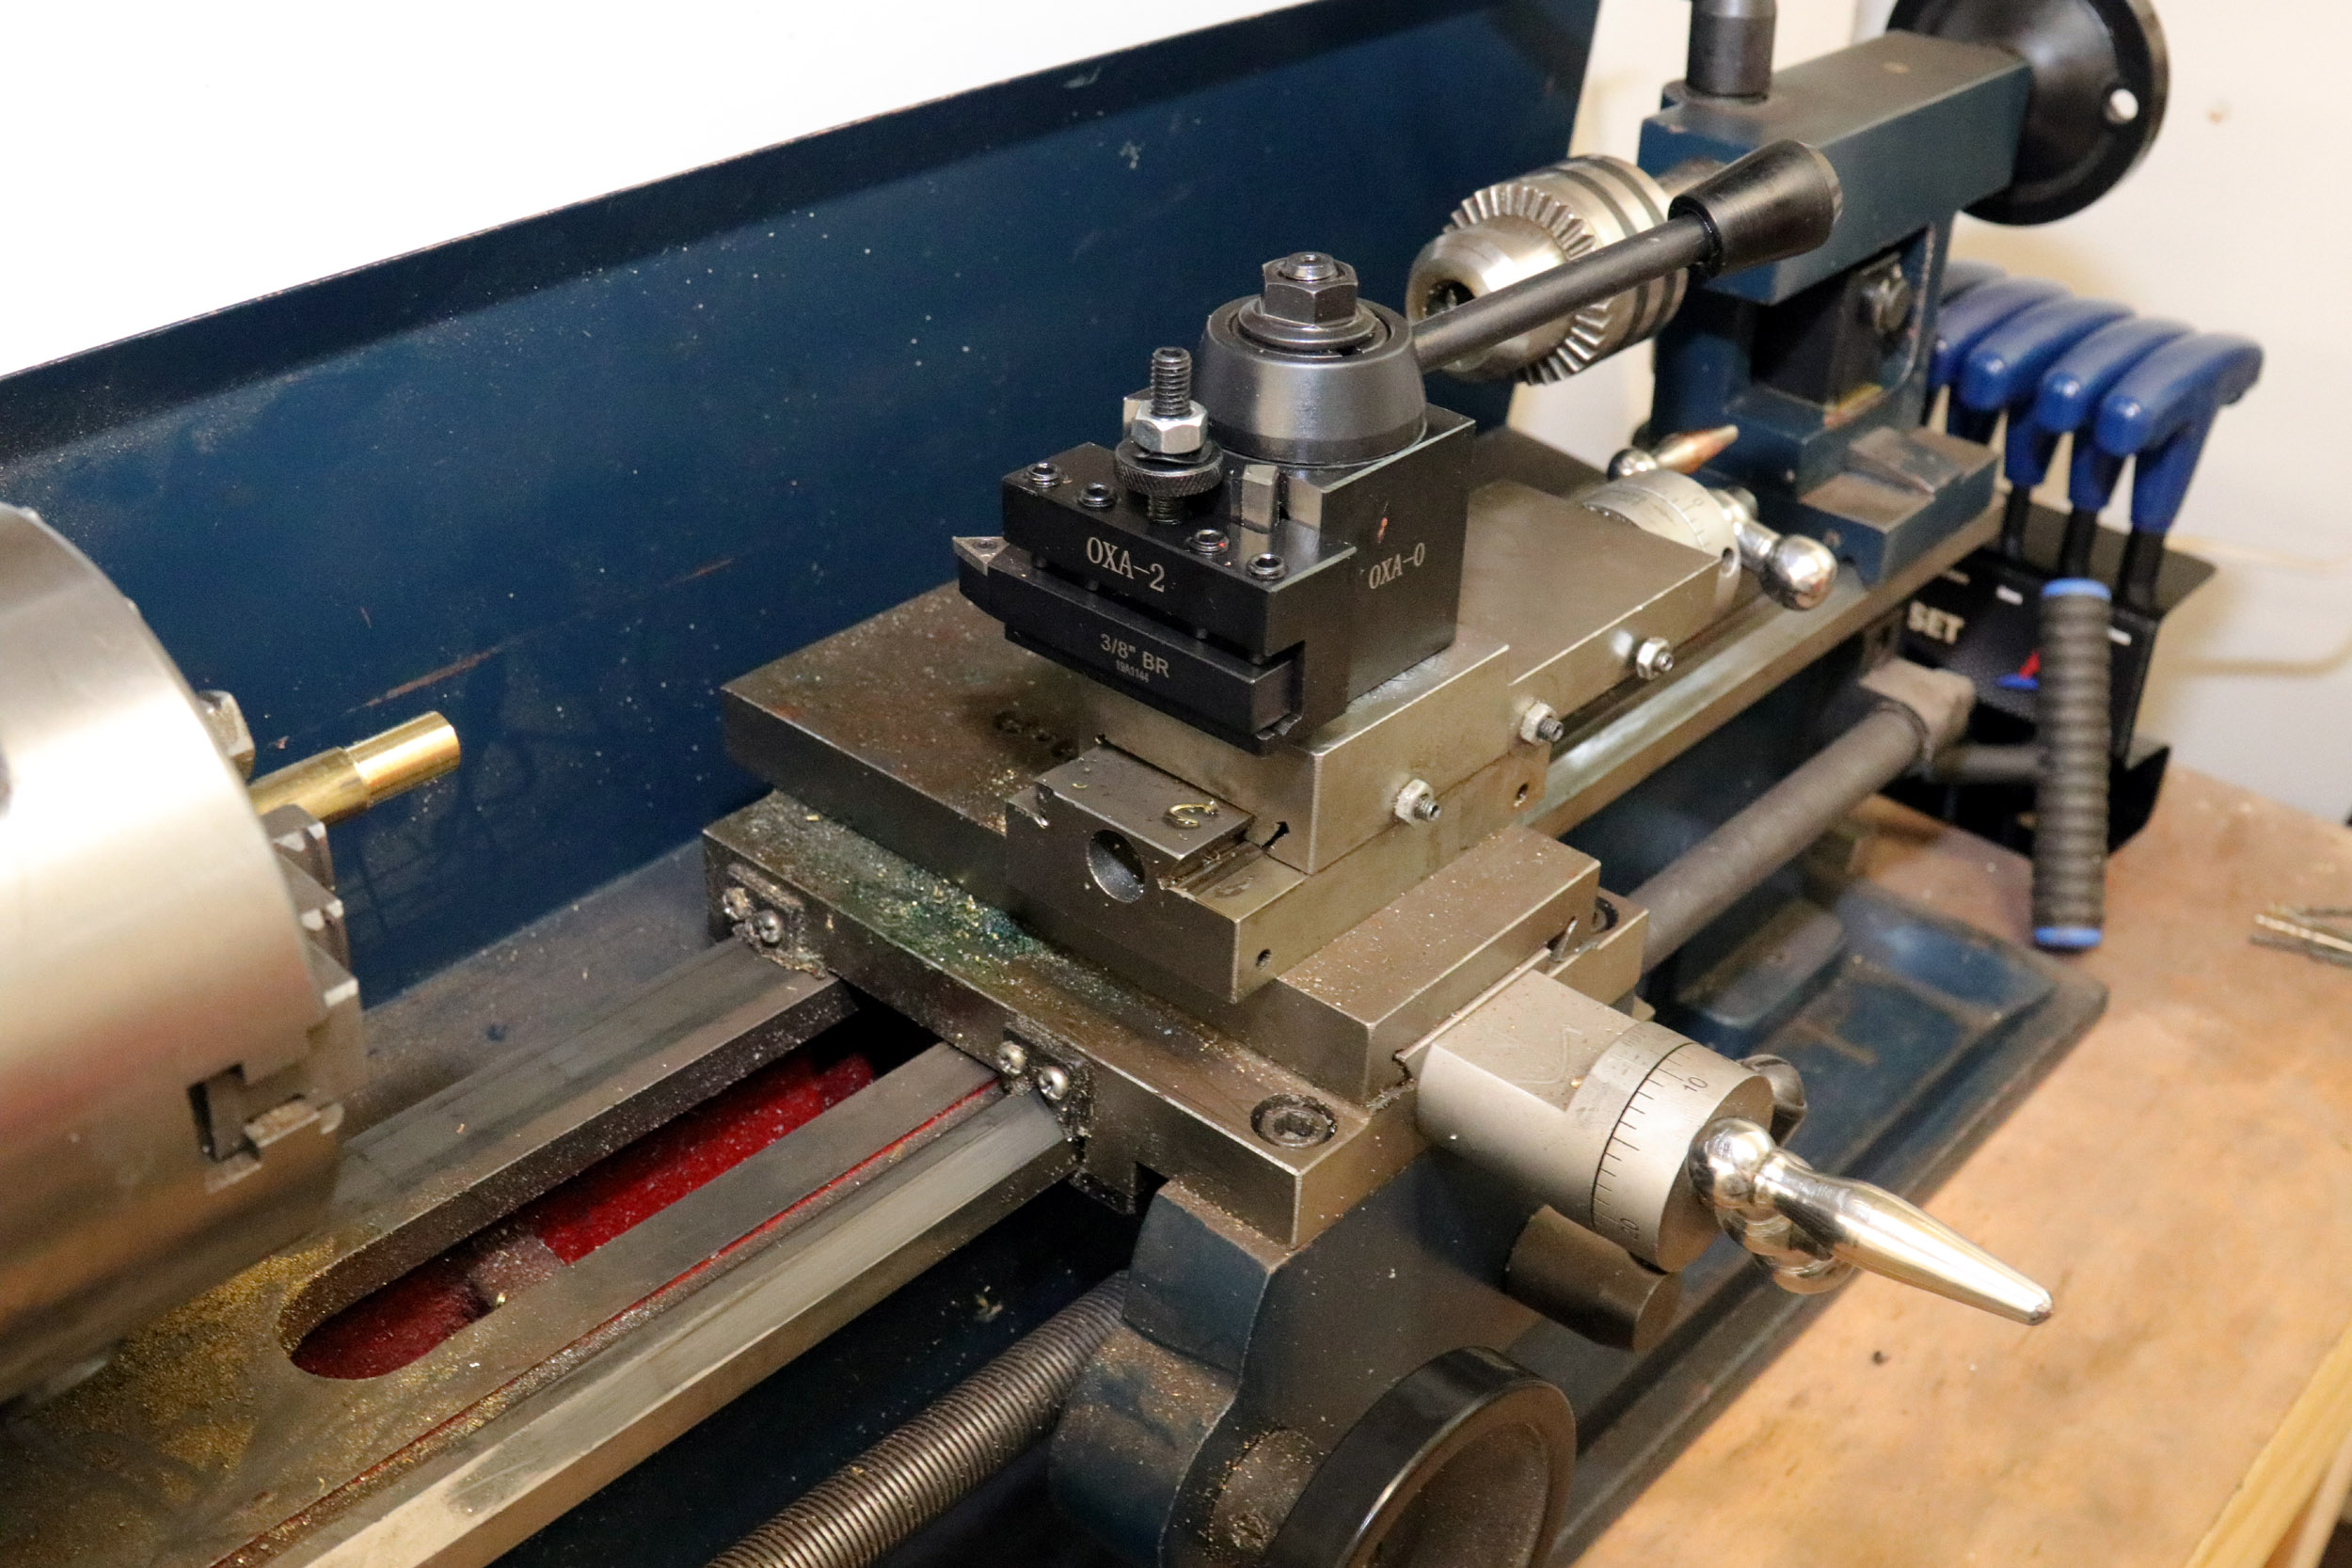
Lathe
Added 4-3-13
In
March 2013 I upgraded a bit to a larger lathe. I got it used from a Craigslist ad. It is a 7 x 14.
The old Unimat was OK but had its limitations and had issues drilling on
center. This is a lot more powerful. I did not want or have the space for a
massive floor lathe. I was hesitant about getting a “Chinese” lathe like from
MicroMark or Harbor Freight because they might not be accurate enough. This one
was made by C.M.T. but it is very similar to other MicroMark etc. lathes. Some
reviews on line said they are fine as a hobby lathe.
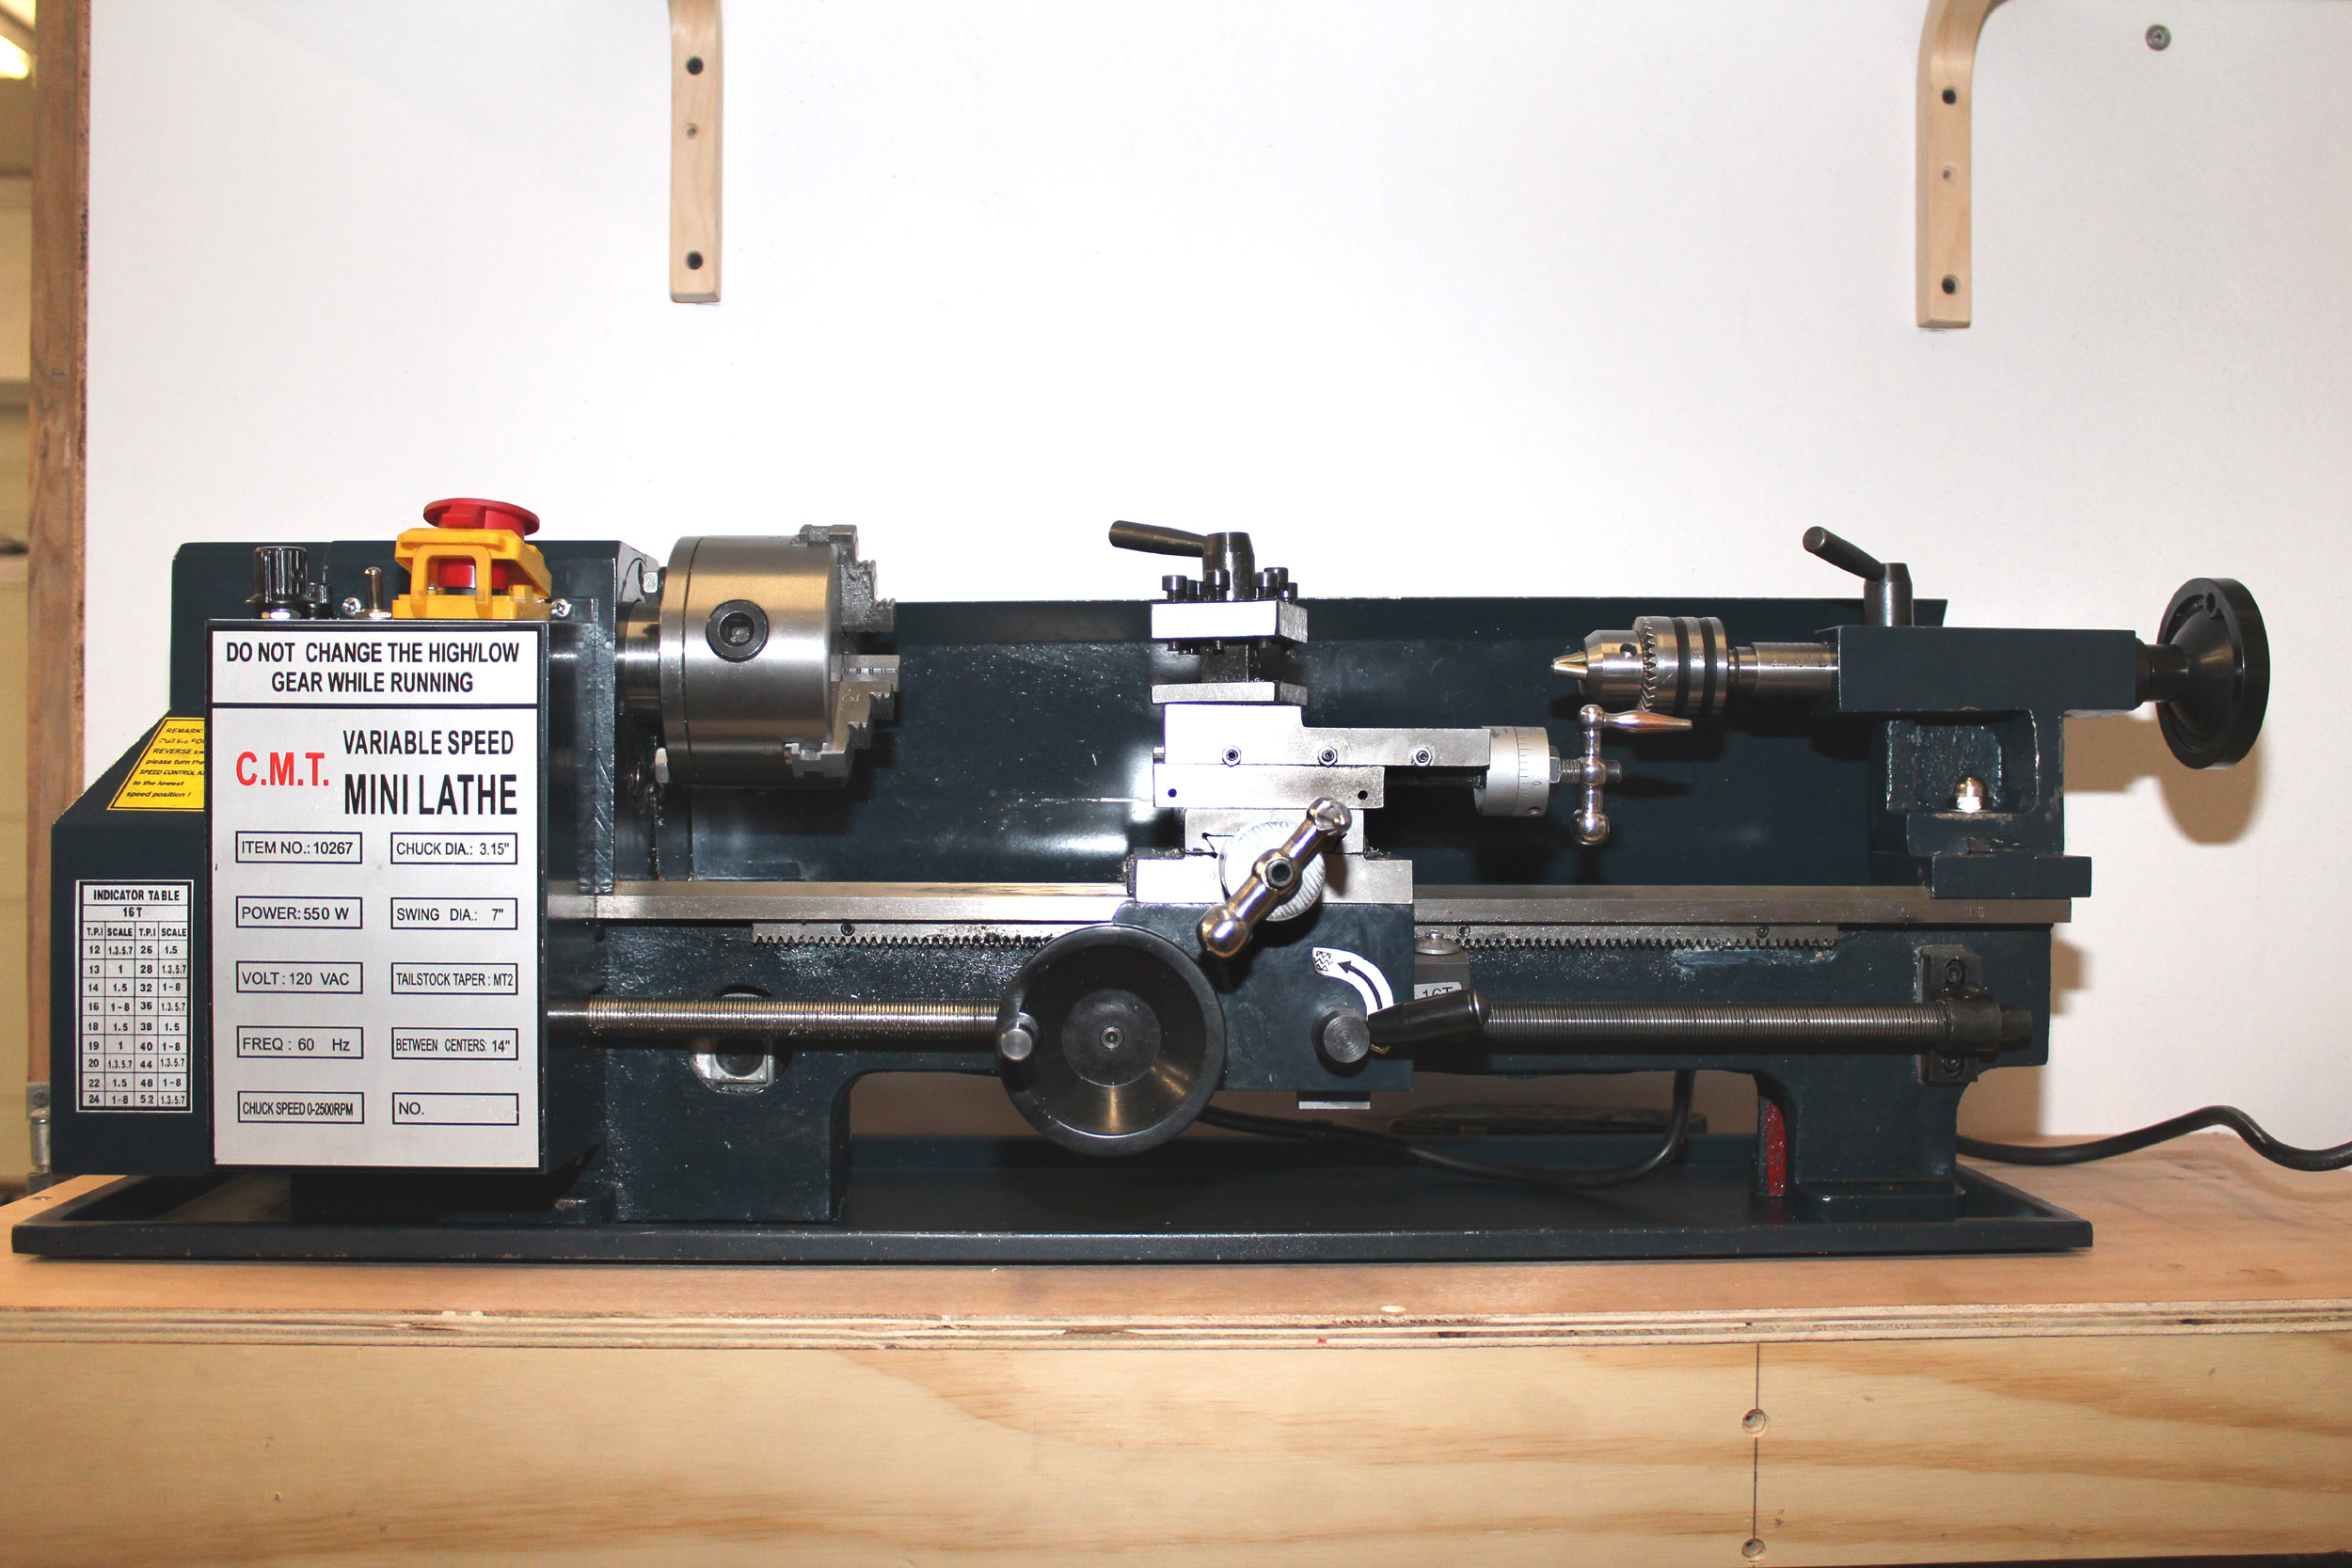
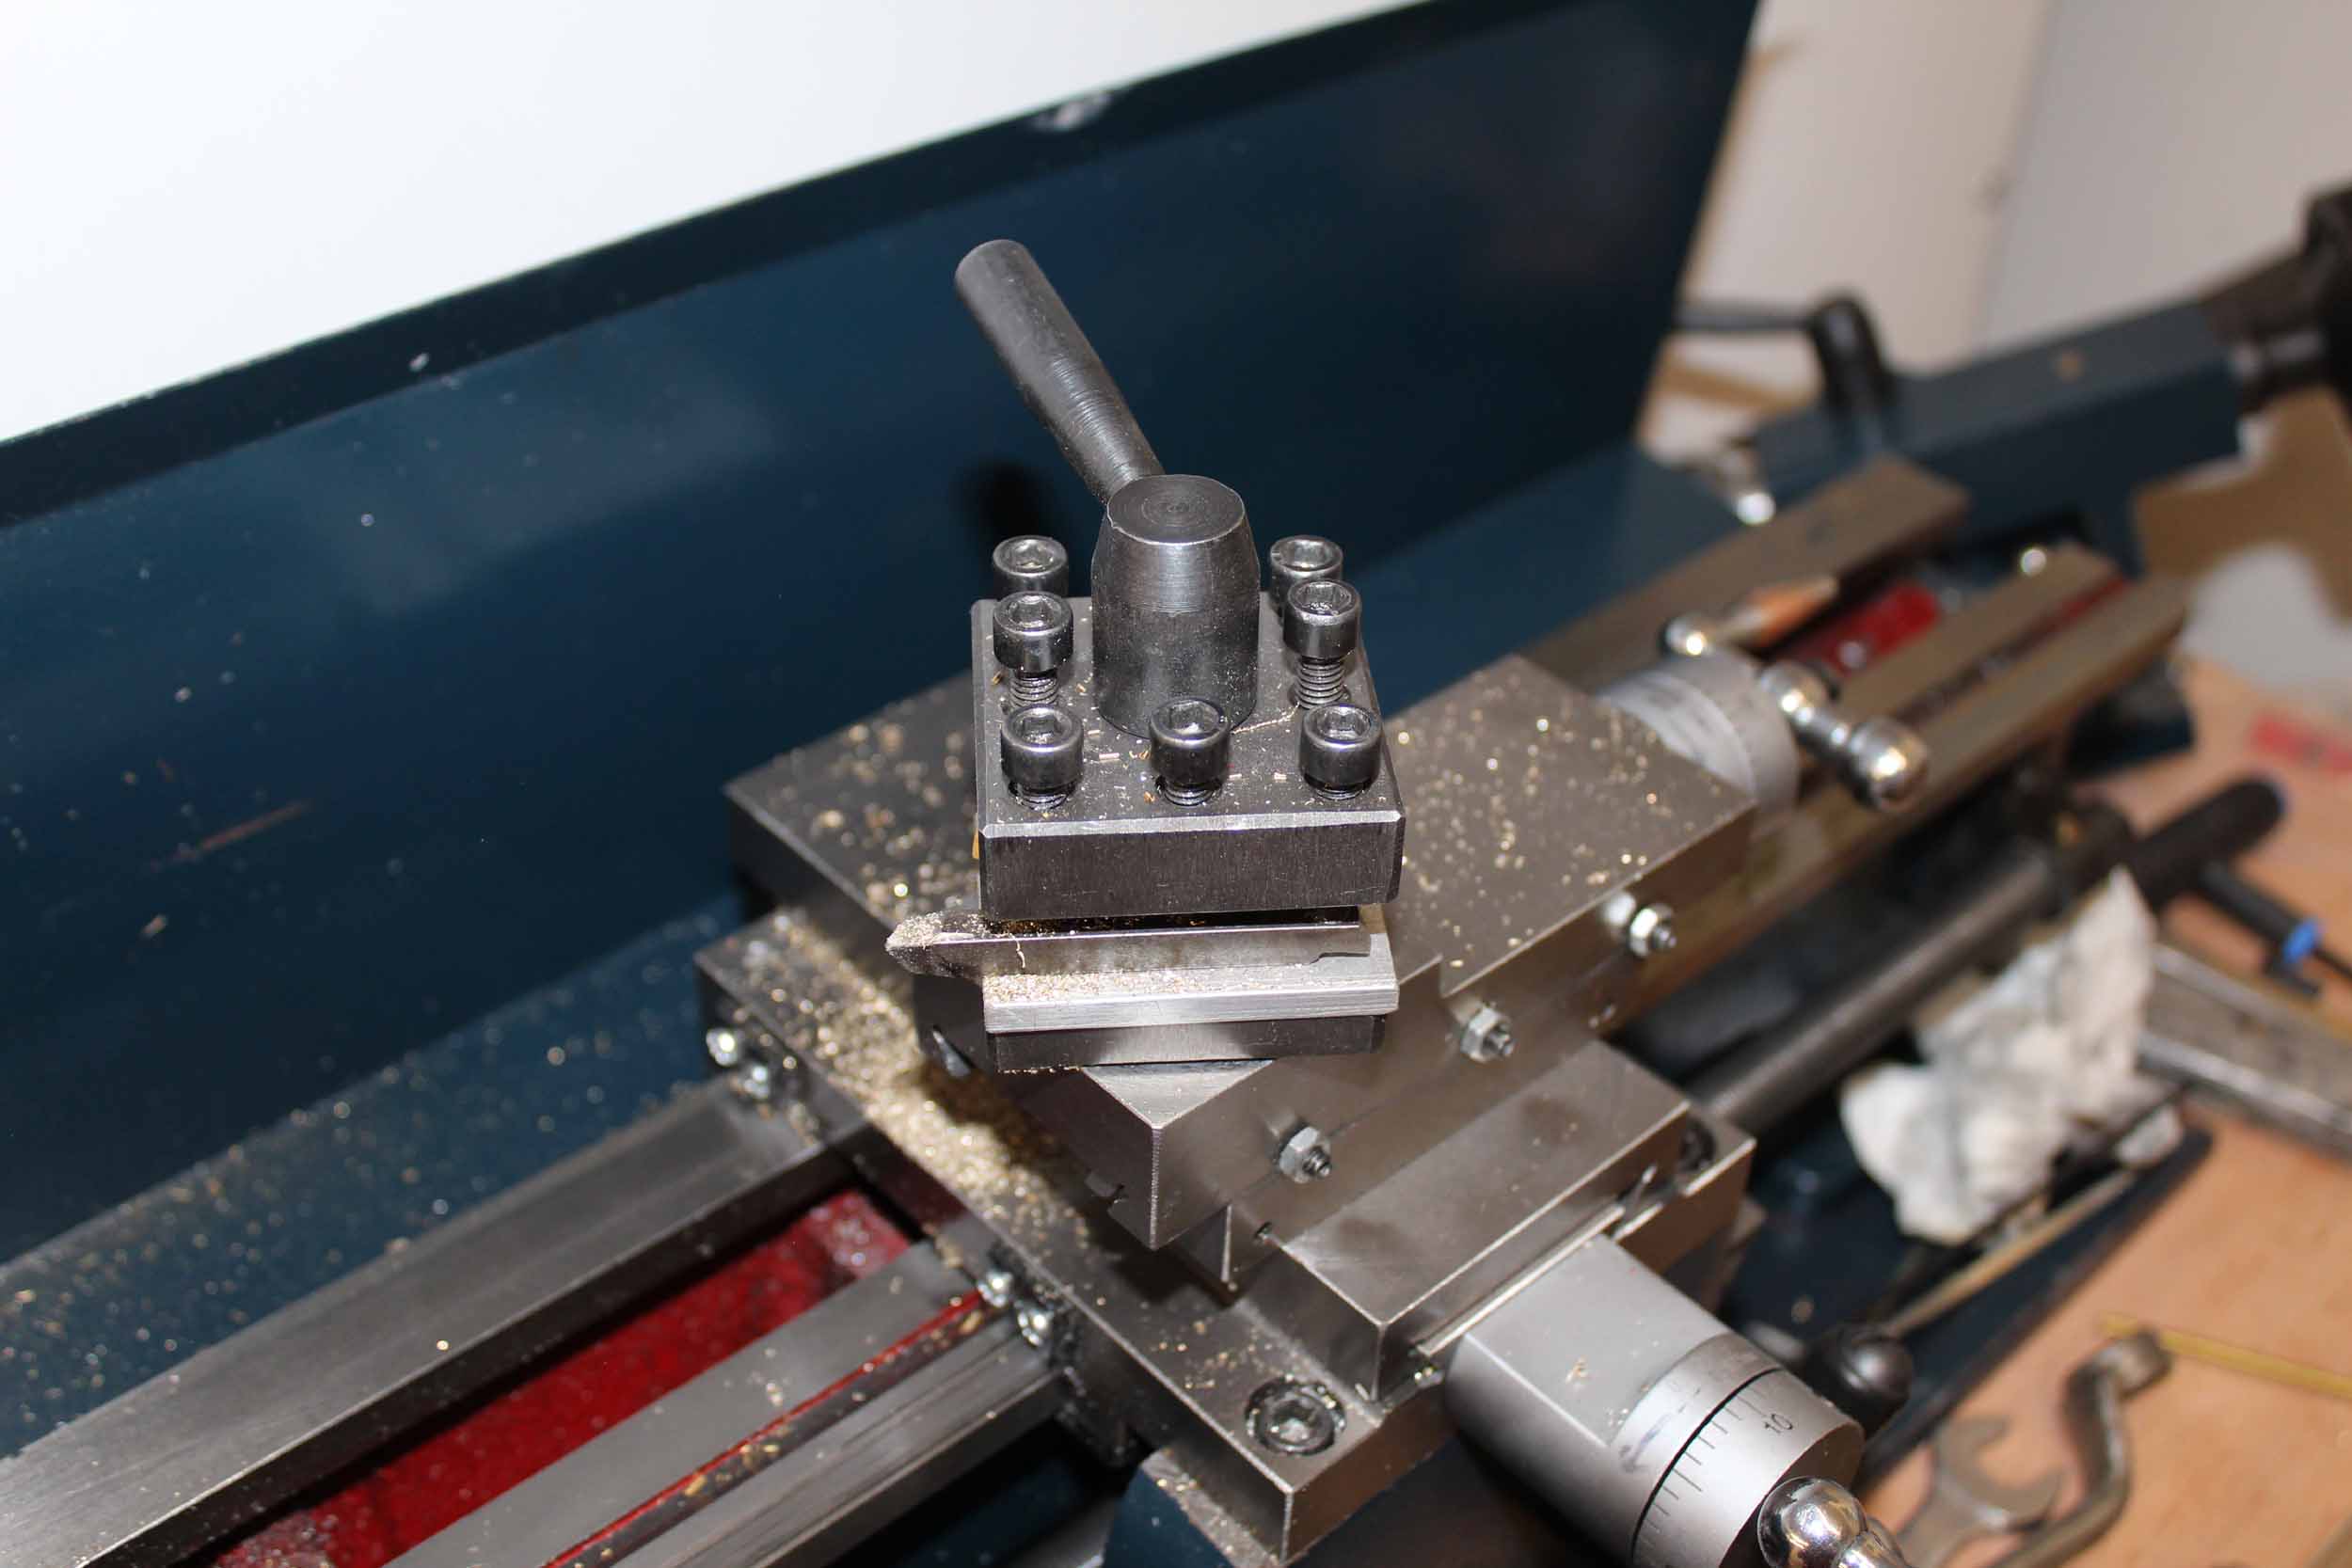
Added 7-18-21
After
8 years of having this it had issues as well.
I could not shim the cutting tools leftover from the Unimat to cut on
center. It had this annoying cap nut that was difficult to access with a wrench
to lock the tailstock. I was using an Exacto saw for
parting off. It was mostly just being used for drilling out driveshaft
couplings, by far not all a lathe should be able to do. In July 2021 I was in a
machine shop class that showed me how to use full size lathes, some of which could
be used on this lathe too. I bought a new quick release toolholder
that has adjustable height tool clamps that could be set to cut on center. I
bought a kit that converted the tailstock to a camlock
that was much easier to use than the old wrench. I also got carbide tip insert
cutter tools and a part off tool that works much better now.
Milling Machine
I
have owned this full sized Milling Machine since about 2007. It is an “Induma”
which is an Italian knockoff of a Bridgeport Mill. Not too many people have an
Induma. Most things that fit a Bridgeport fit this as well. I bought it for
$250.00 with a brand new motor – less than it was worth in scrap. I was living
in the second floor of an apartment and I still bought it! I had no idea when
or if I was ever going to get a house. Luckily a friend found a place to store
it for me for free for 5 years but I had almost no access to use it
either.
It
is over 7 feet tall and possibly 1500 pounds plus! It has a custom motor
mounting plate for a 110V C face motor making 3 phase
power not needed. A friend wired it so
the motor can be reversed. It has the usual barrel switch but does not use that
to reserve the motor. Making the shop so I could have room for this machine was
a factor. I finally had it moved here on
4-12-12. So I now have a heavy duty machine in my arsenal – to work on
trains! I believe in having tools to do
the job. With every new tool you get, it just increases whatever you can make.
In
July 2021 I took a machine shop class that taught me how to use the mill better.
I got the power feed motor working and bought basic machine shop accessory
tools I did not have.


Added 4-25-12
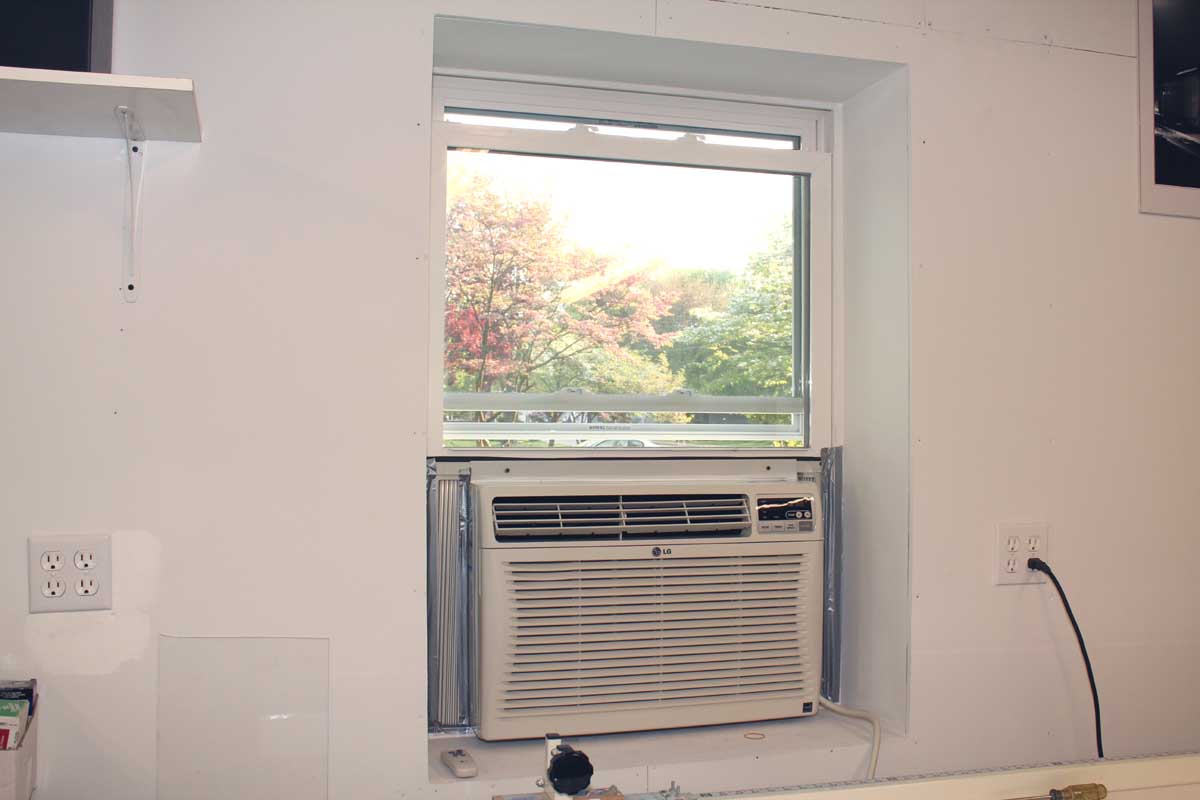
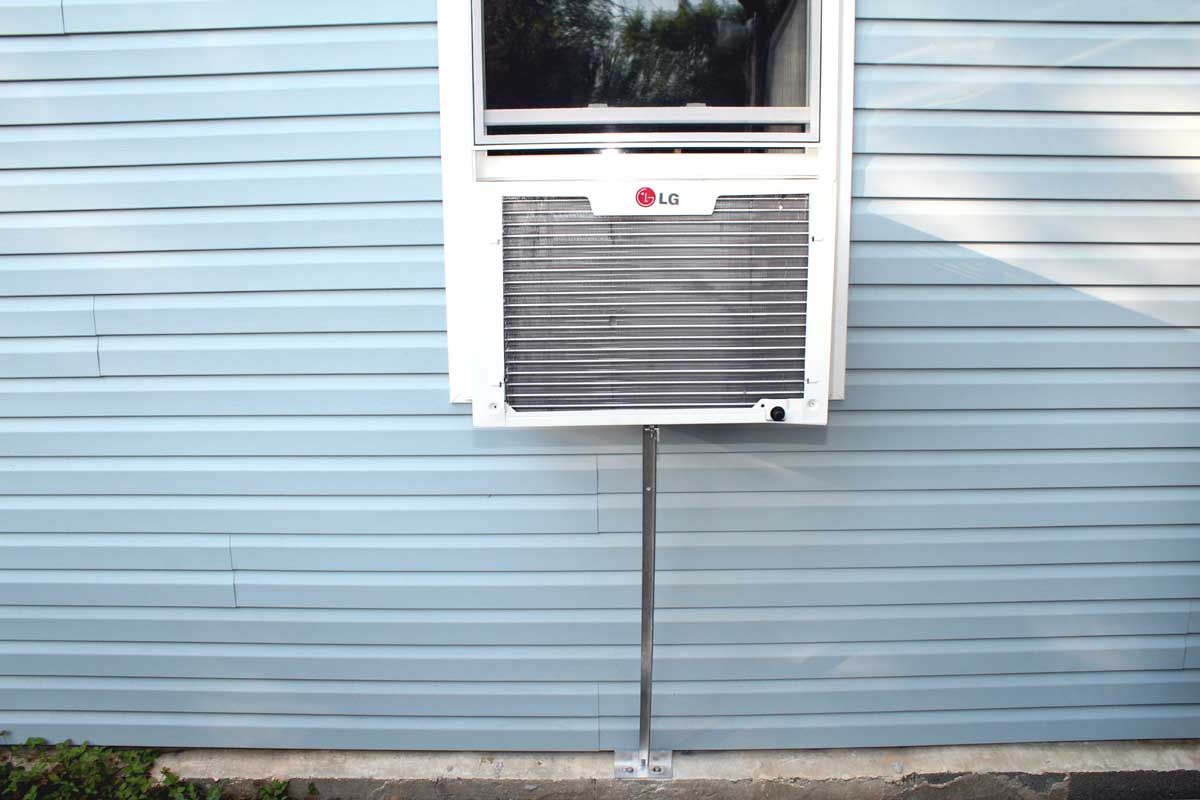
Air Conditioner
I bought
the Air Conditioner on 4-24-12. According to the Air Conditioner rating chart
the shop requires a 12000 BTU for the size of the room. This is a 24,500 BTU!
It will be only run on an as needed basis when I want to work on the hottest
days. I want to hit cool and blow cold air like a Bering Sea Hurricane!
It is a BEAST at 125 pounds! I installed it by myself. It wound up being a bit
more involved than I expected. I could not use a conventional A/C support brace
because of the vinyl siding over the block wall. I would ruin it trying to find
solid support so I made an aluminum brace from angle and bolted it to the
foundation. The milling machine came in handy here! The instructions said to
mount it level as it is supposed to hold water in the bottom tray. When it was
mounted level condensate leaked back inside on the window sill. I had to do
some adjusting to give it a slight pitch away which made it trickle drain and
still retain water. All is fixed and fine now.
2-5-13
HVAC Update
The
heater and A/C unit have done a great job. Getting to my wanted temperature
only takes about 10 minutes. The insulated walls are really keeping the shop at
a good temperature. There is easily a 20 degree difference from the outside
temperature to the inside at any time I get for free without the heater or A/C
running at all.
Added 7-10-12
Parties!

The Work Shop doubles as
our party room! Doggies are allowed to party here as well.
Added 11-10-12
A wave of organization hit the workshop. Much
more to come, especially in sorting and organizing nuts, bolts and small items.
Added 2-10-13
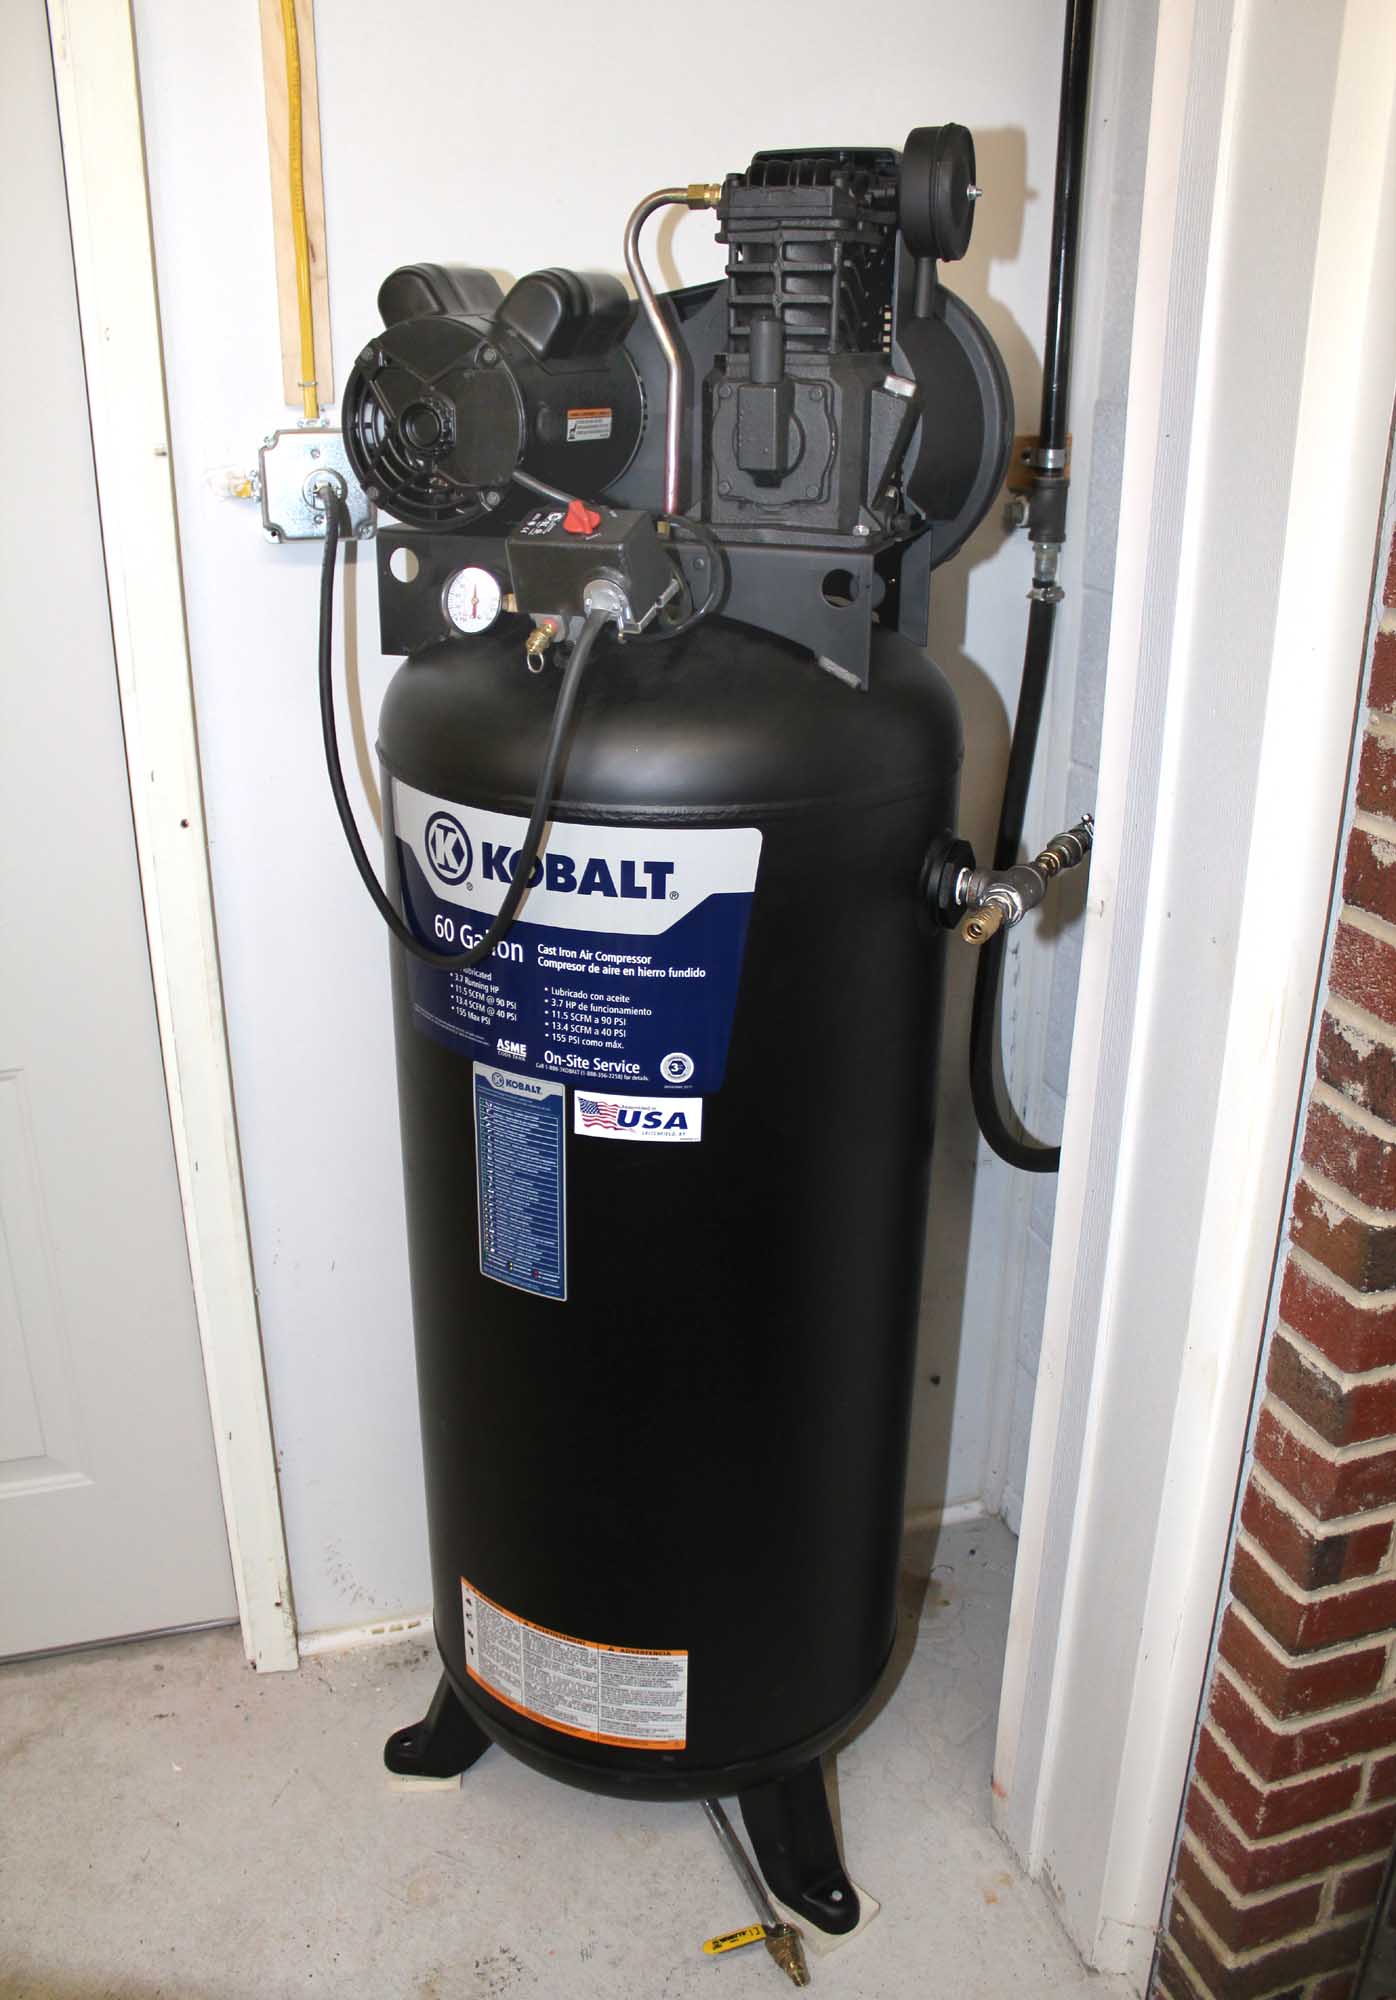
My
110v Craftsman compressor died after about 7 years of use and abuse. It always
struggled to keep up when I was using the blast booth by running constantly –
NOT good for it at all! I sometimes ran my second 110v compressor at the same
time. It was probably the biggest 110v unit made. I decided to step up to a
small 220v unit which almost doubled the compressed air capacity, and there was
only $75.00 difference between the 2 units. It was a no brainer. I had to run a
new 220v line across the shop and into the garage. It was quite the involved
project. On first fire up after 3 days work there was a pin hole
leak in the tank because of a bad weld at a seam. Lowes made it good by
swapping out a new compressor here today so I did not have to take it back to
the store. That made things a LOT easier!
There
are no wheels. I also did not want to hard wire and pipe it in. I got rid of
that awful bleeder valve for draining condensate and replaced it with a ball
valve I can reach. I made a 40’ long hose up to connect and drain it into the
street.
As you can see it is a beast – almost 6 feet tall! Kobalt is made by Campbell Hausfeld.
Added 9-27-13
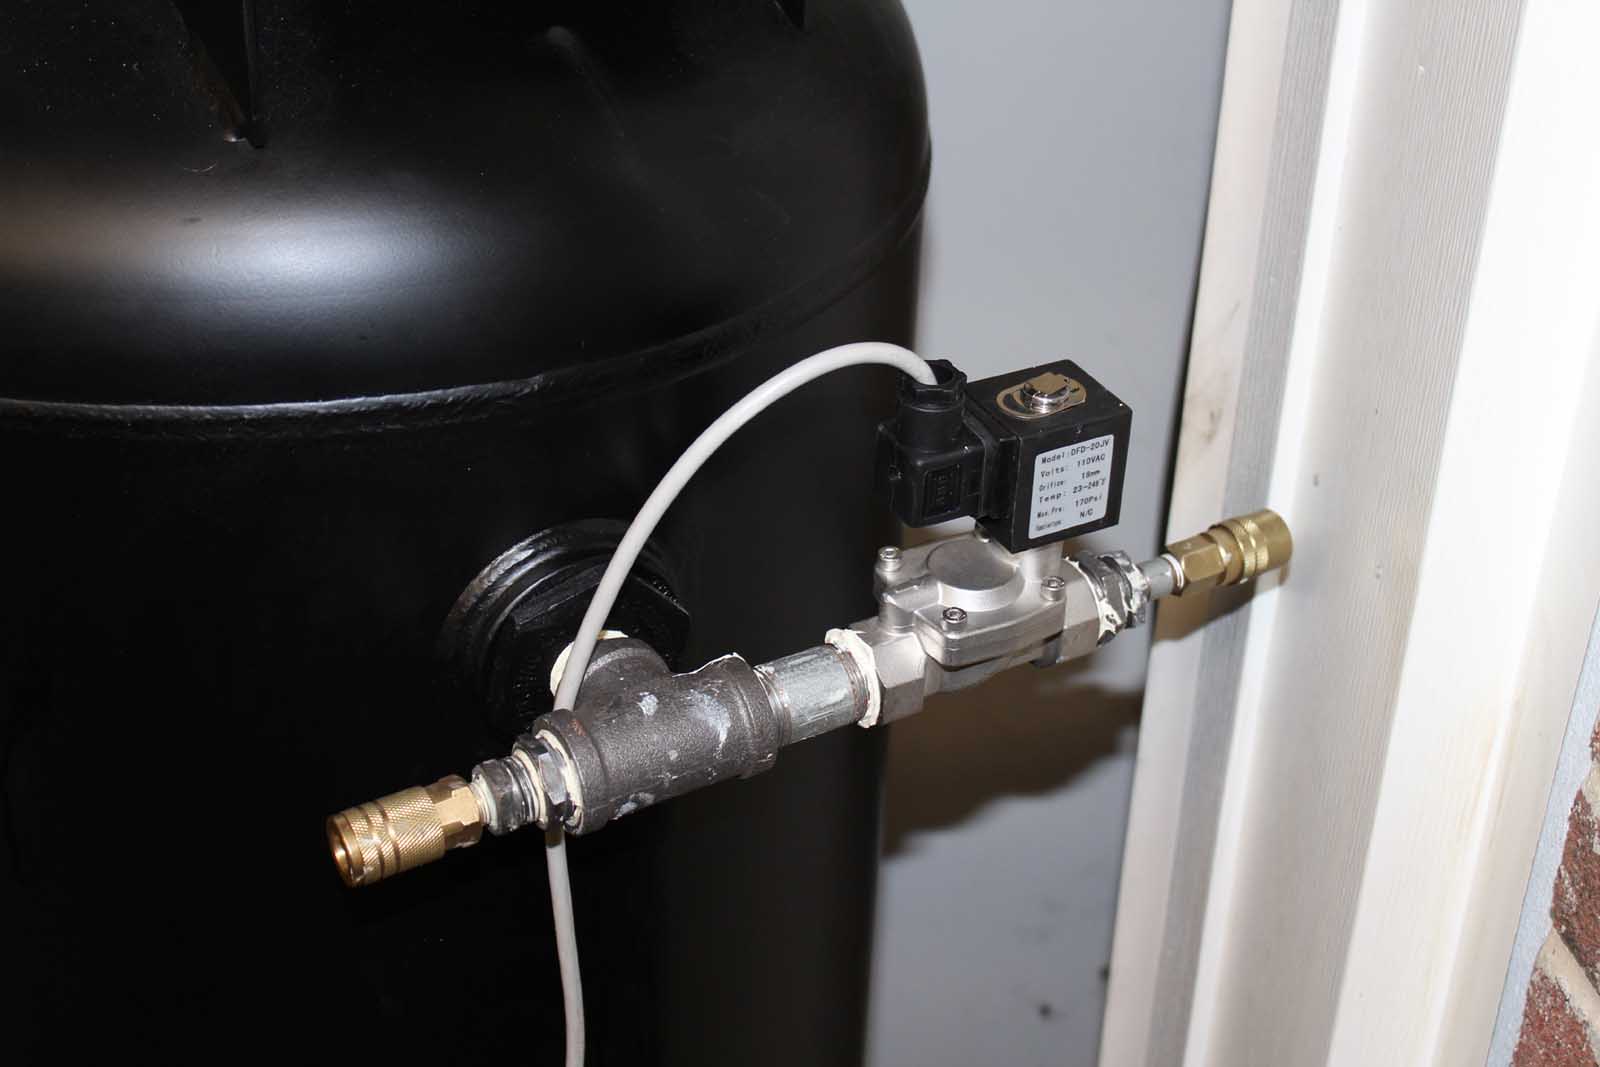
In
spite of my best efforts of putting pipe dope on all joints, my air pipe system
in my shop walls has a slow leak – someplace. I am never going to find the leak.
I
wired the original 110v compressor to a light switch. When I put the 220v
compressor (as shown above) in I did the same thing with an all new 220v
circuit. I wanted to have compressed air all the time but this would leave the
compressor to cycle to keep up with the leak. If I put a valve right at the
tank it is not likely to leak there.
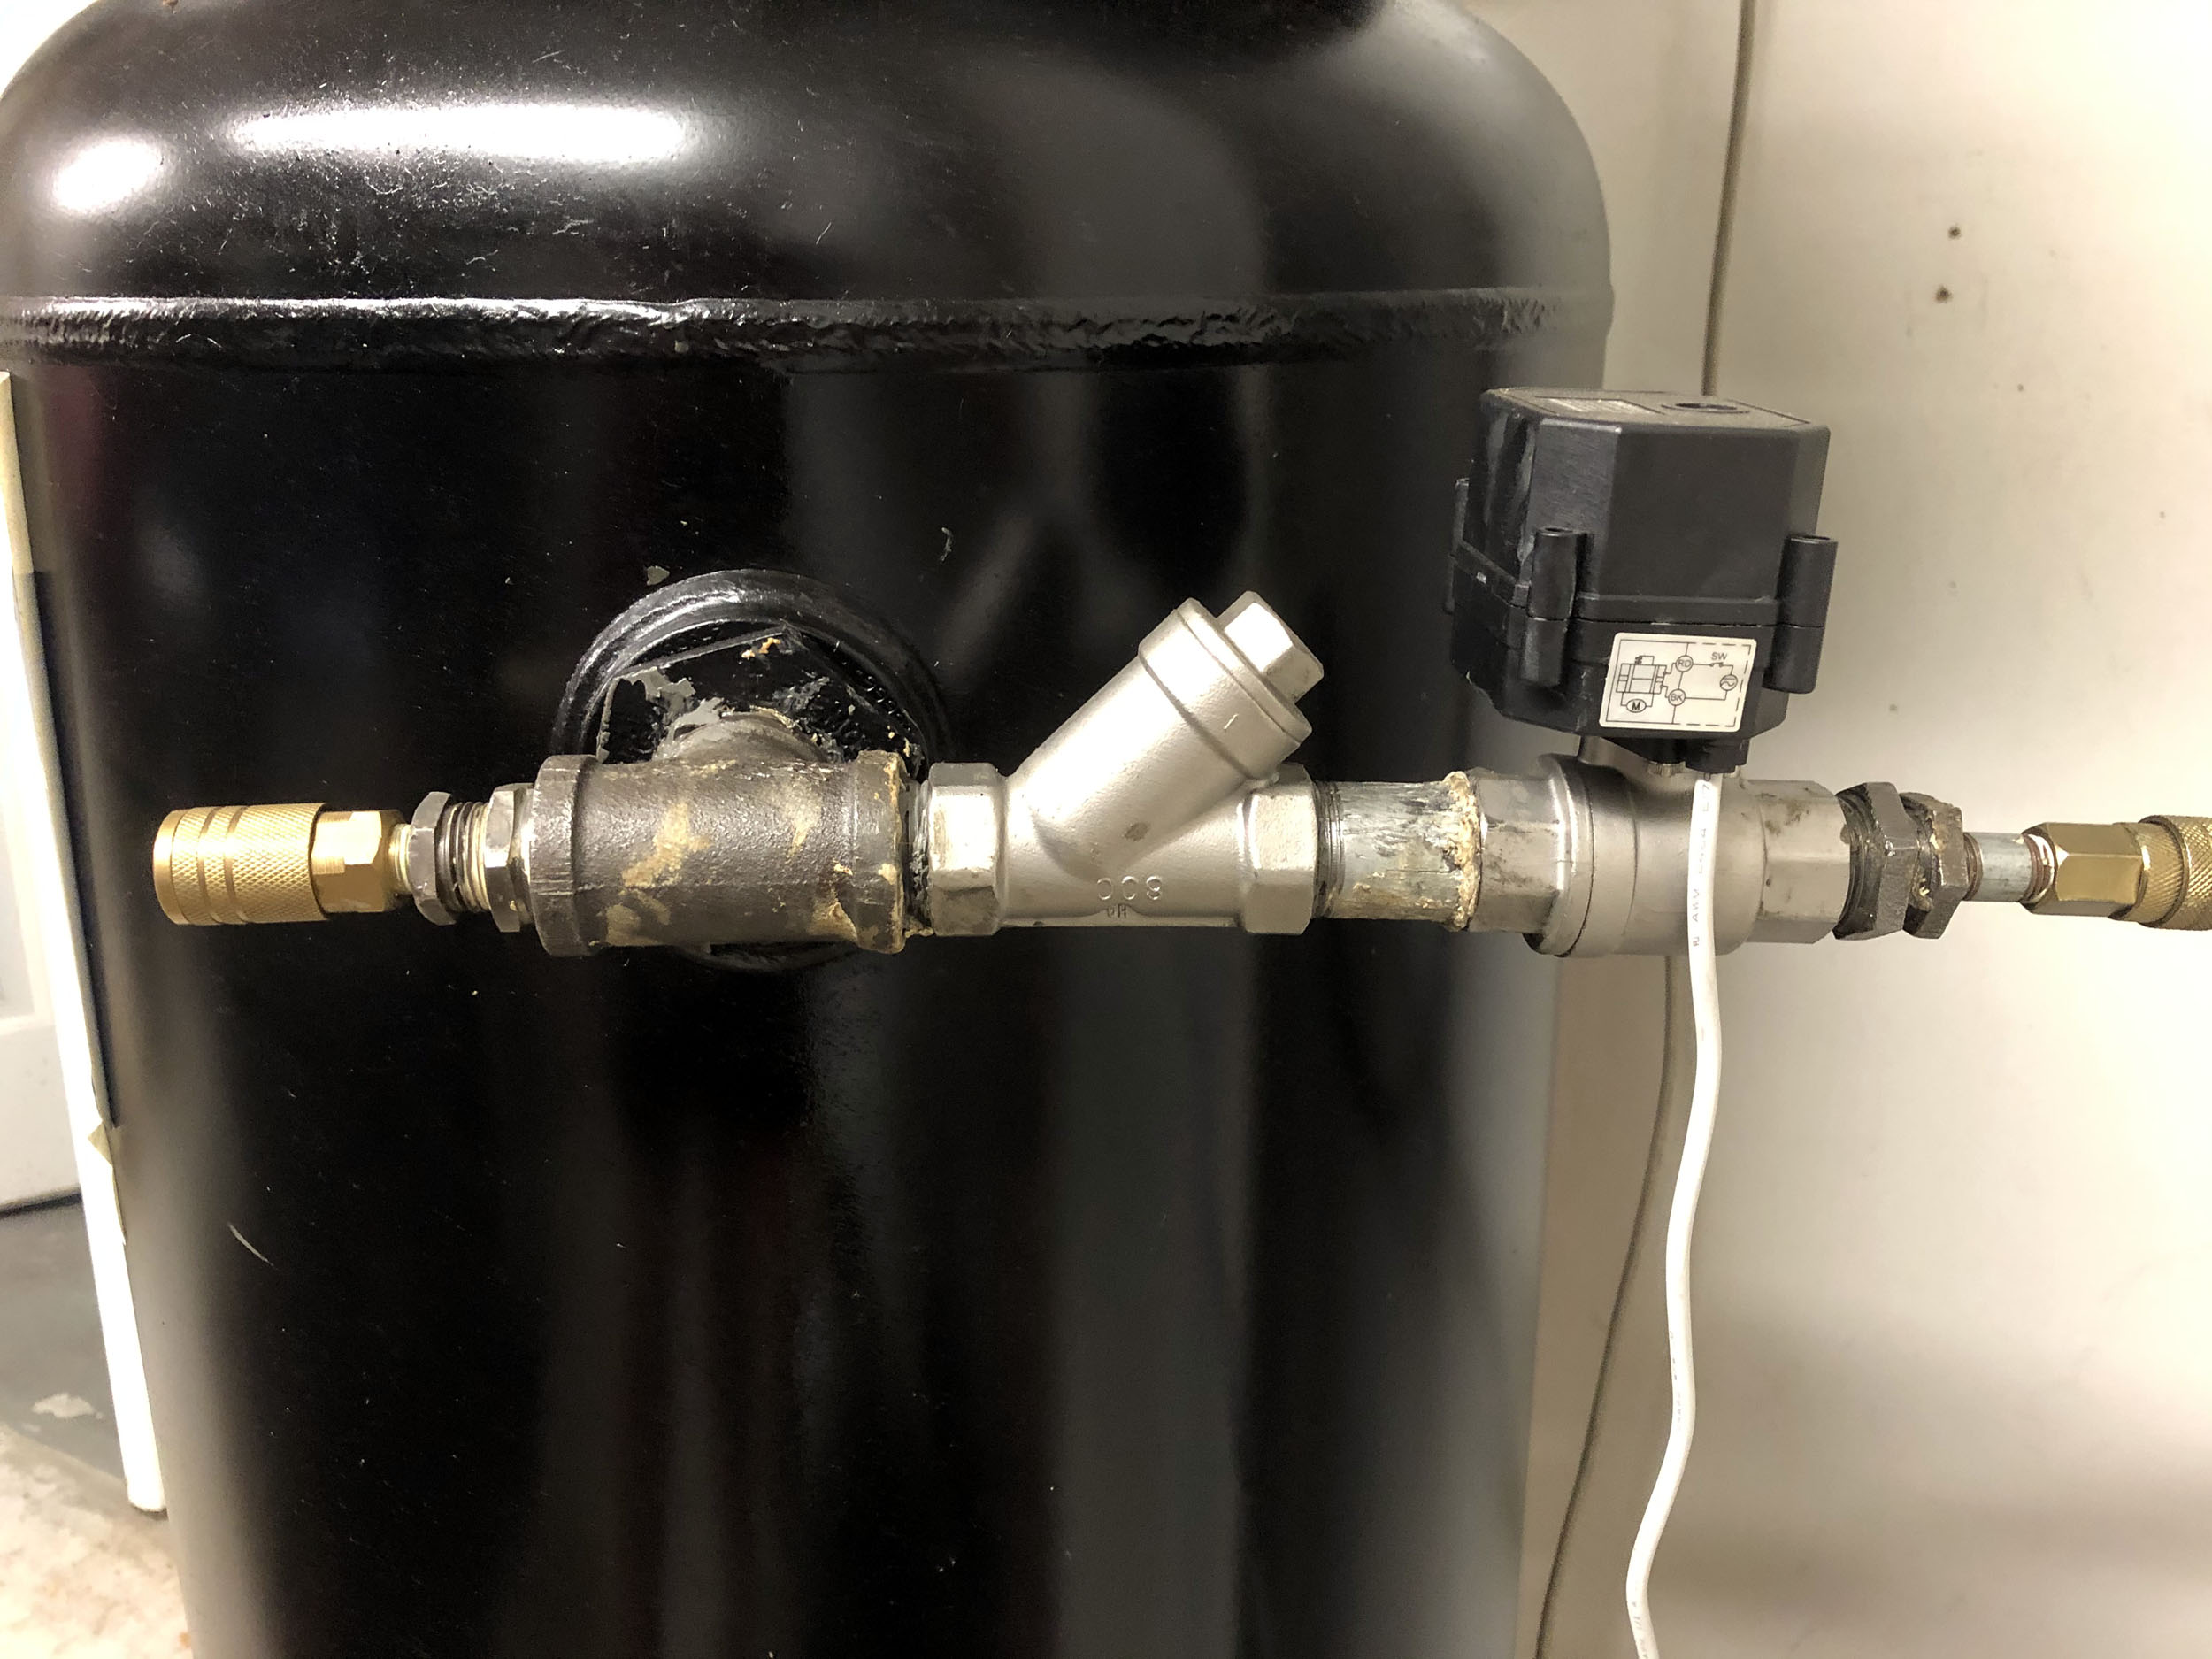
That
is when I bought this. It is a normally closed 110v coil shut off valve. Now
the compressor stays on all the time. When I want compressed air I flip the
light switch on that was originally for the old 110v compressor. The valve
snaps open & the system is charged with air. When I am done for the day I
turn off the switch & the valve closes. The pipe system leaks down in about
15 minutes – big deal - but the compressor stays fully charged at all times.
Best of all, this valve can be operated very remotely even though for me they
are right to the other side of the wall. Since the piping gets reduced down to
¼” right next to the tank I could have gotten a smaller valve! (:->) Oh
well…
2019
Valve Update
These diaphragm solenoid valves leak if you get a speck of schmutz thrown from the compressor. It easy to fix and
clean but it is annoying. I have switched to a motorized ball valve. So far so good. I also added a line strainer.
Added 11-21-13
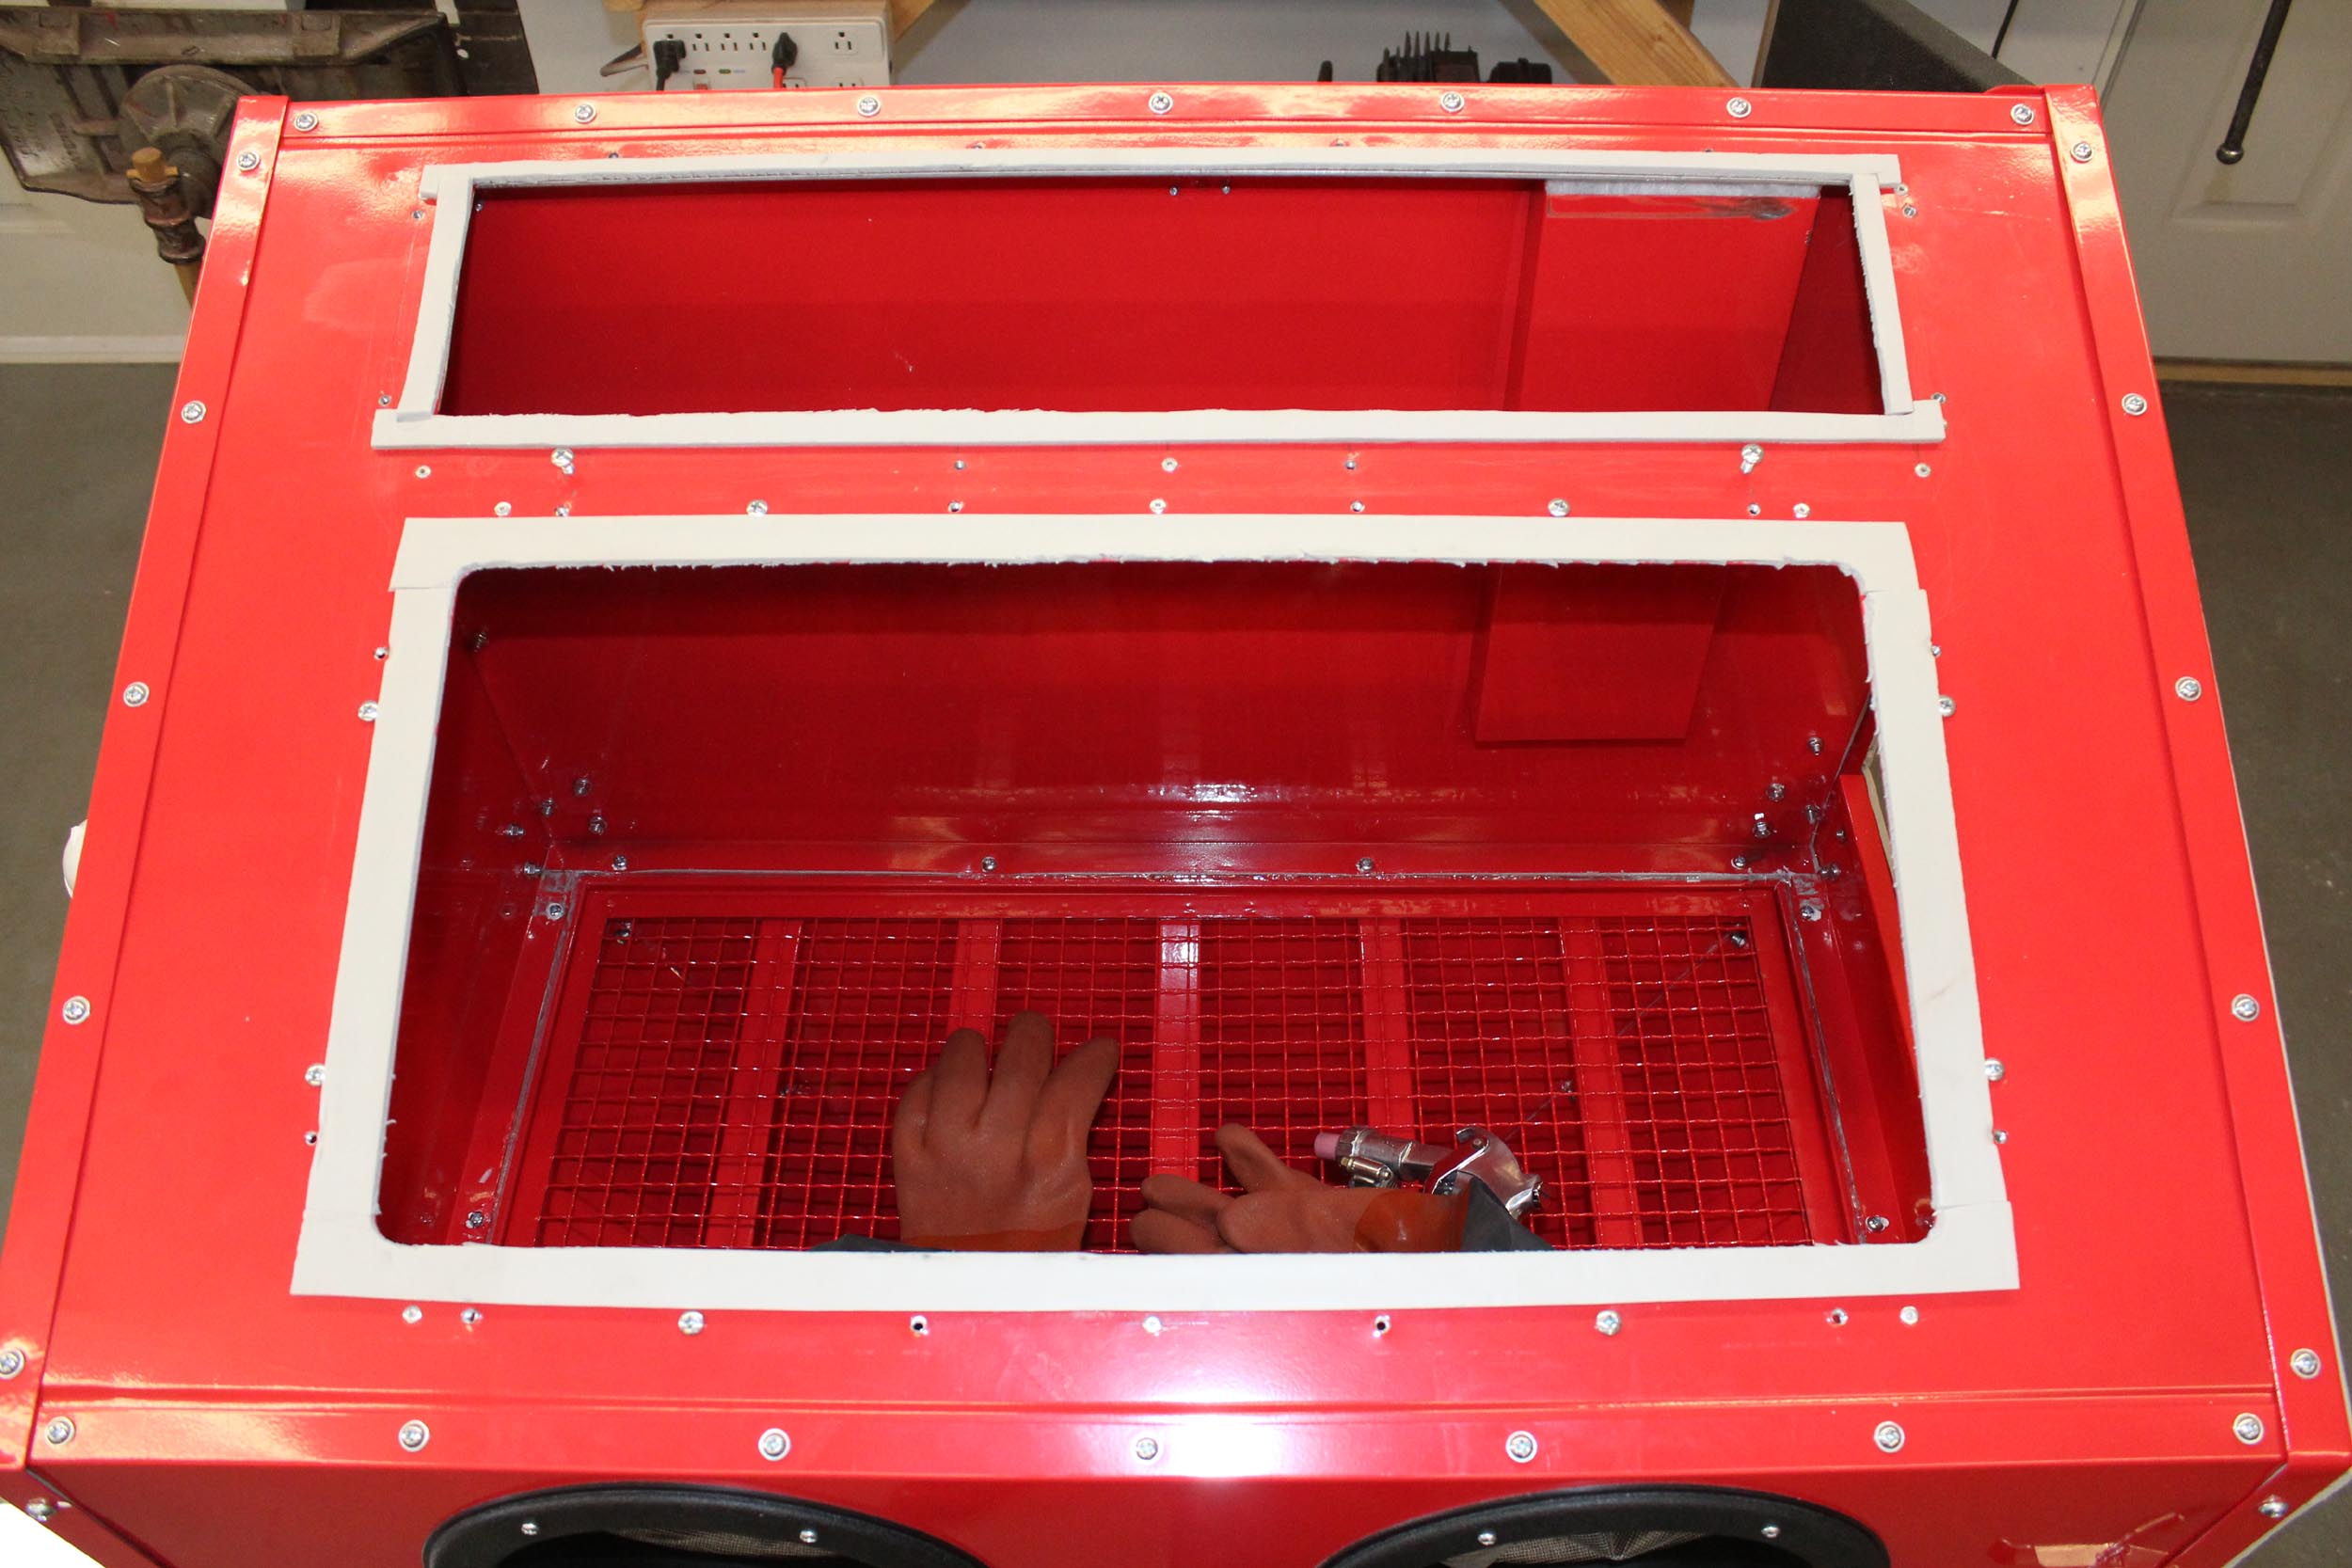
Harbor Freight Blast Booth
Know
that if you want a blast booth, and you SHOULD want a blast booth, it is going
to be a dirty mess. You cannot put this in a utility room next to the washer
and dryer. Top load, side load, it does not matter - they leak blast media and
create a mess. It cannot be avoided.
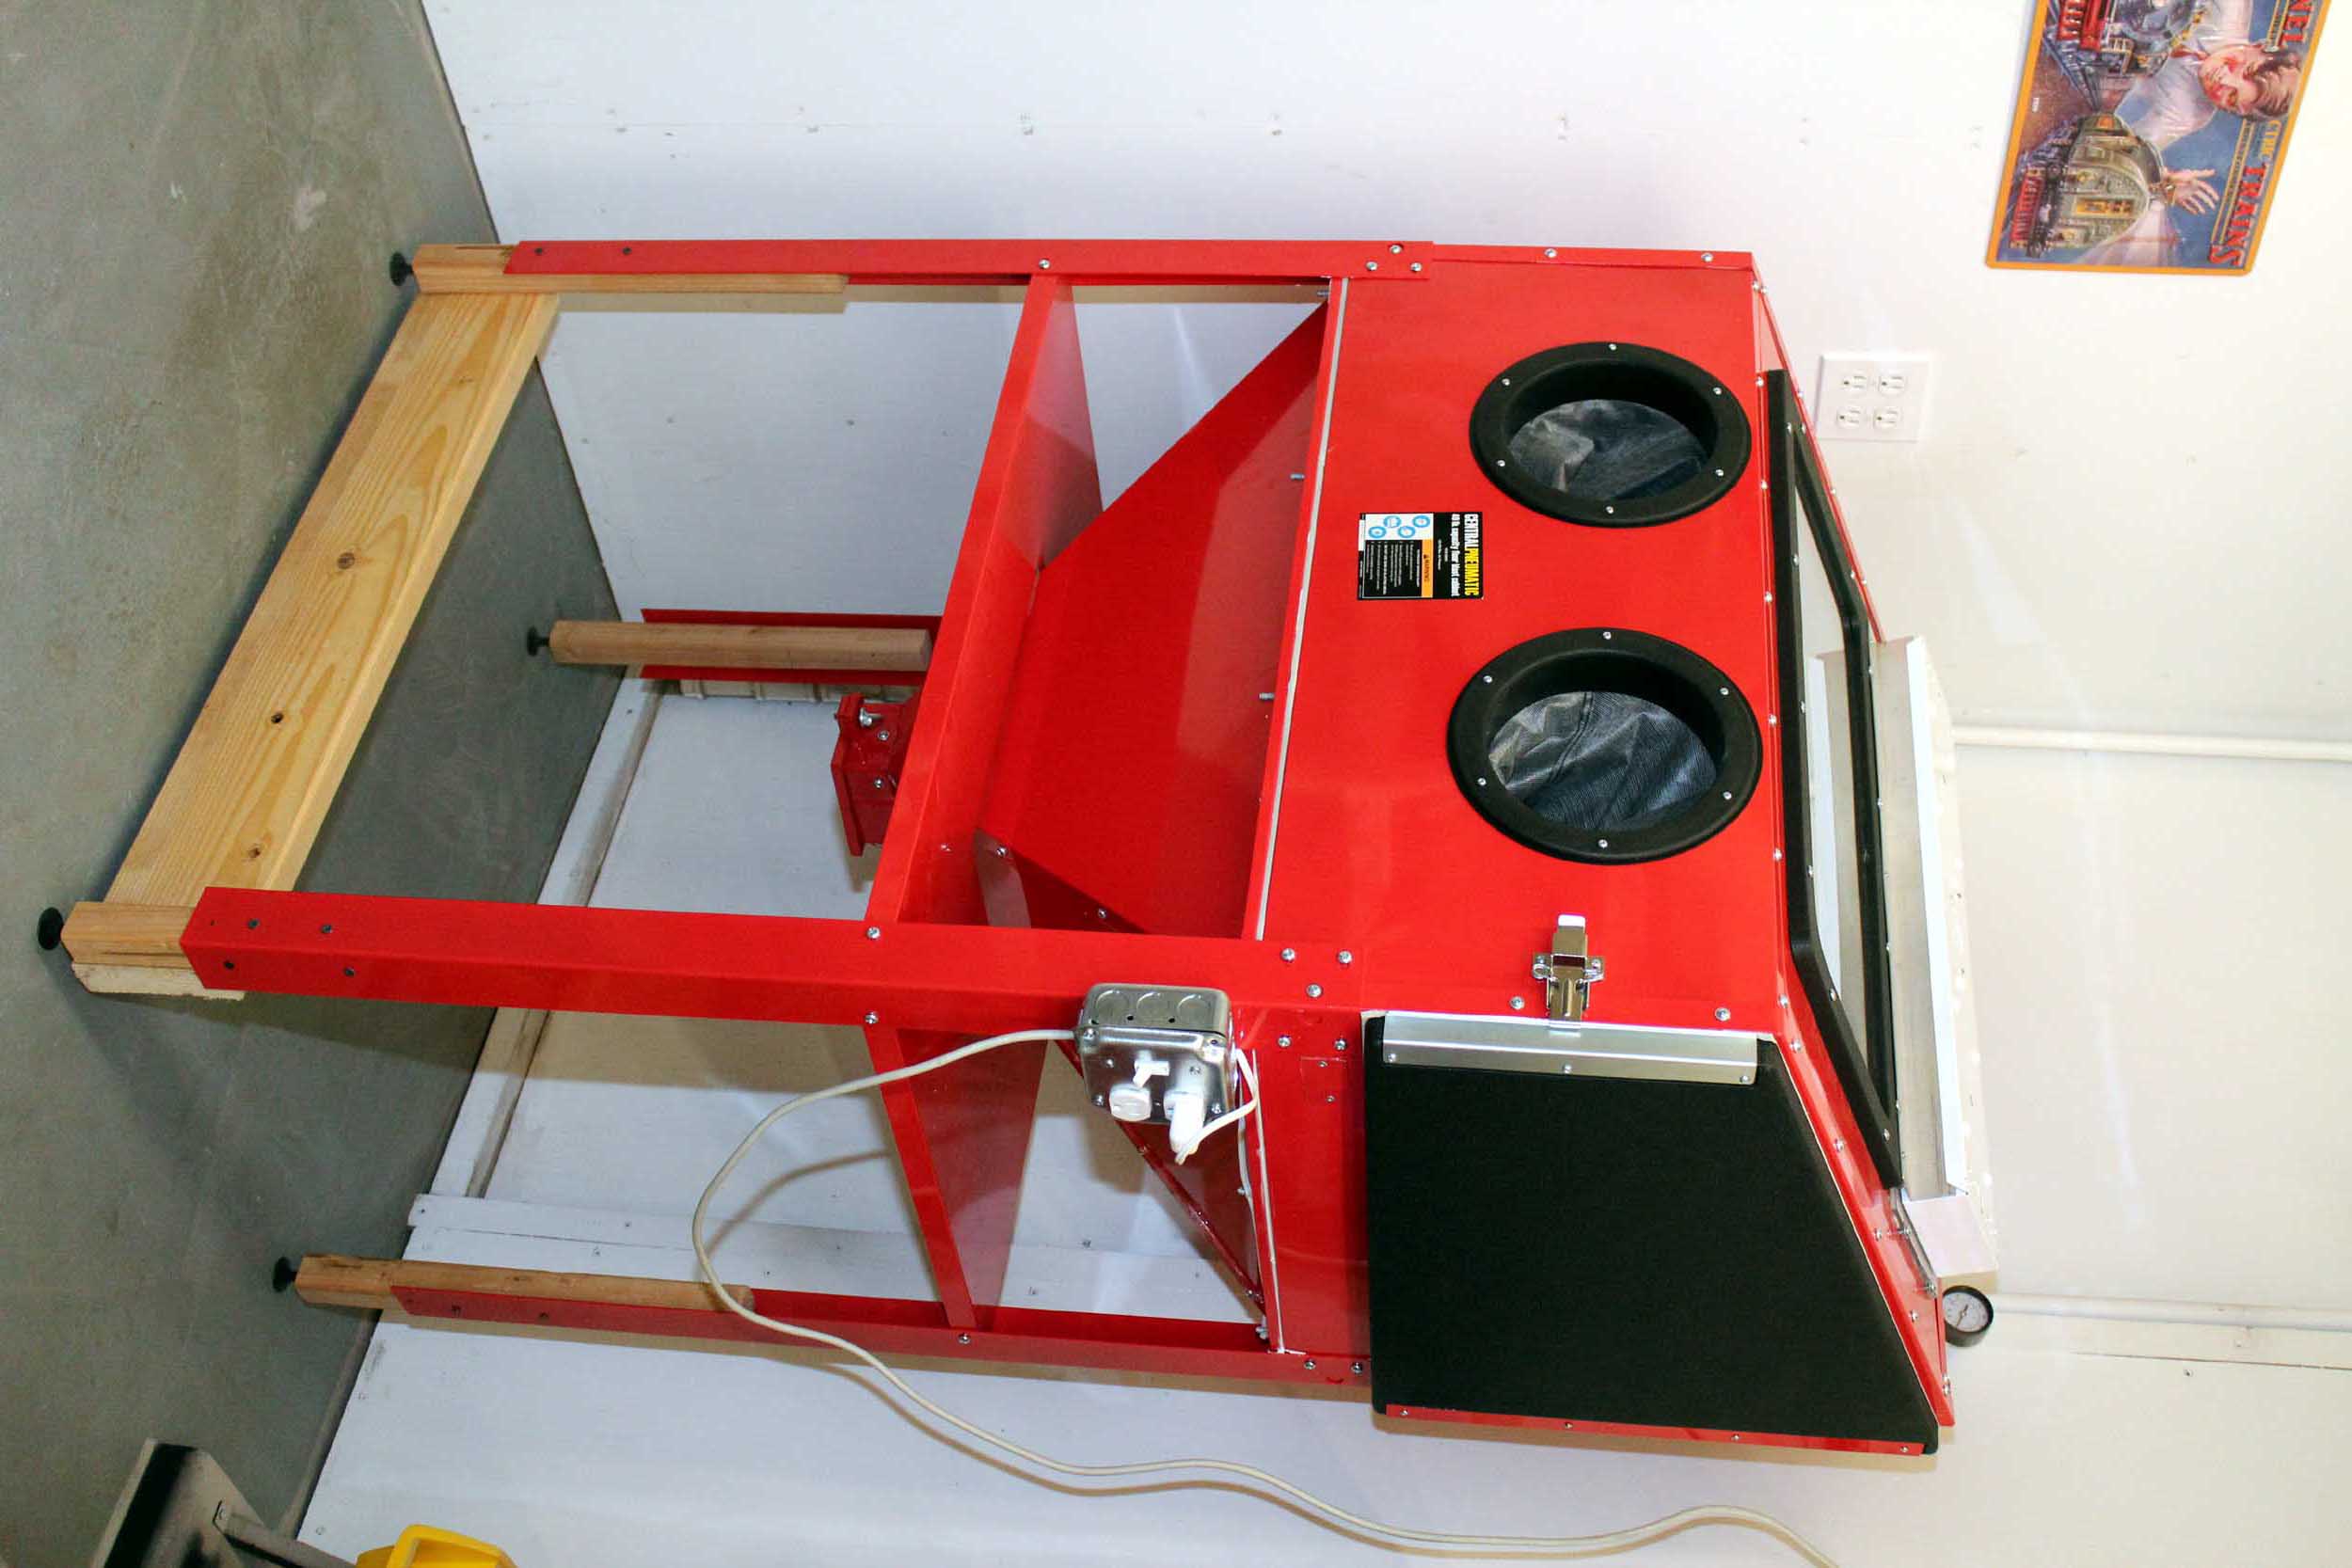
I
have wanted a new blast booth for a while now. My original plastic booth was
getting to be over 10 years old. It has served me well with truly hundreds of
models getting blasted over the years. But it was getting to be problematic
with leaking blast grit ALL over the shop. I spent some significant time trying
to add better sealing but it did not work that well. At over $3.00 per POUND
for the 400 grit aluminum oxide why blast and coat the shop with it and then
have to vacuum it up? My plastic booth also did not blast very well any more.
It took a long time to blast a car.
Harbor Freight now has a store about 20 minutes from me. That can be dangerous
to my wallet! Their items are generally OK for occasional use. They sell a free
standing all steel booth that is just slightly bigger than my original booth. A
big advantage of the Harbor Freight booth is it was designed with a much deeper
hopper with makes the blast fall to the bottom better. I was getting “angle of
repose” issues with the original booth that continually ran out of blast to the
feed tube even thought the booth was FULL of grit. I was getting bombarded with coupons for an
end of October sale so I caved in and bought it. It came in a MUCH smaller both
than I was hoping for meaning it was a complete assembly job from sheet metal
components. The manager said he could assemble one on about 2 hours. HA!
Assembly
and the modifications did turn into a week long ordeal as do most projects I
work on.
Just
after buying it is when I read the reviews – probably not the best move. Most
liked it, but some said it leaked. After starting the assembly I can see where there
are possibilities for leakage if you followed the directions exactly and did
nothing extra. That would NOT be me! I was >>>truly
obsessed<<< that it would not leak so much as even ONE microscopic
grain of blast grit. There is an additional 30ish feet
of foam weather-strip and a complete tube of caulk consumed in my madness. I
even bought a $20.00 3000 PSI hydraulic bulkhead
fitting (for 60 psi air!) so I could seal
where the air entered the booth!
Besides
the very basic construction I did almost nothing the instructions suggested.
All original holes were caulked with a sheet metal cover patch pop riveted in
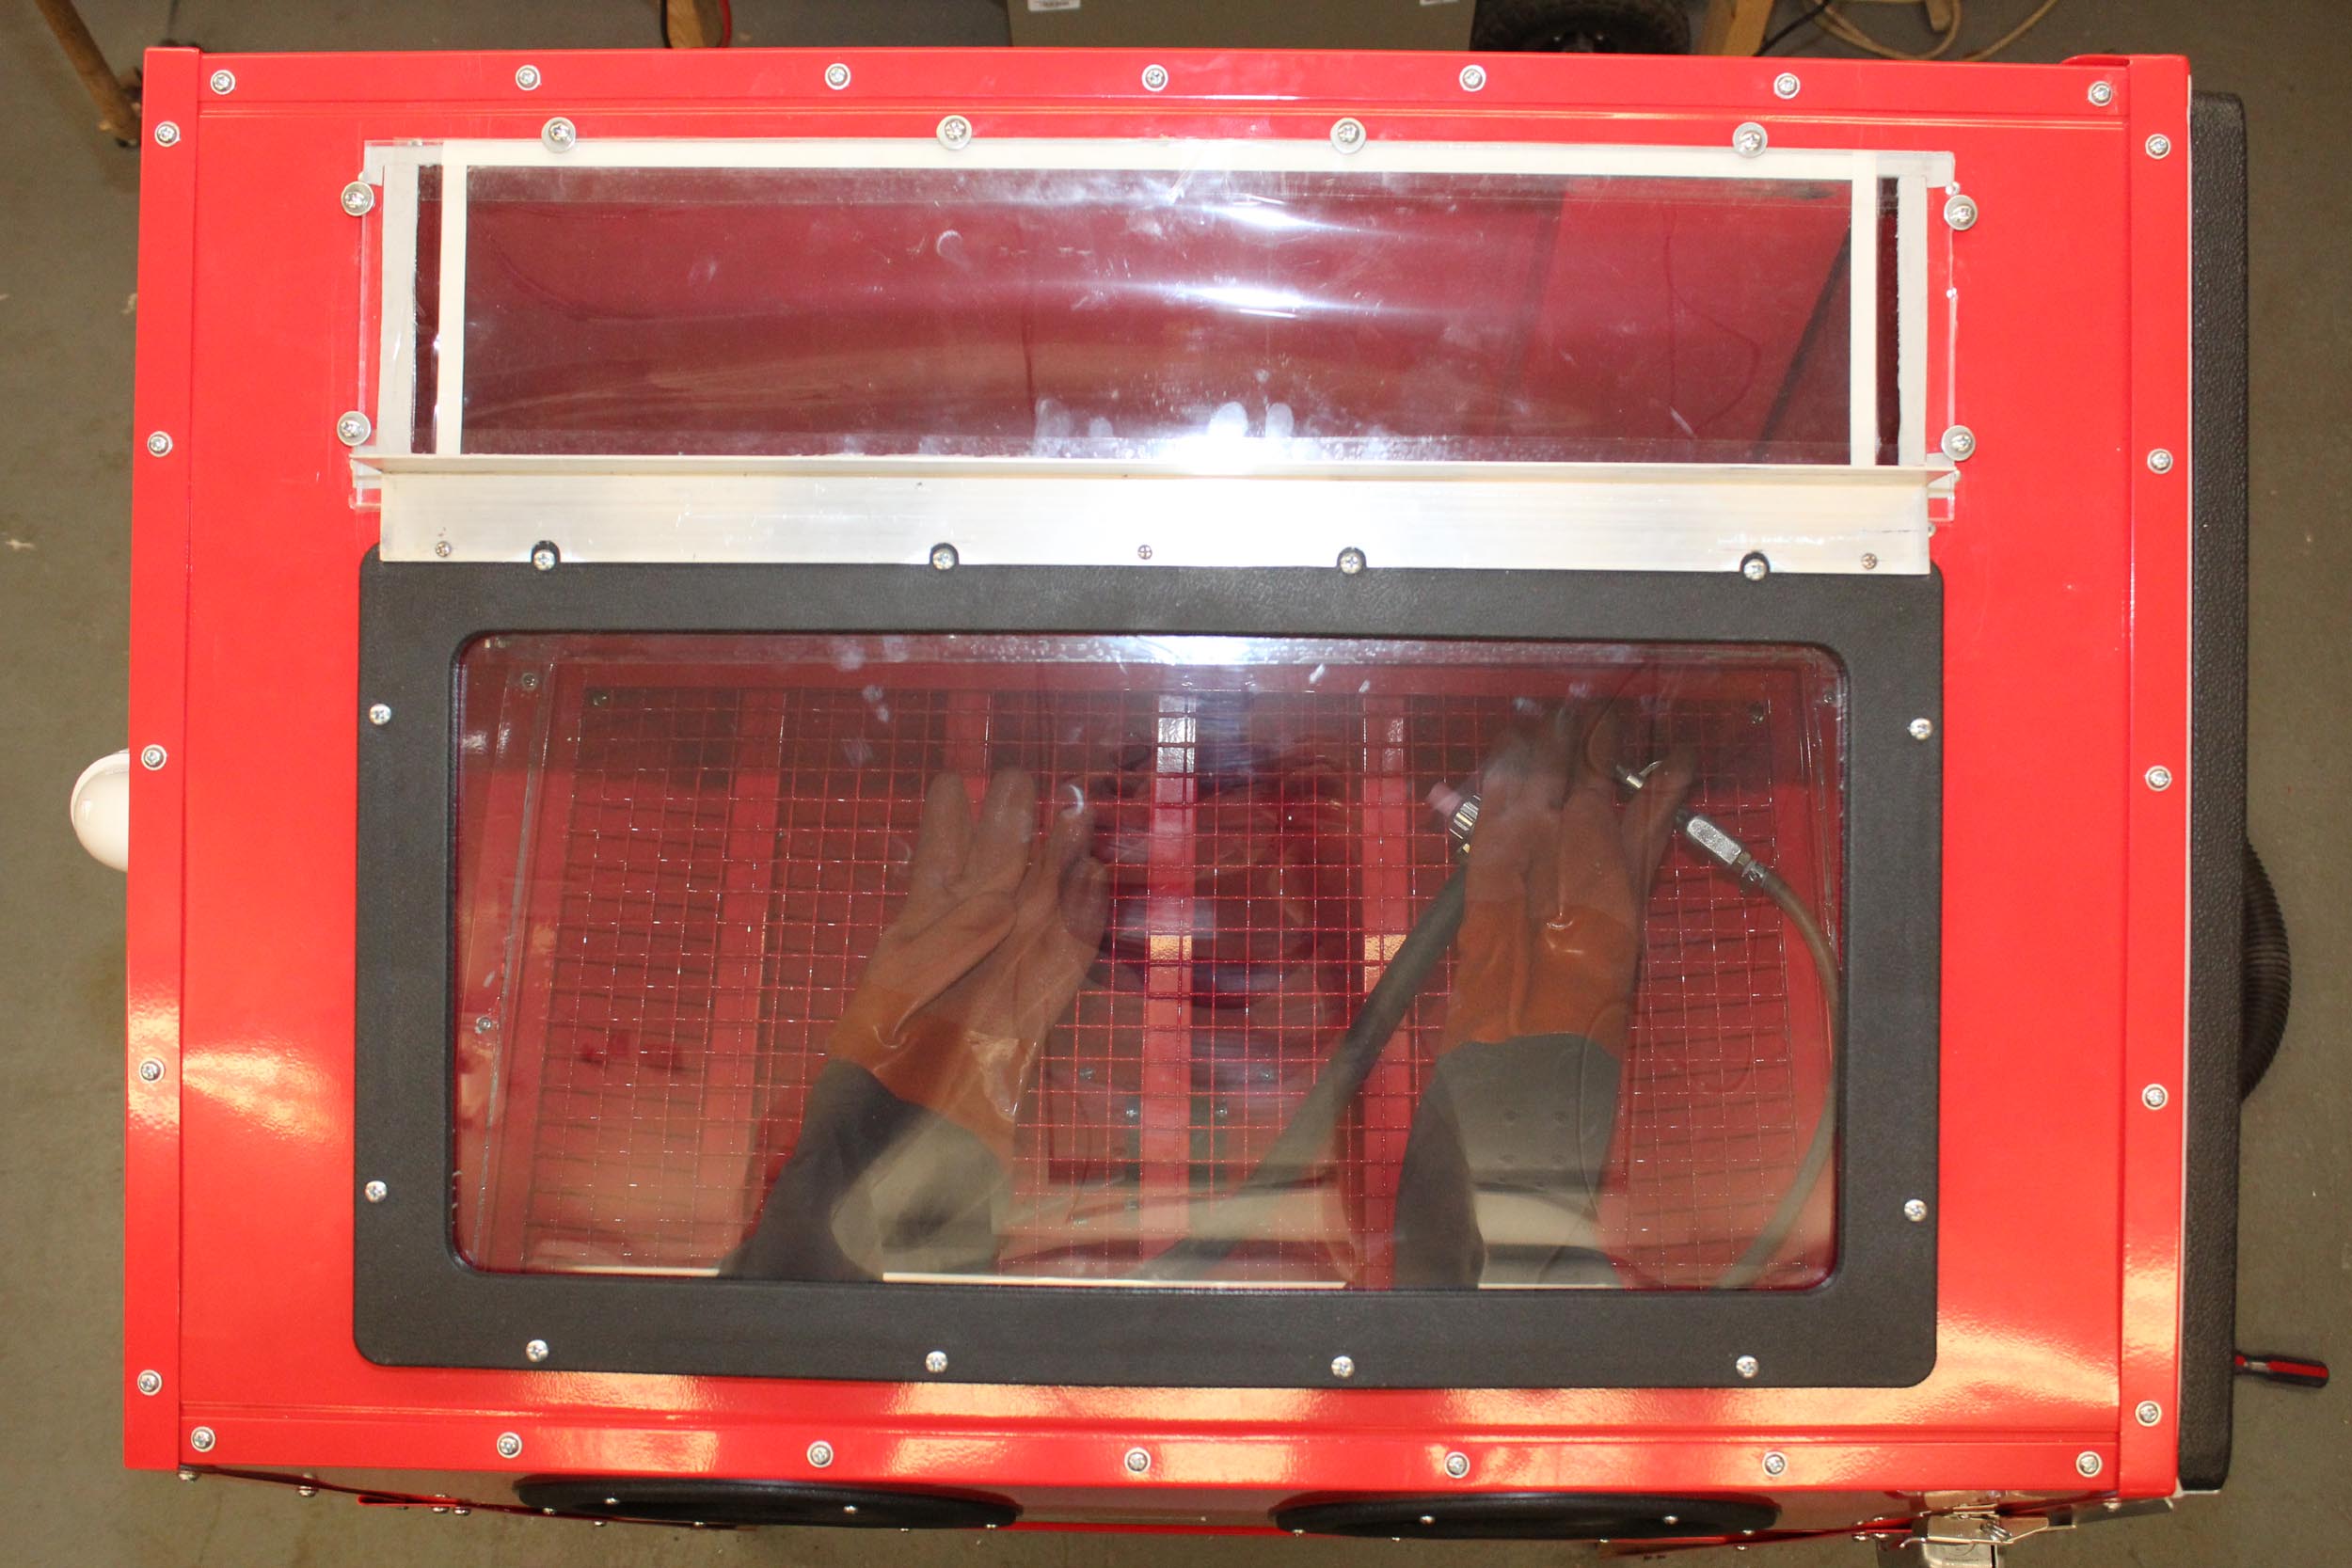
place. The lighting, where the air enters the booth and especially the top
glass were all modified. All lighting for a blast booth should NOT be IN the blast booth.
After about 3 real seconds the blast grit covers the light bulb and you can’t
see a thing. With my old blast booth I cut holes in both ends and mounted
lights. For the new booth I cut a hole above the window for a 24” long
fluorescent fixture. This meant making a new window and sealing it as well.
You
must be able to do maintenance. There is a thin sheet of plastic that goes over
the window that eventually gets fogged with the blasting and needs replacing.
On the old booth with the opening window/door it was very easily done. The new
booth has a side door so the glass is sealed. As designed the glass is attached
with bolts and NUTS! Think about the side door and trying to access a dozen
loose bolts and nuts. NO! I
lined the opening with 1/8” thick aluminum bar. I screwed it to the booth and
tapped holes to match the original window frame screw pattern.
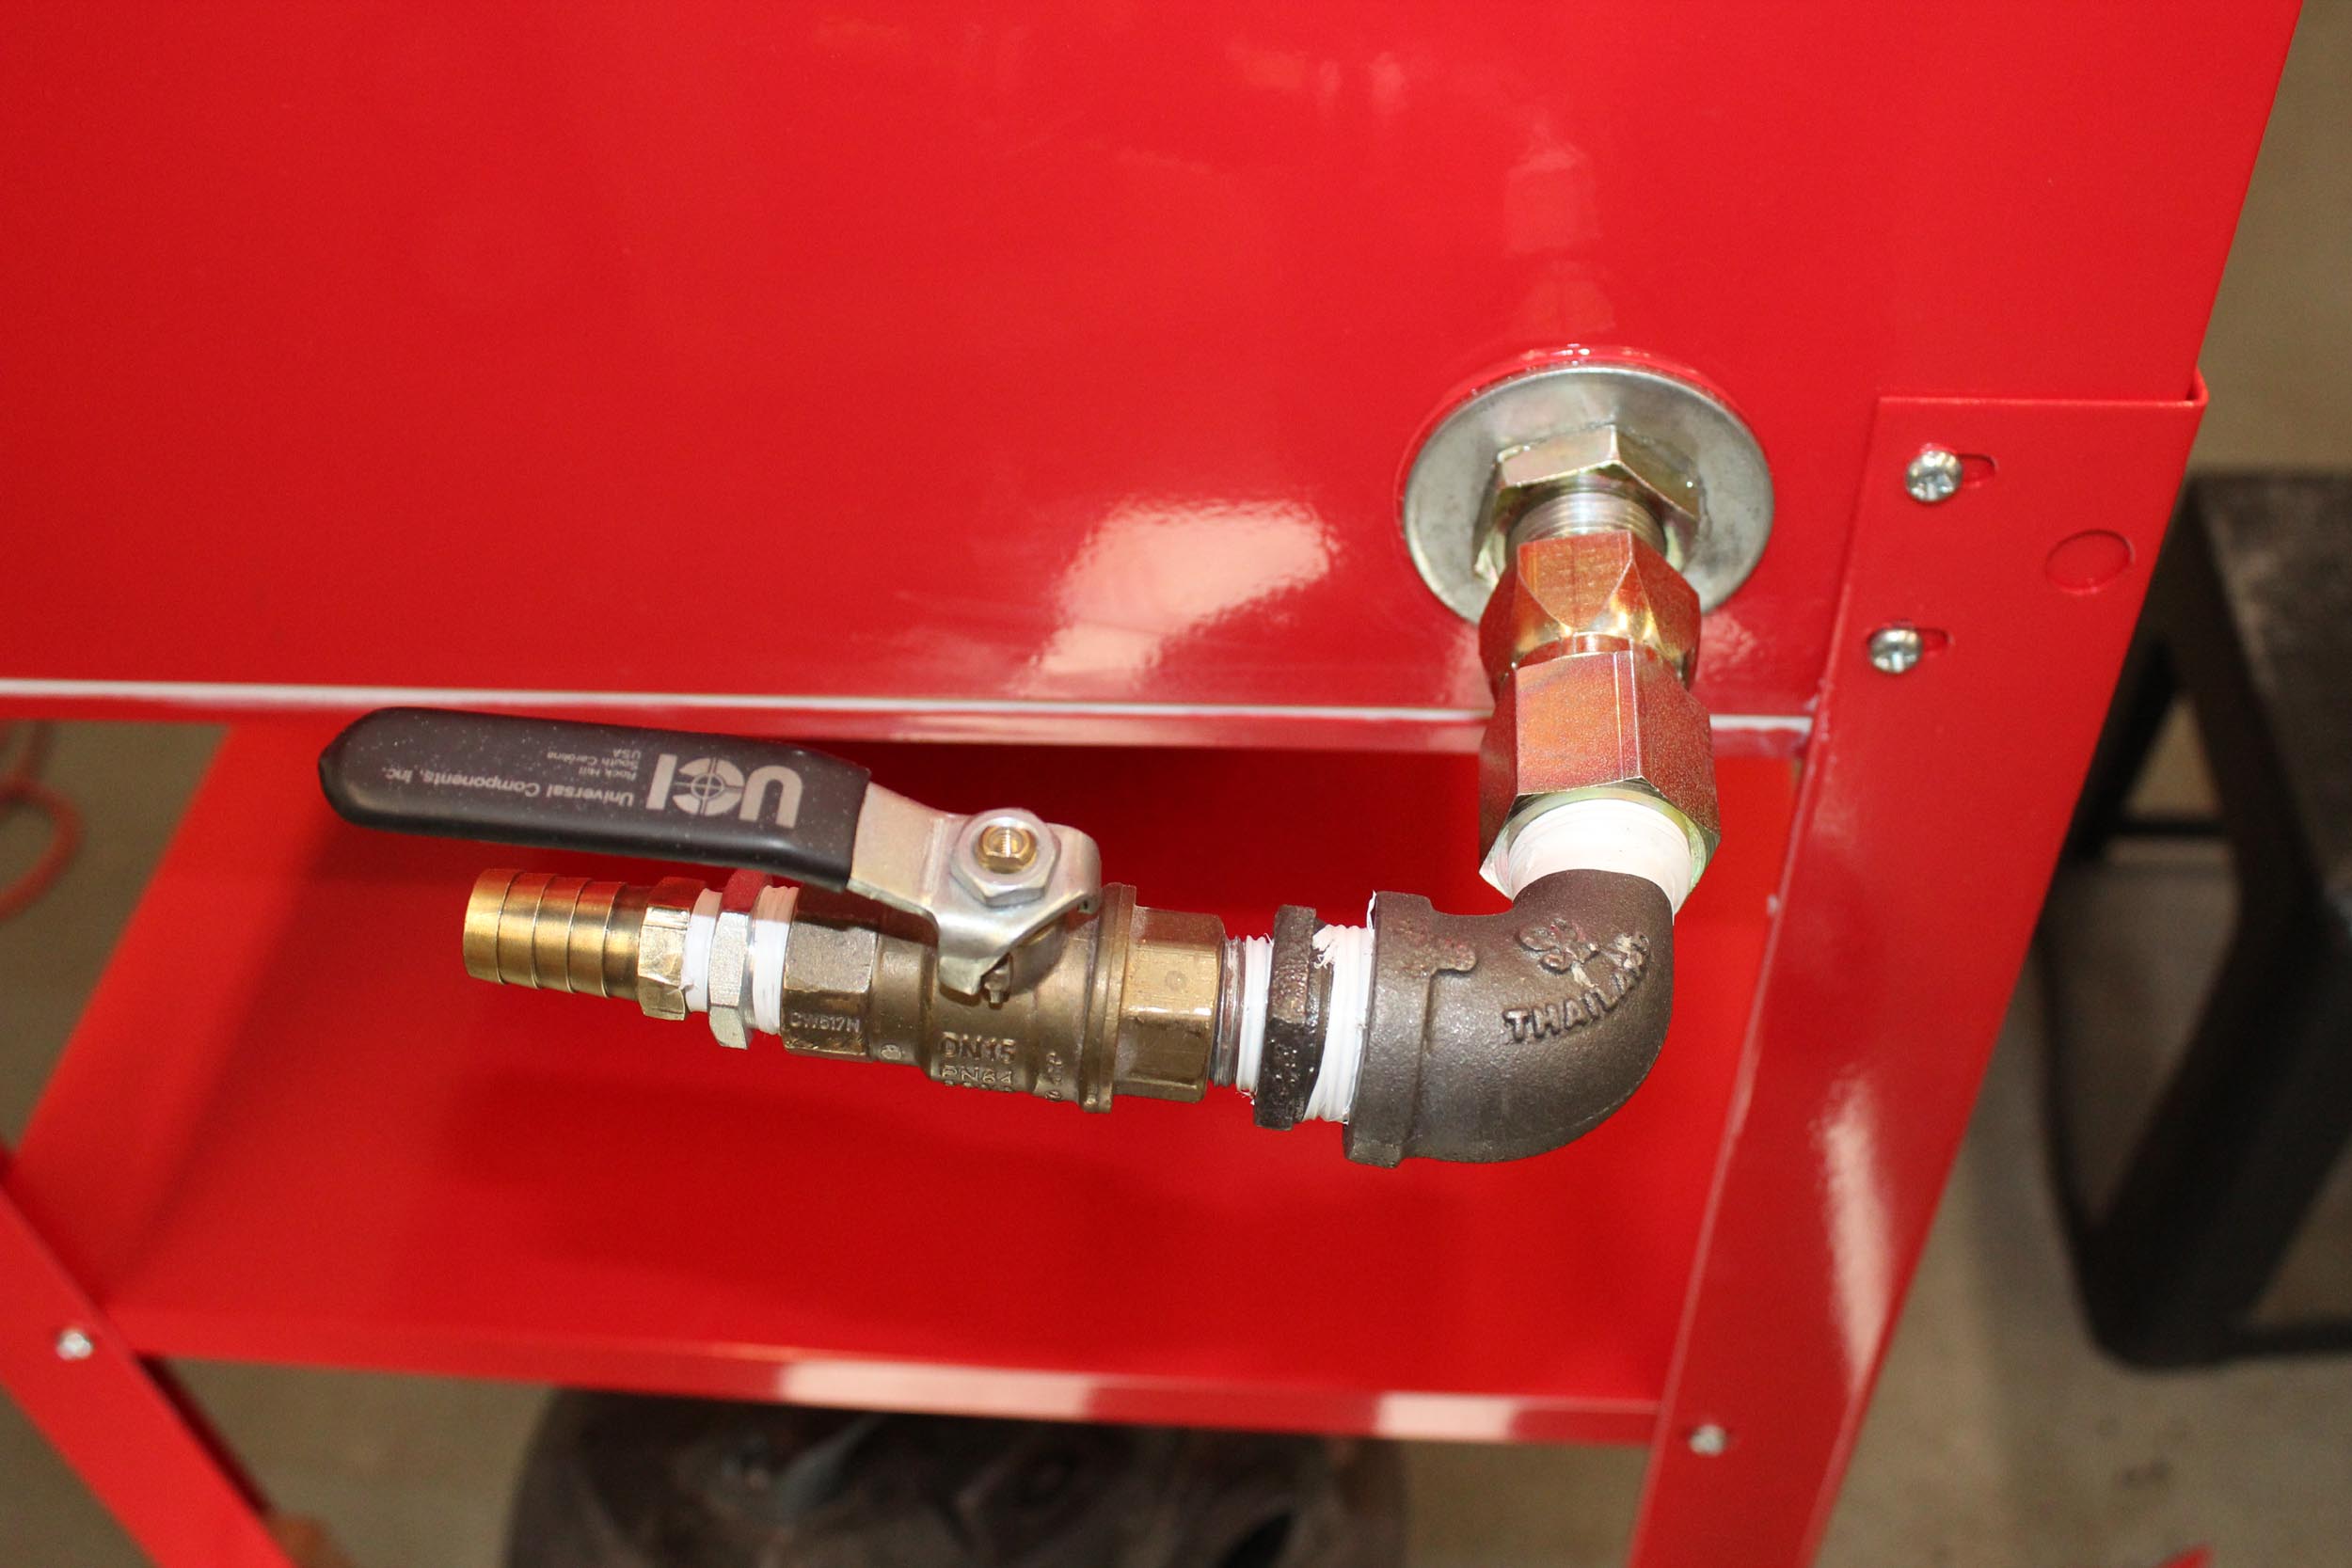
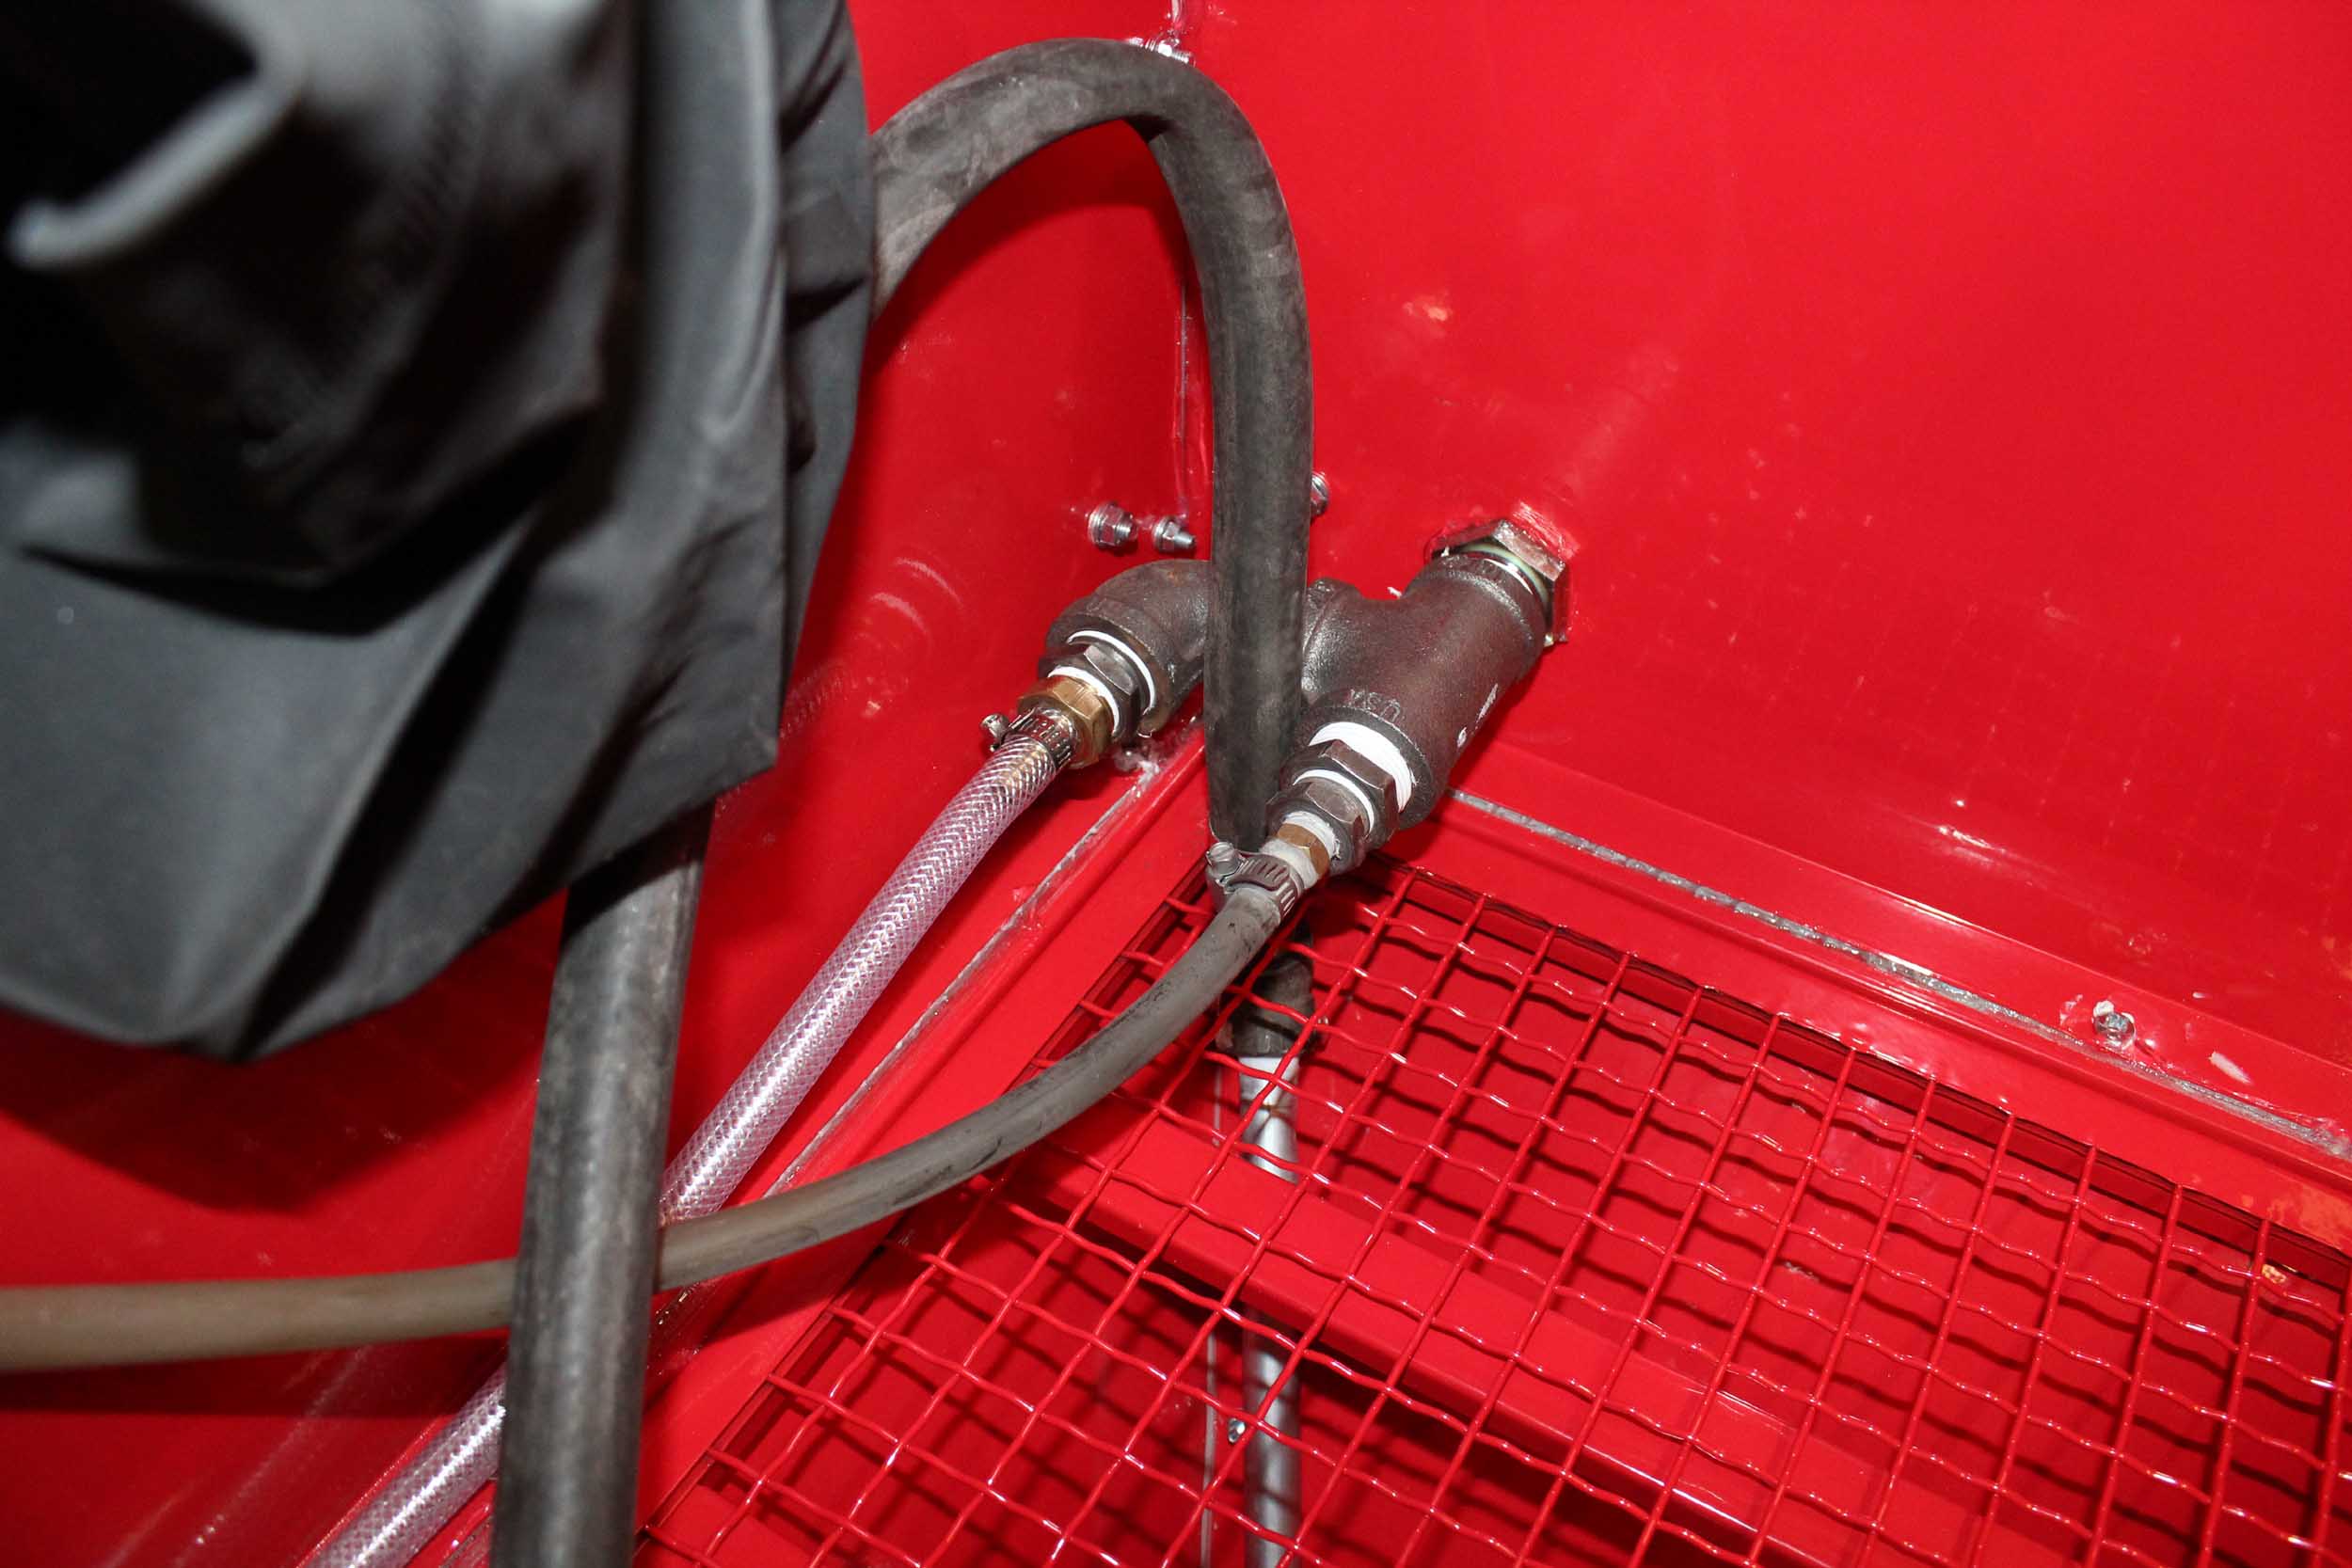
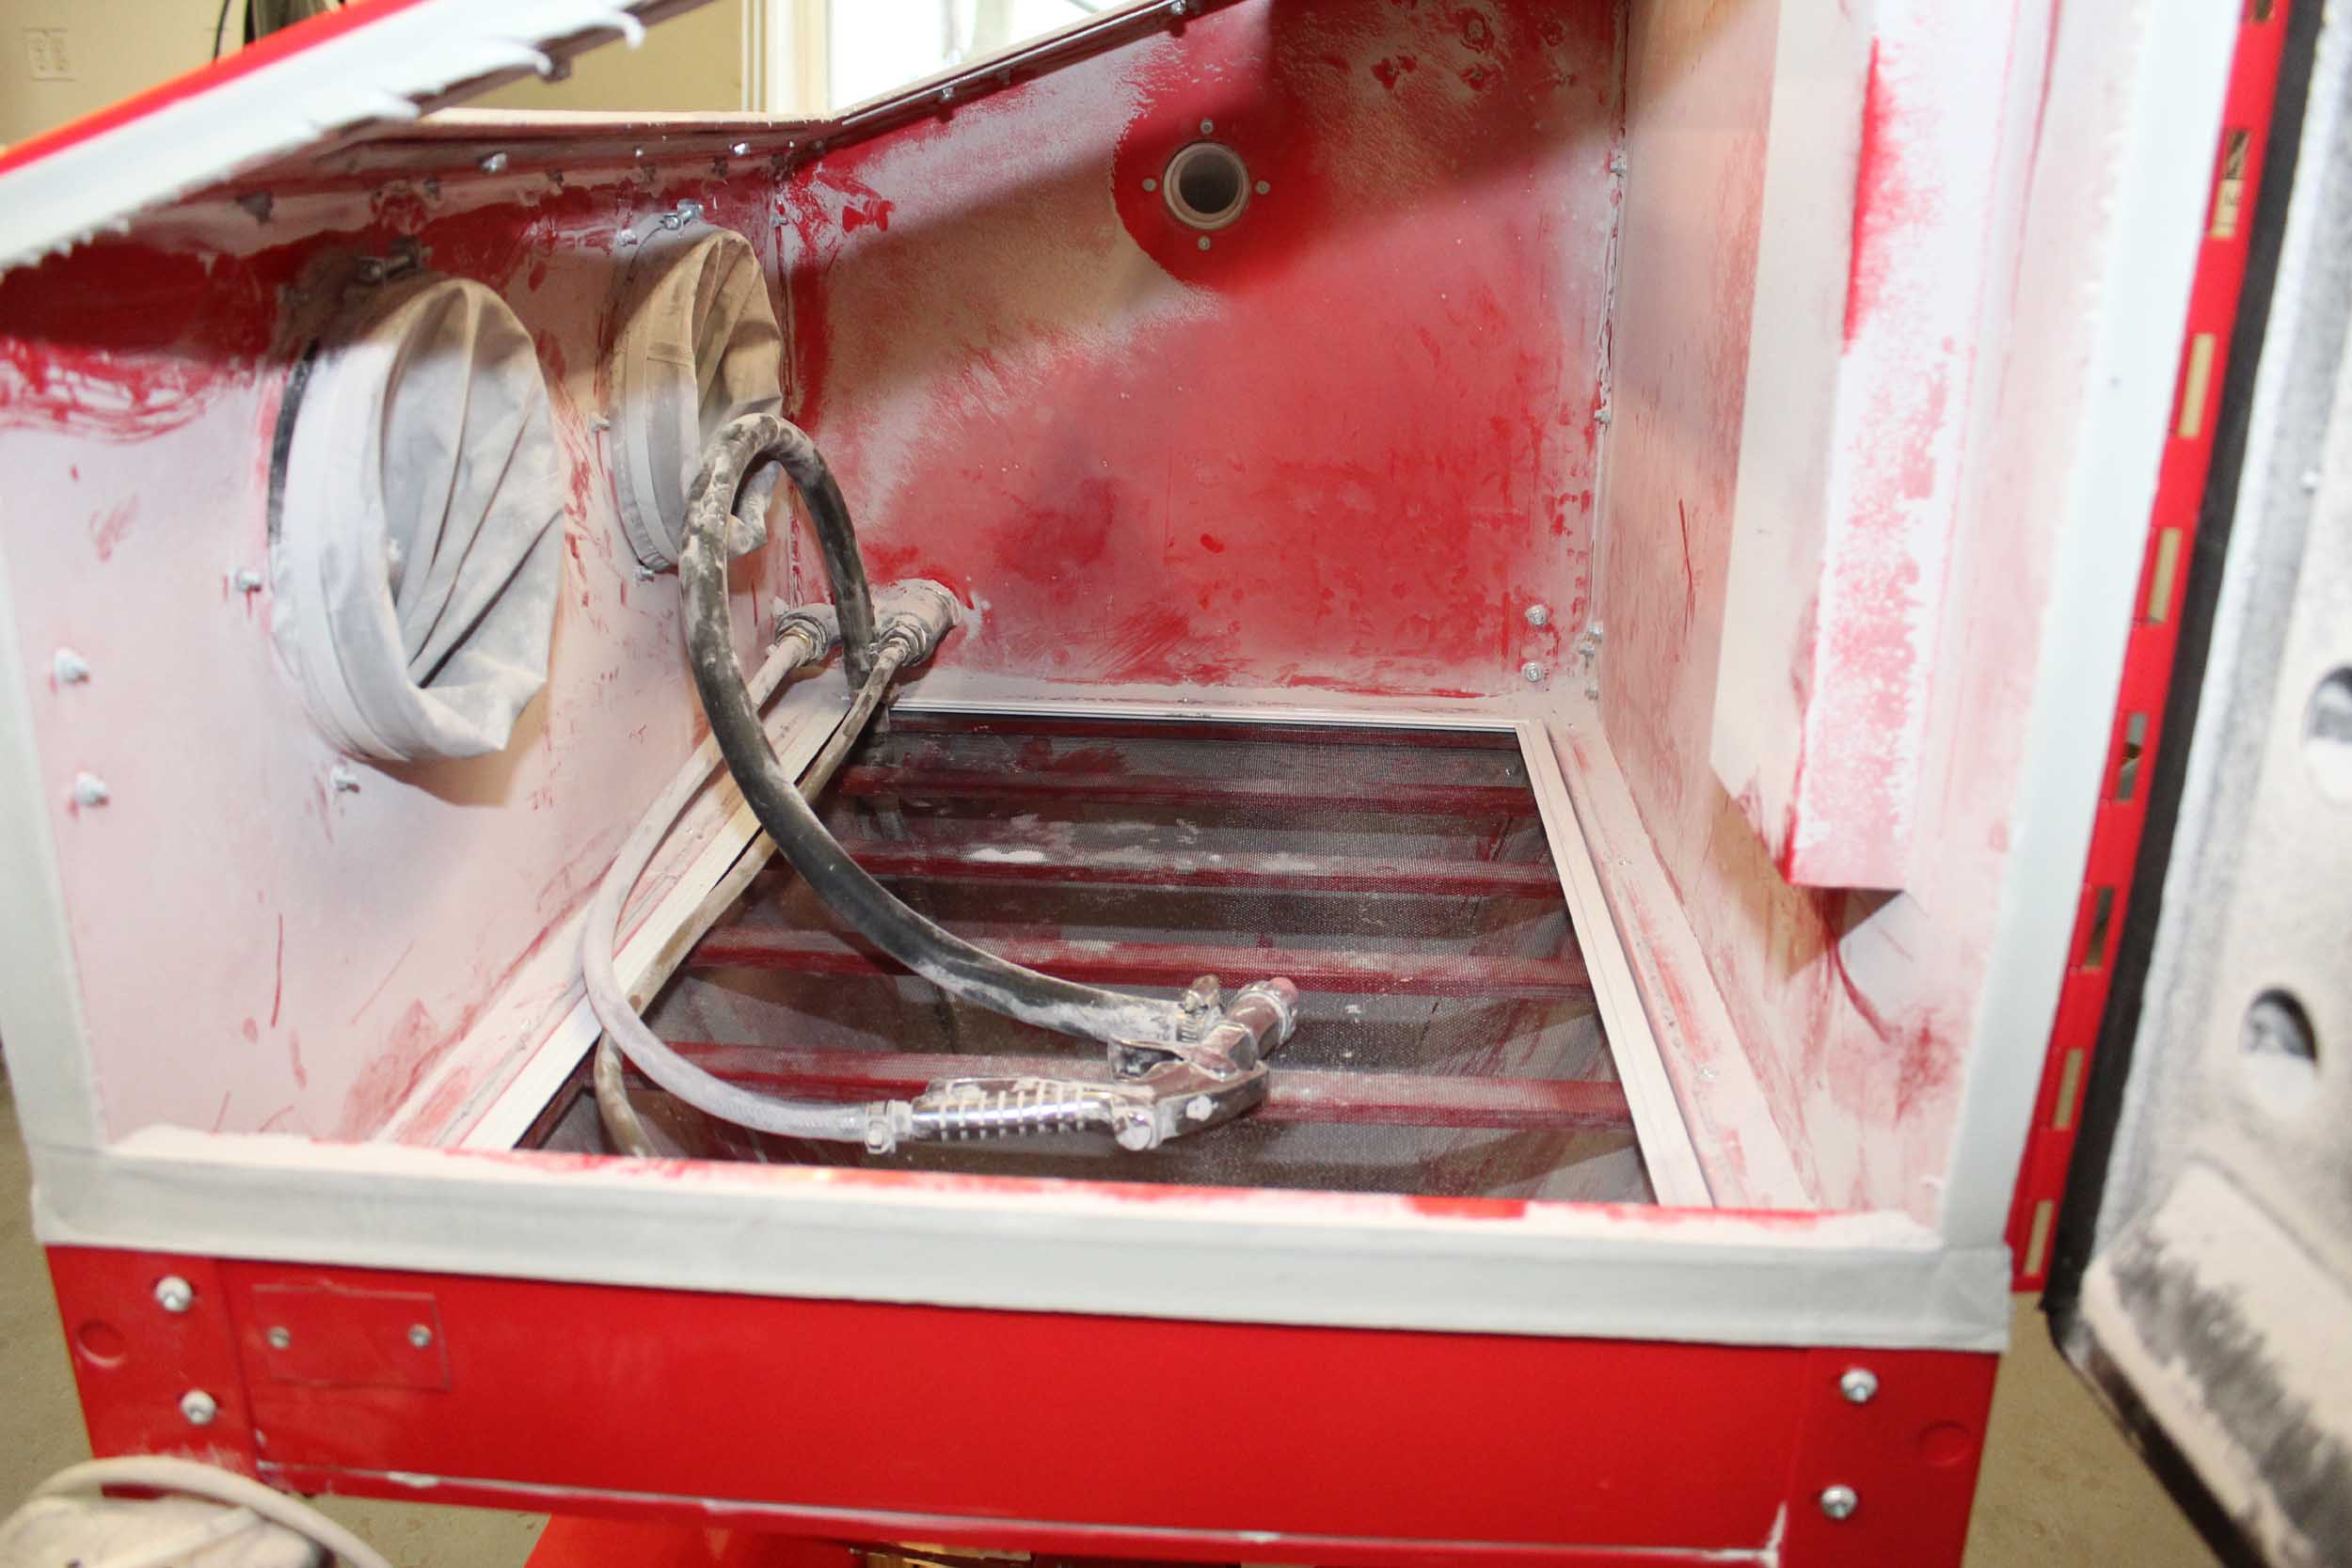
For
the plumbing I moved everything down to the lower left front corner. This kept
the air and grit hoses very short. Once through the bulkhead fitting I put a
tee. There is a blow off gun in the booth (not
included) which is mandatory. You can blow off
the model before opening the booth and clear the lighting or window. The grit
pick up tube was mounted down in the hopper as opposed to just stuffed through
the mesh bottom. I had a custom “window” screen made to use in place of the
heavy grate bottom. The window screen continually filters the grit from debris
as I blast, and keeps small detail parts that always come off while blasting
from going down in the hopper to likely be lost. This
window screen idea has worked VERY WELL! A
small brass detail item did come off a model I was blasting, but the only way I
noticed it was because the part was sitting on the screen when I was done.
I
added 4” to the legs with adjustable feet. It was made for a vertically
challenged user! I am 6’-2”.
A
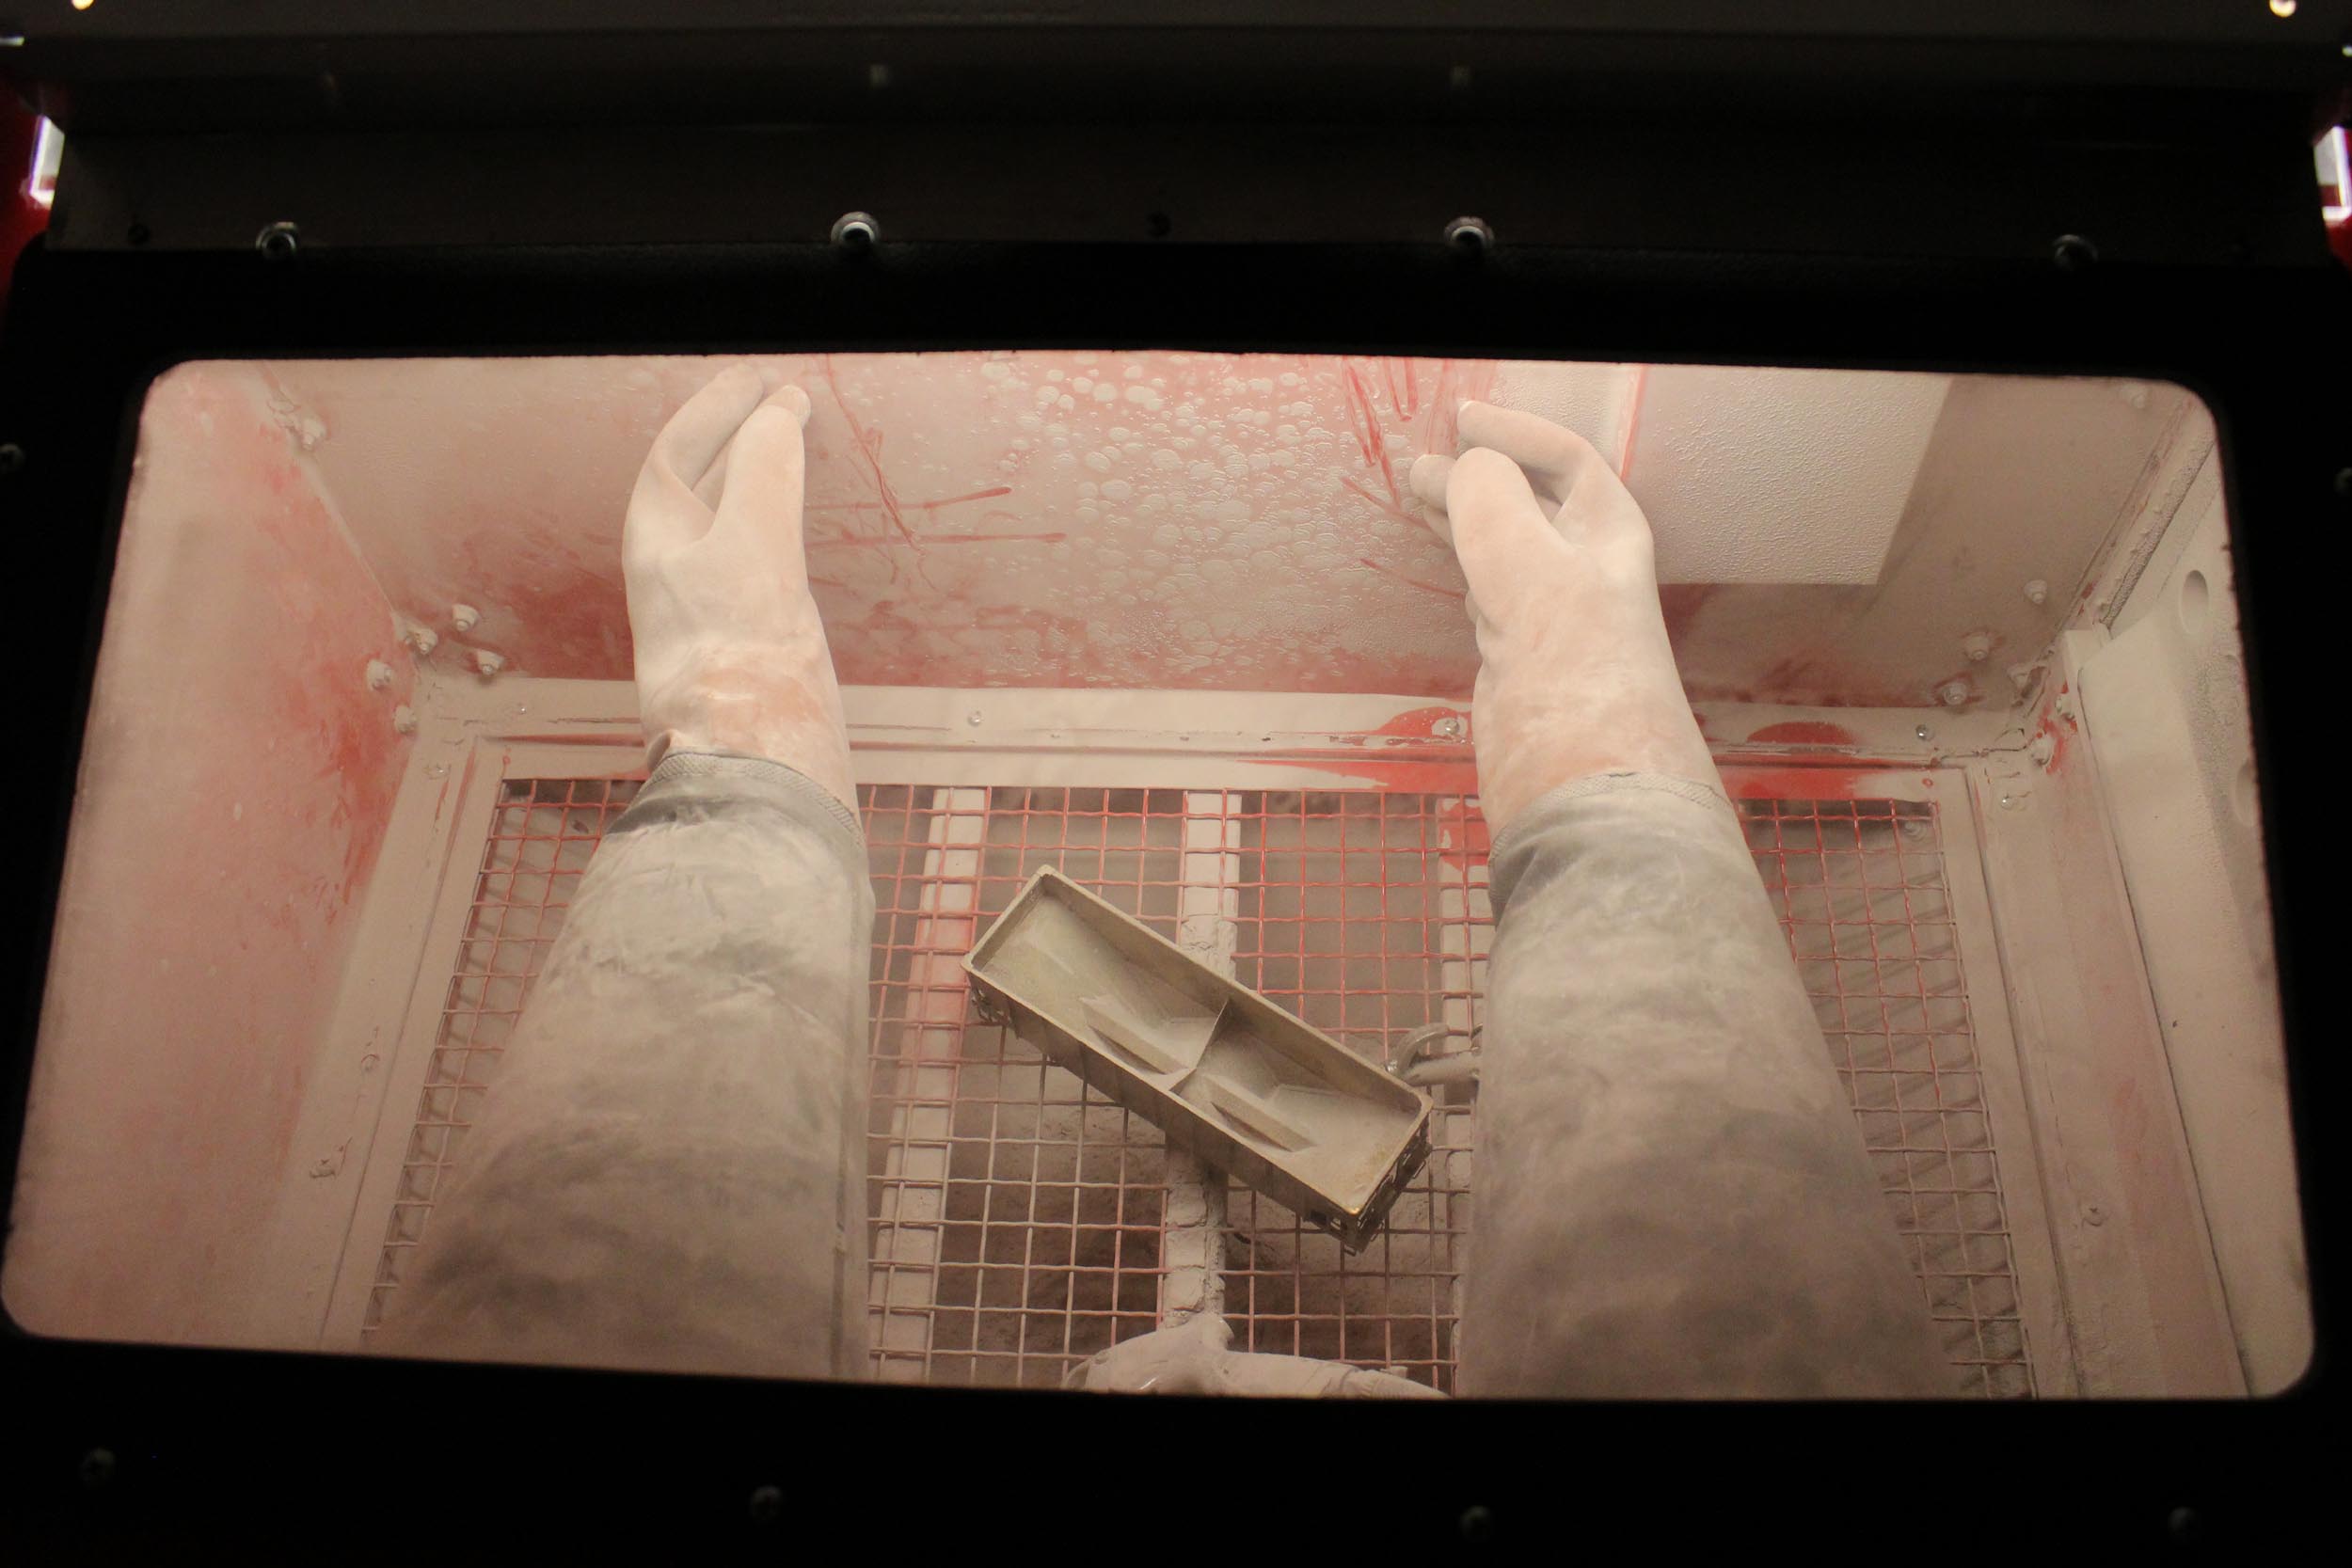
short test at first made it all worthwhile. It was awesome! The booth is sealed so well the gloves
stood straight out when I turned the shop vac on! The
blasting aspect is 1000 times better than my old booth. It does not leak in the
slightest while using it but does dump some grit on the floor almost every time
when opening the side door. That is really annoying. I did not think about that
possibility, and there is really nothing I can do.
Plumbing
Windows
Window Screen Bottom
Airtight!
The gloves stand straight out when I turn the shop vac on.
Added 1-4-20
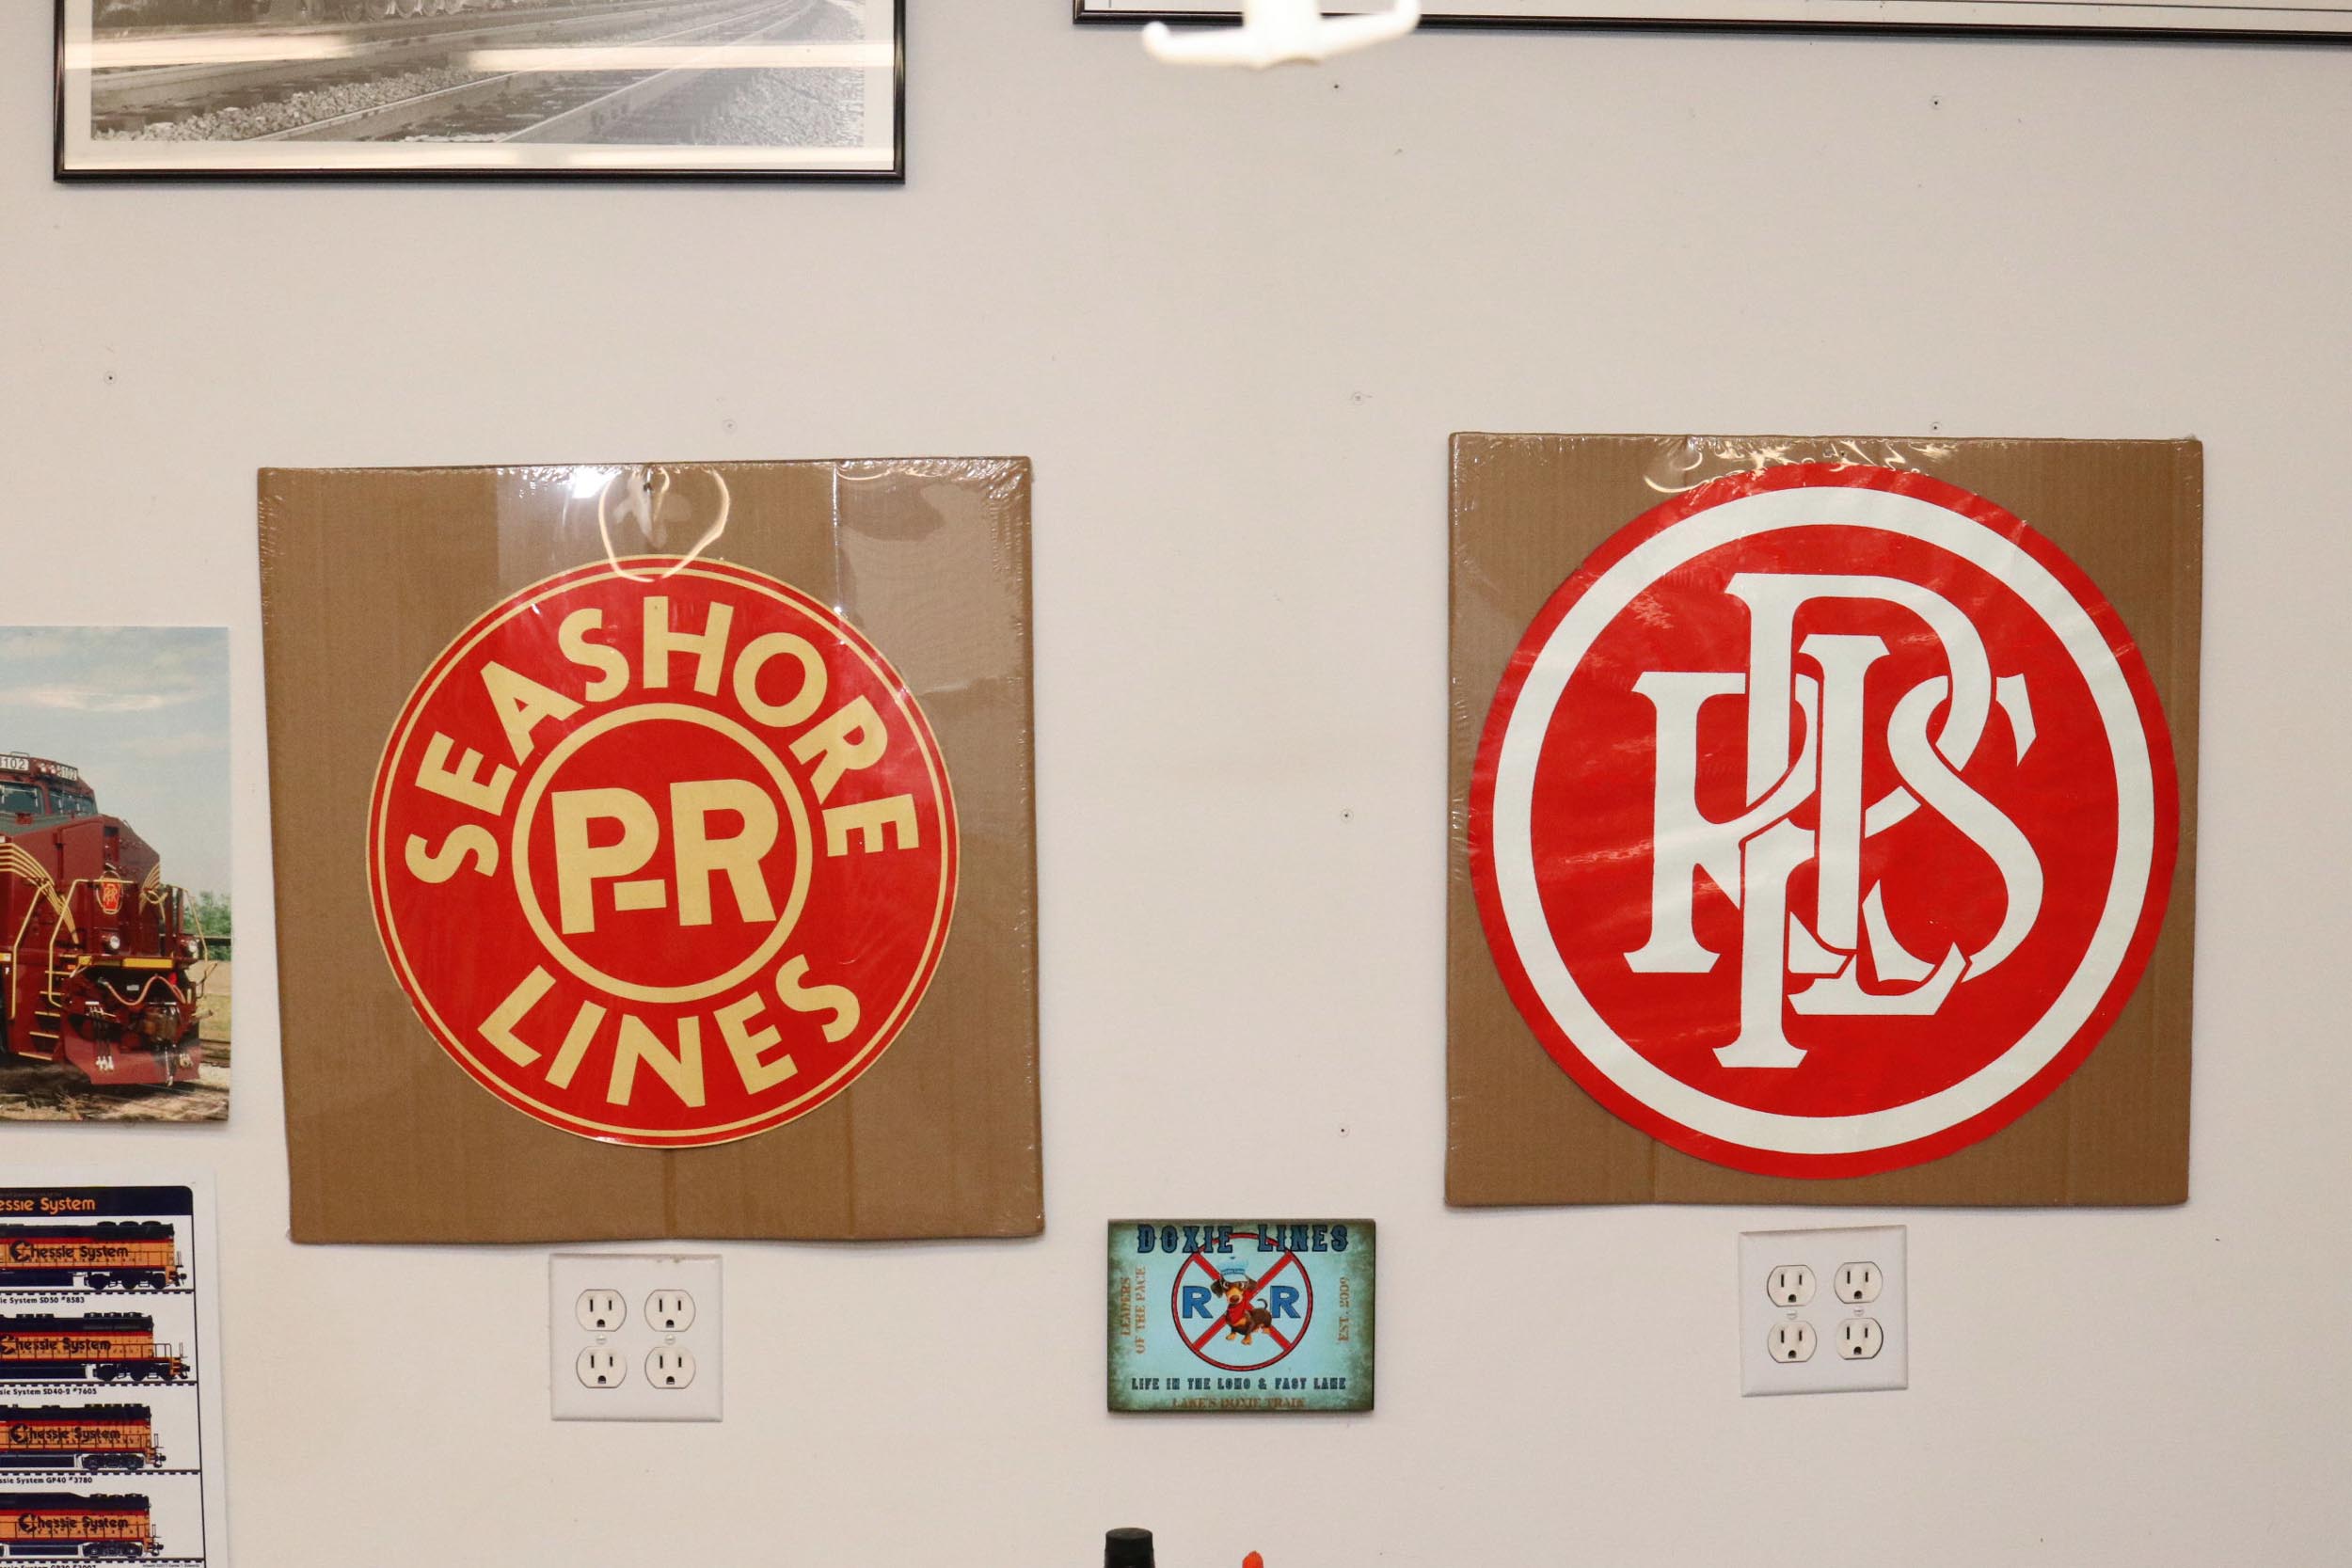
PRR
& PRSL Logos
I
have had both original unused PRSL logo stickers having in my shop for years
now. I just got an unused PRR Keystone. The Keystone was already mounted on
Masonite but was not covered. I wanted it protected. The difficulty in getting
a keystone shaped picture frame was obvious so I got heat shrink window plastic
sheet. You shrink it with a hair dryer.
Getting
large odd sized round picture frames for the PRSL logos is why they remained in
the cardboard I got them in for years. Since the shrink-wrapped Keystone turned
out pretty well I kept on going.
I
photographed the 3 stickers when they were not wrapped. Some were a bit wrinkly.
It did not immediately occur to me that the PRSL stickers could be brittle. By
far they were not brittle even 50+ years later. They were actually rather
bendable. You can still read the Scotchlite writing
on the back of the older PRSL sticker.
I had
to make a large compass and cut plywood backers for the PRSL stickers. The
older PRSL is 15 ¾” diameter and the newer PRSL
is 19”.
Everything
is now hanging in my shop over my workbench. I just used 1” wire nails. This is
why I used plywood and not drywall in my shop. I can mount anything I want
anywhere I want. I hate drywall.


Updated 7-18-21
All
photos and content © Lanes Trains 2005-2021